
In the article [QR code create with Rust language runnable on Azure Functions], created Rust app uses warp library to listen HTTP GET request as web server.
In this article, describes steps to add feature to listen POST request and to generate QR code and respond it. Addition, upload it and test it on Azure Functions.
>>Sample project as base of this article.
・Add feature of listen POST method
Download Sample project as base of this article, and create function use Visual Studio Code Azure Functions extension.
This article describes example as that the sample are downloaded to the [QRCodePOSTMethod] folder on local PC.
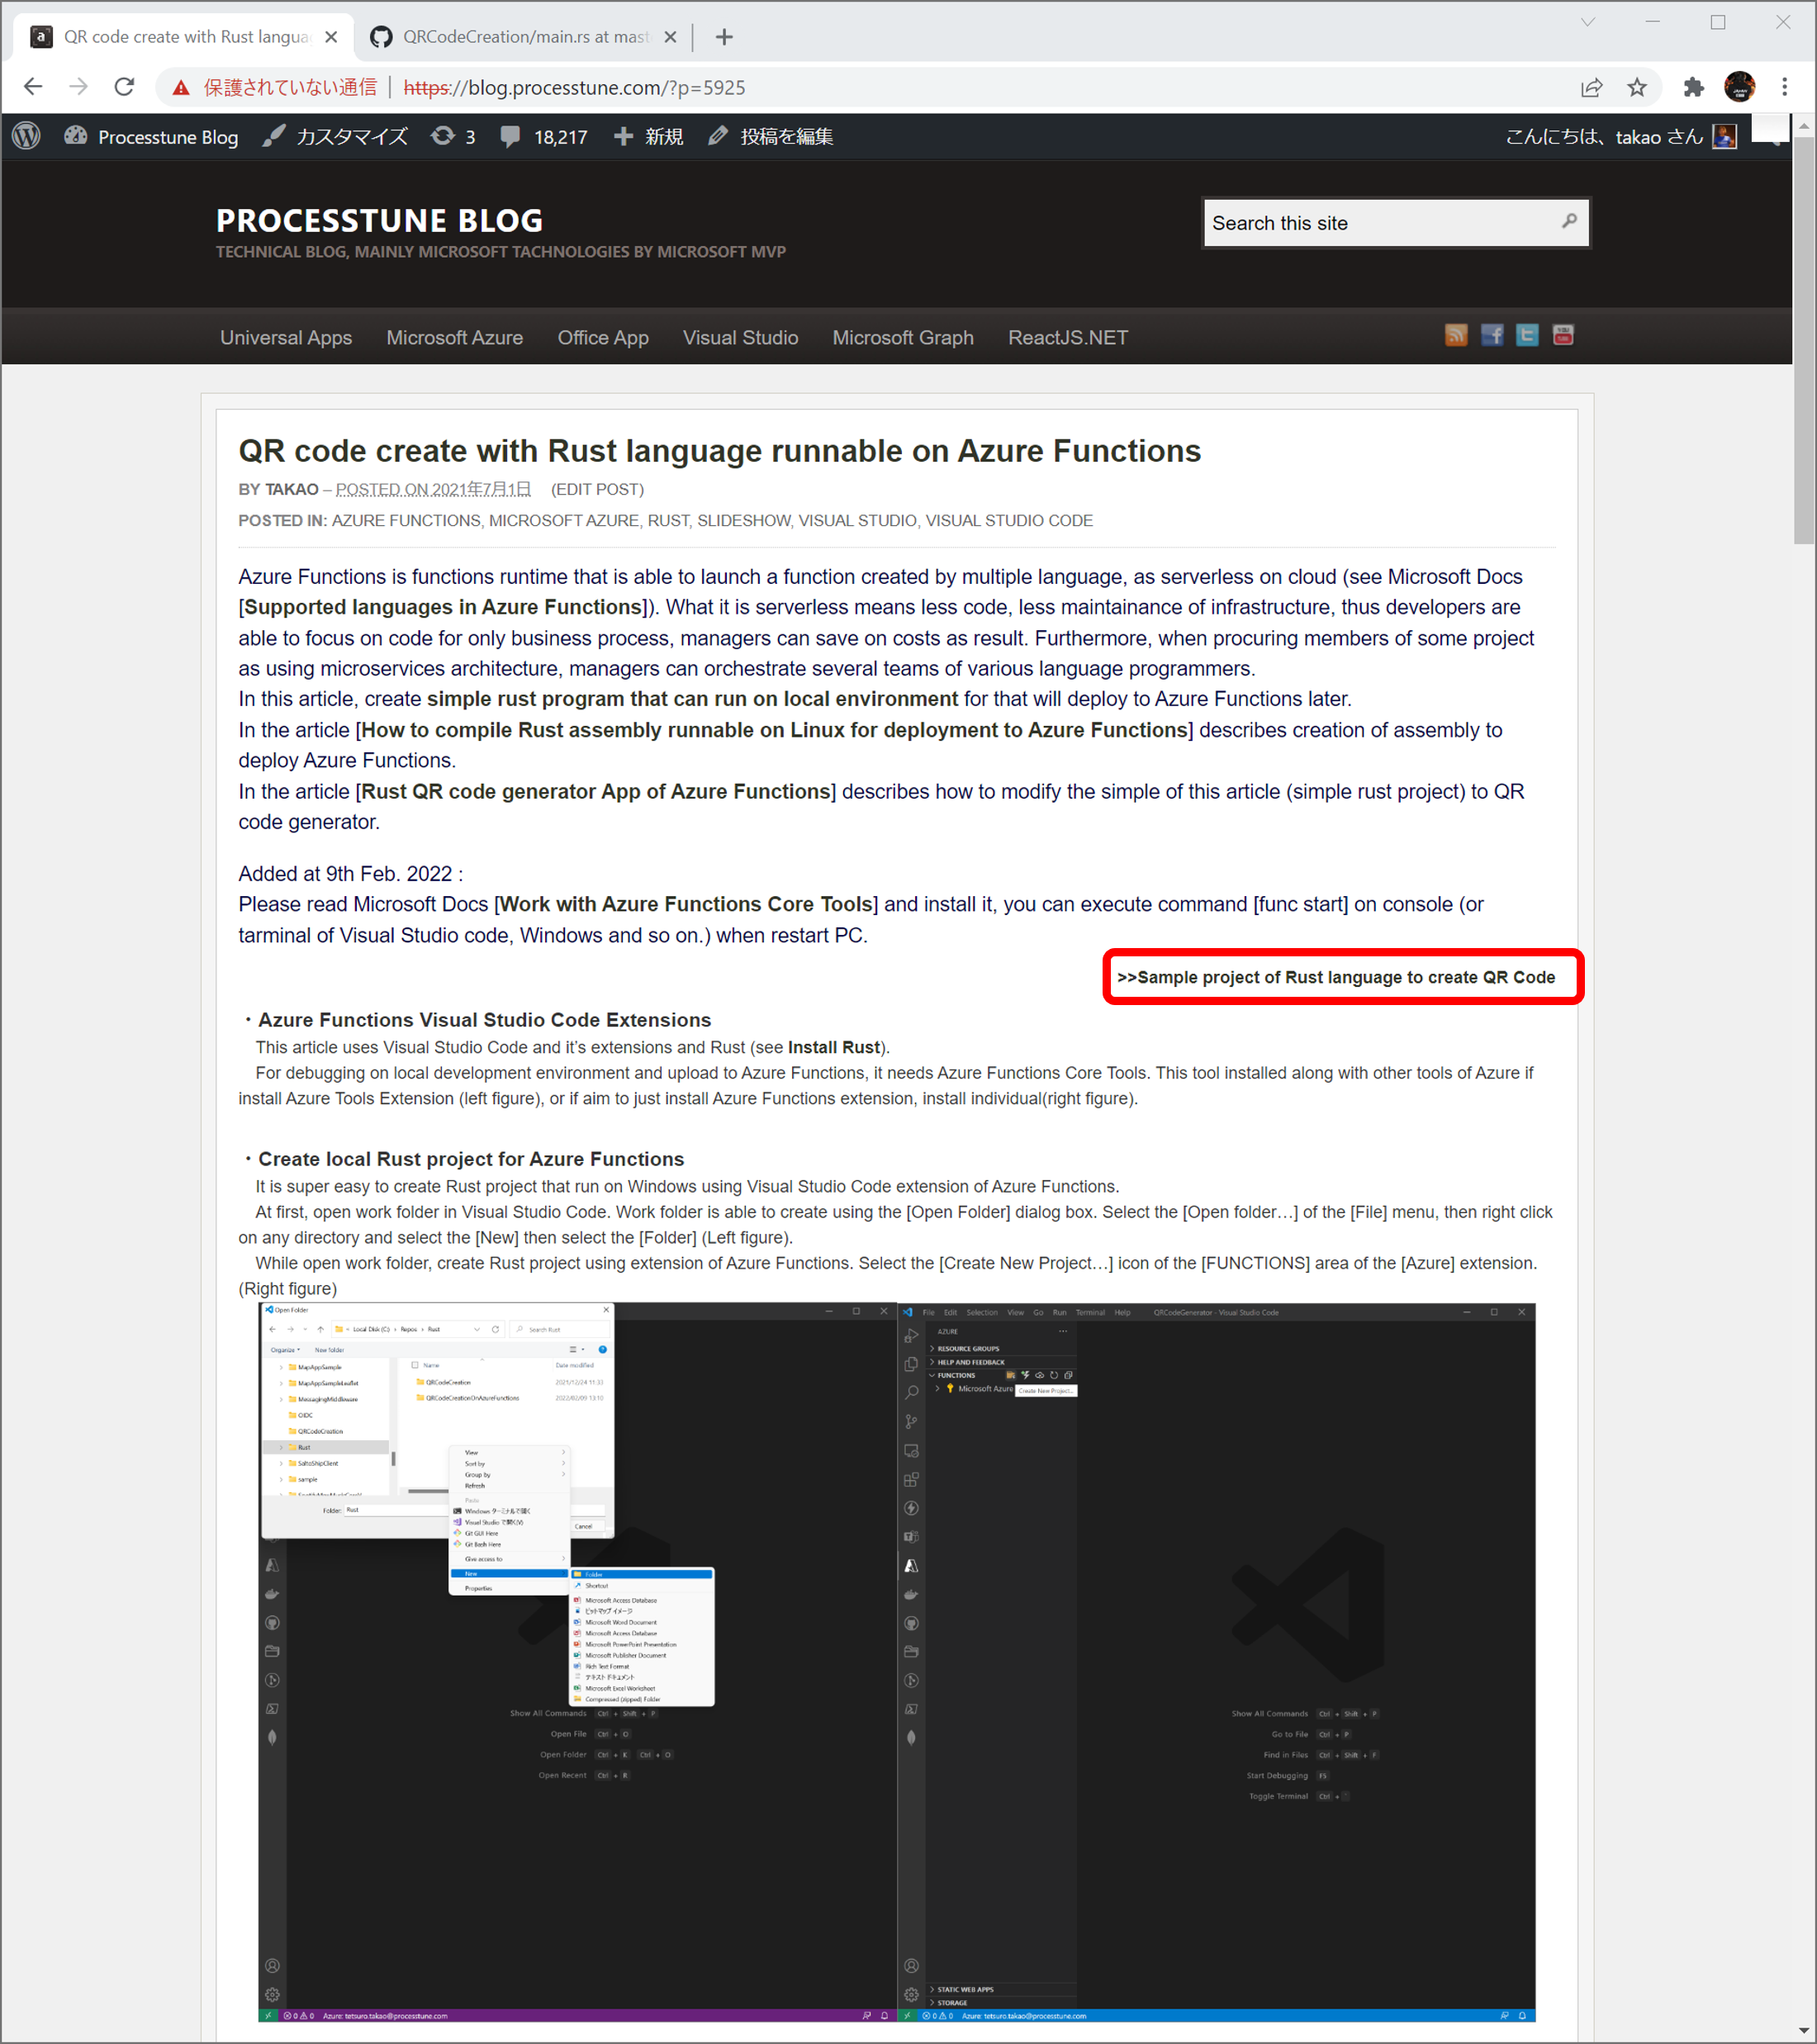
Until show figure below, create local project like as the article [QR code create with Rust language runnable on Azure Functions] using the sample.
At first, define name of the Functions app using Azure Functions extension. This example name is [QRCodePOSTMethod].
Though who read the article [QR code create with Rust language runnable on Azure Functions] can use same name used in its article, in this article, it is not good for my development environment that the Rust local project of GitHub is changed for this article. So changed a name using Azure Functions extension.
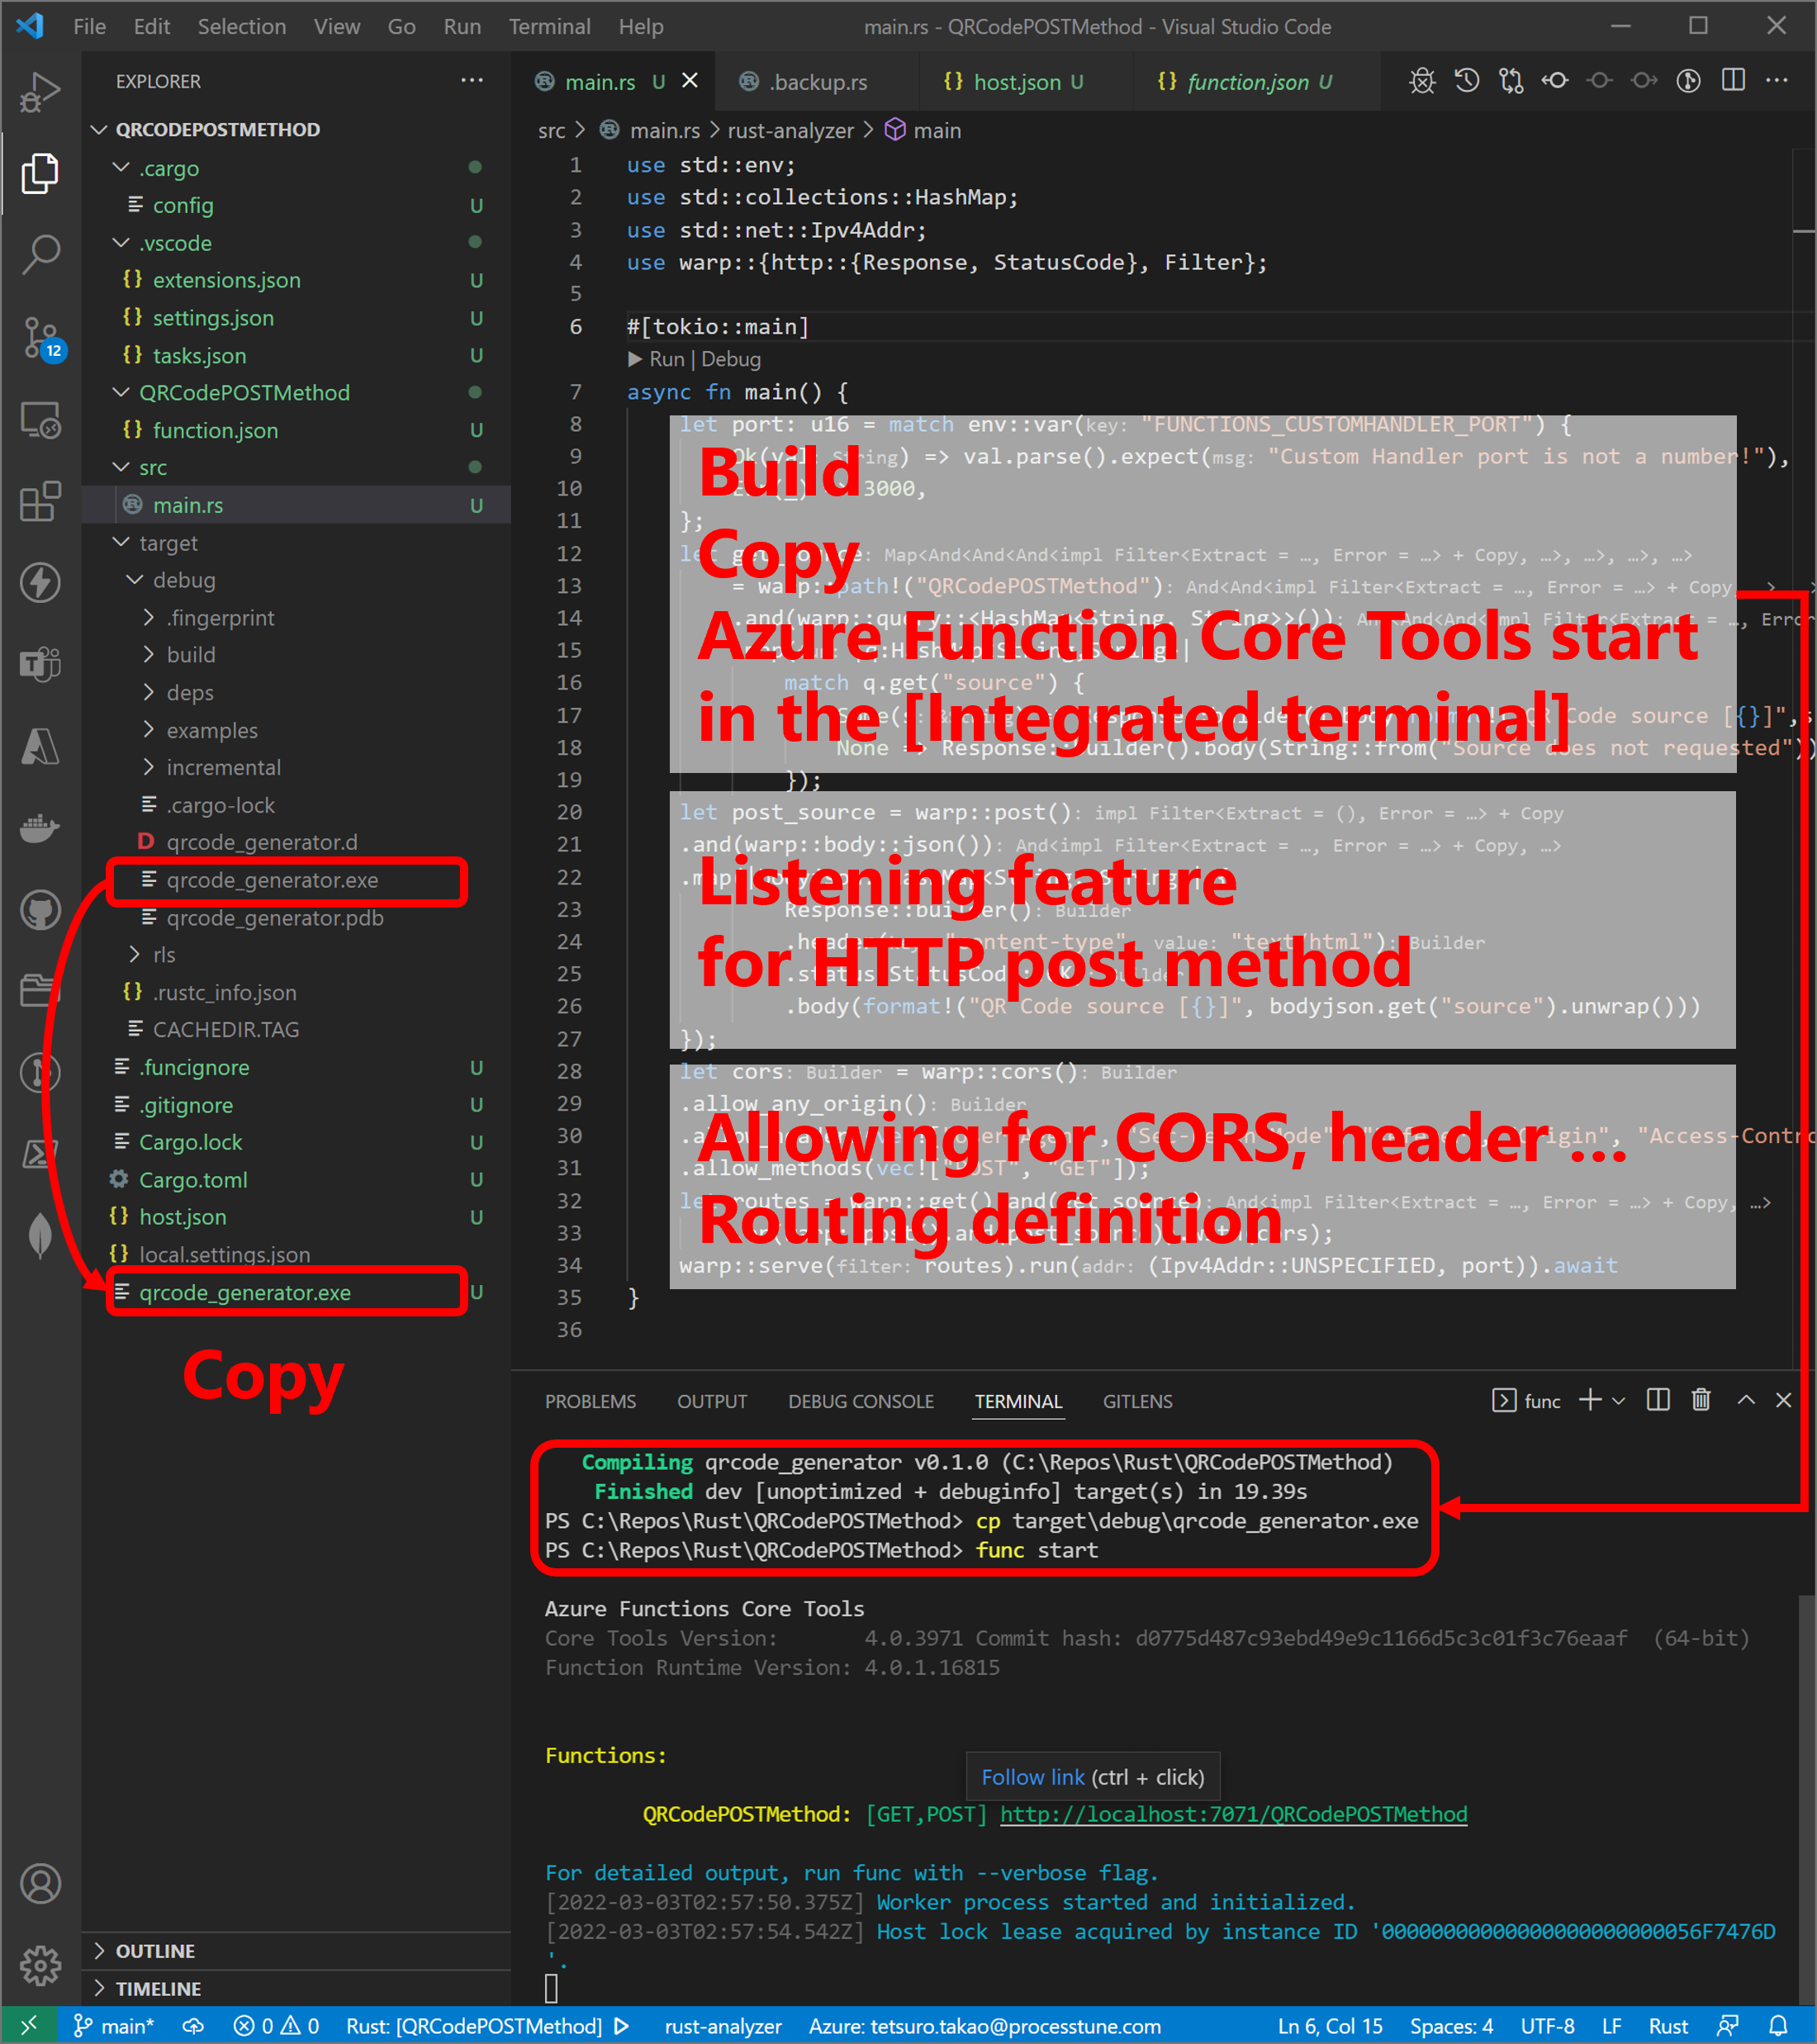
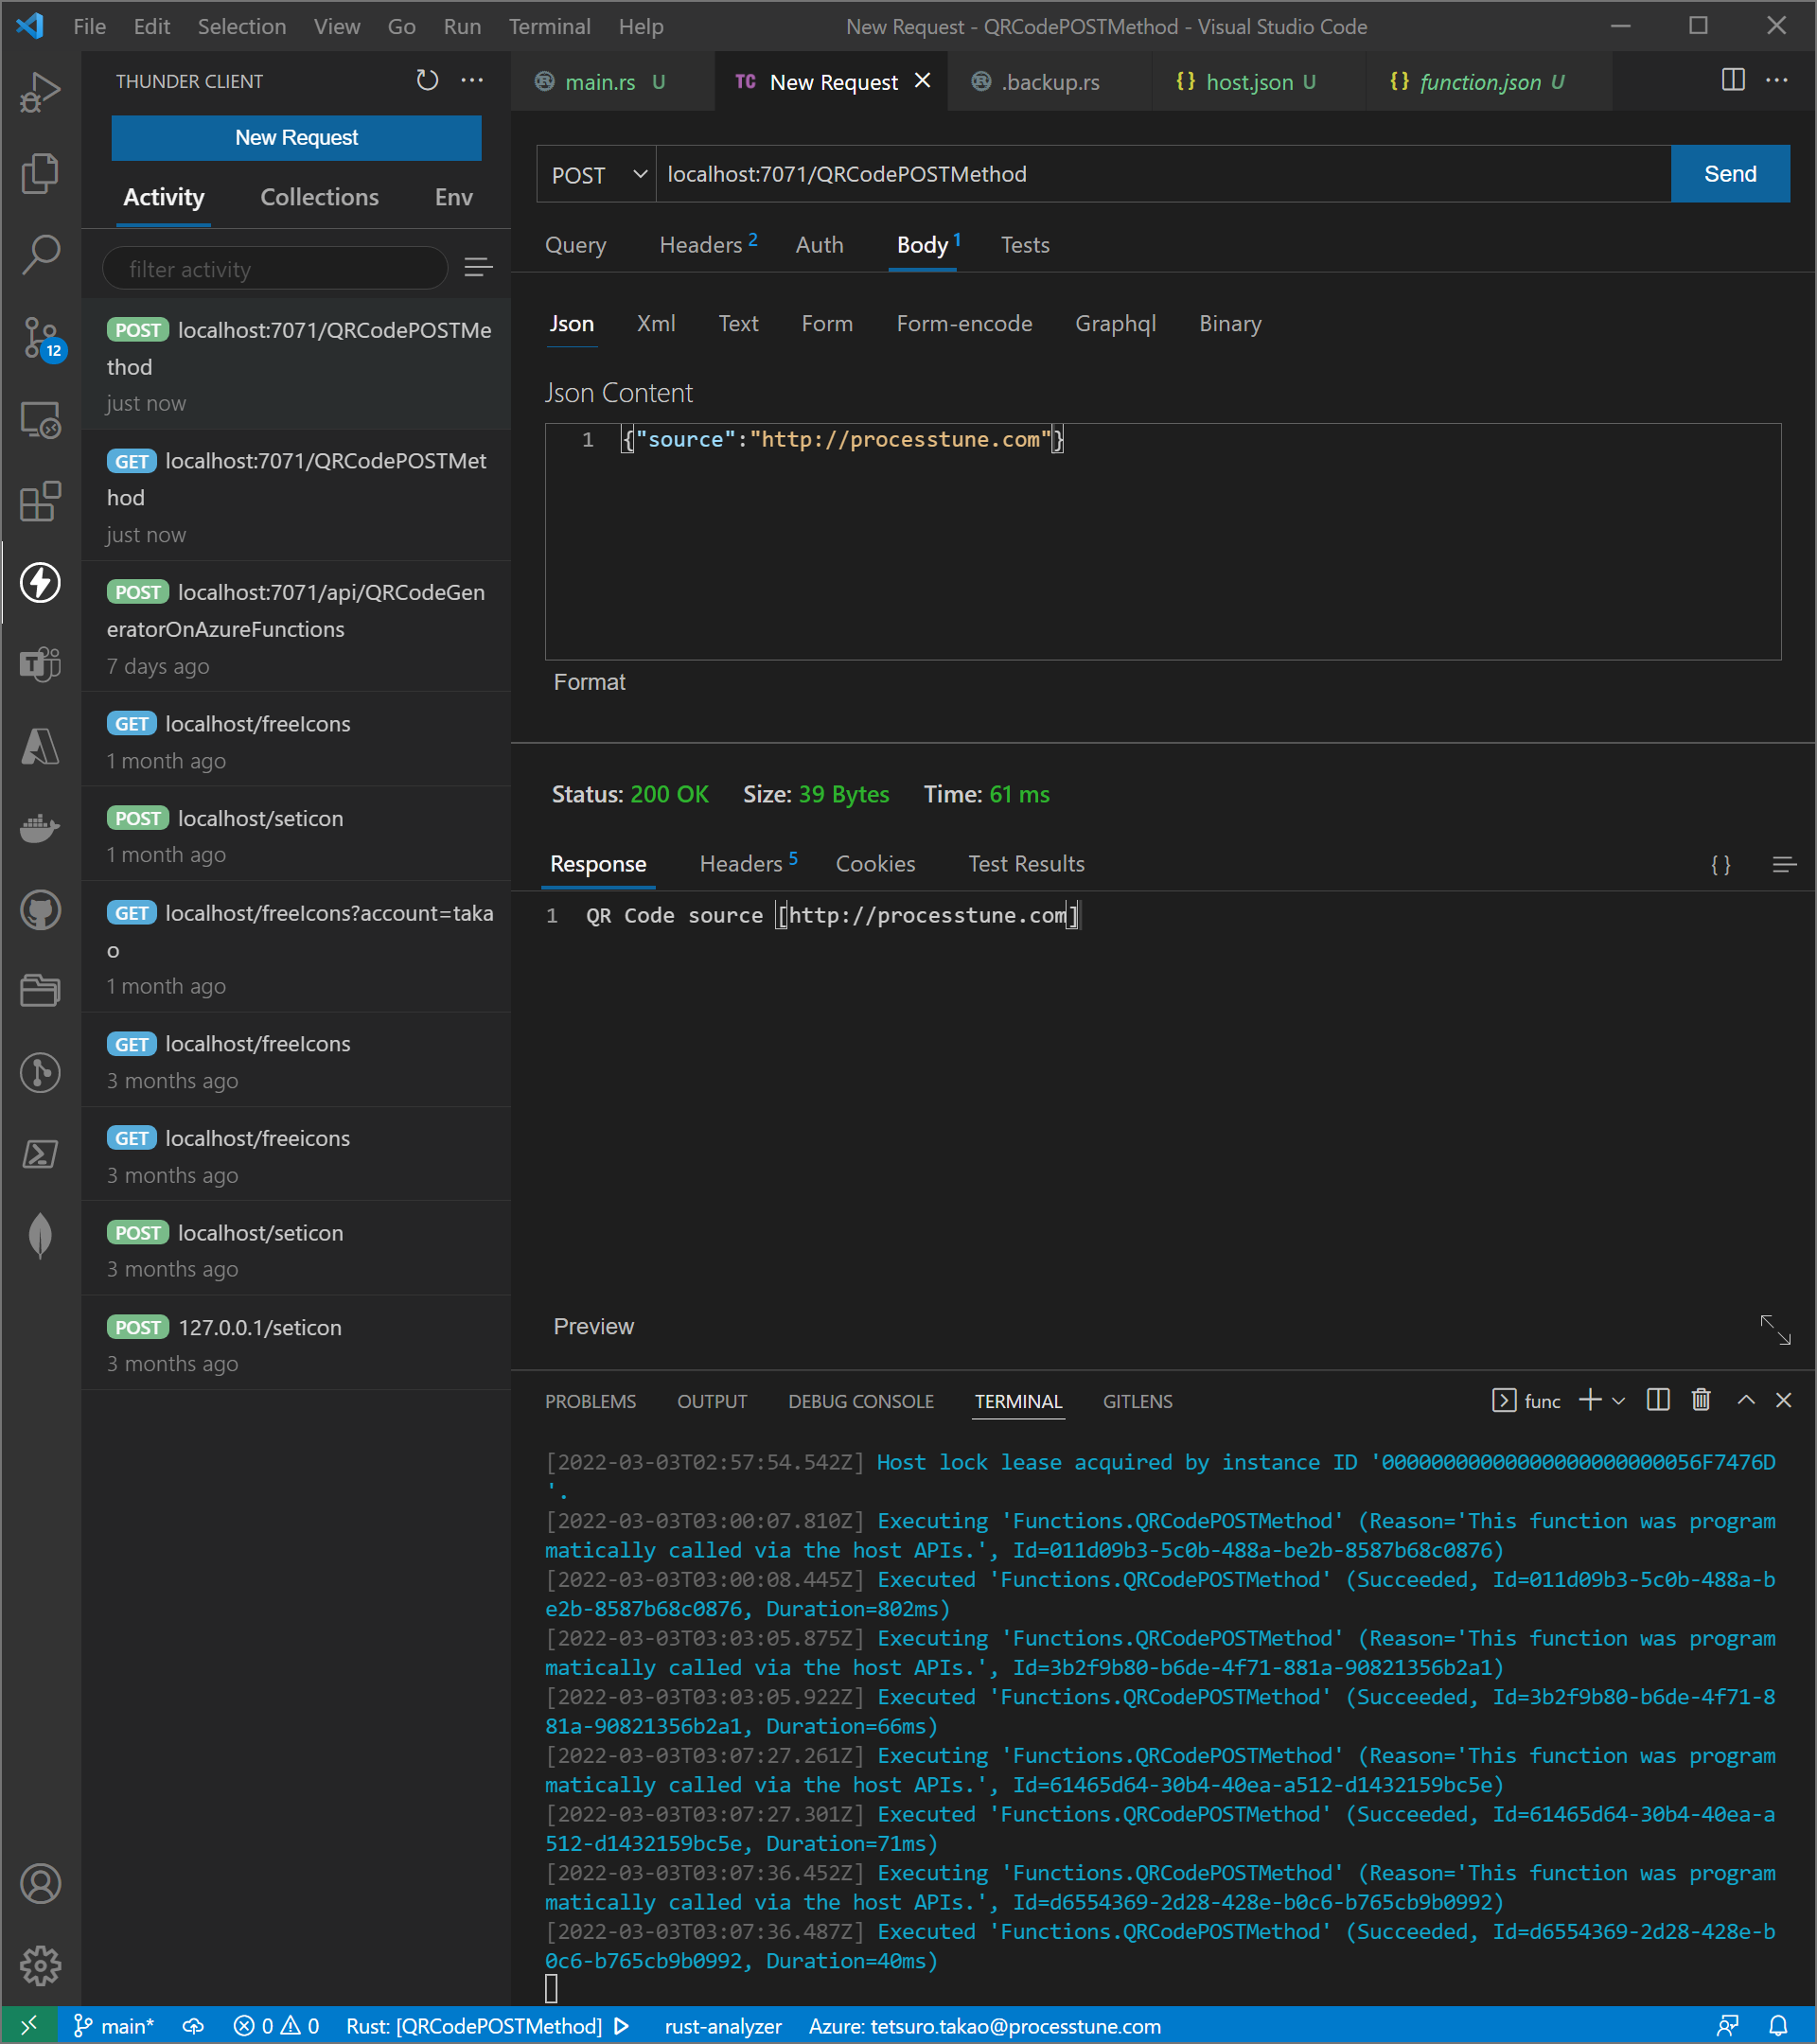
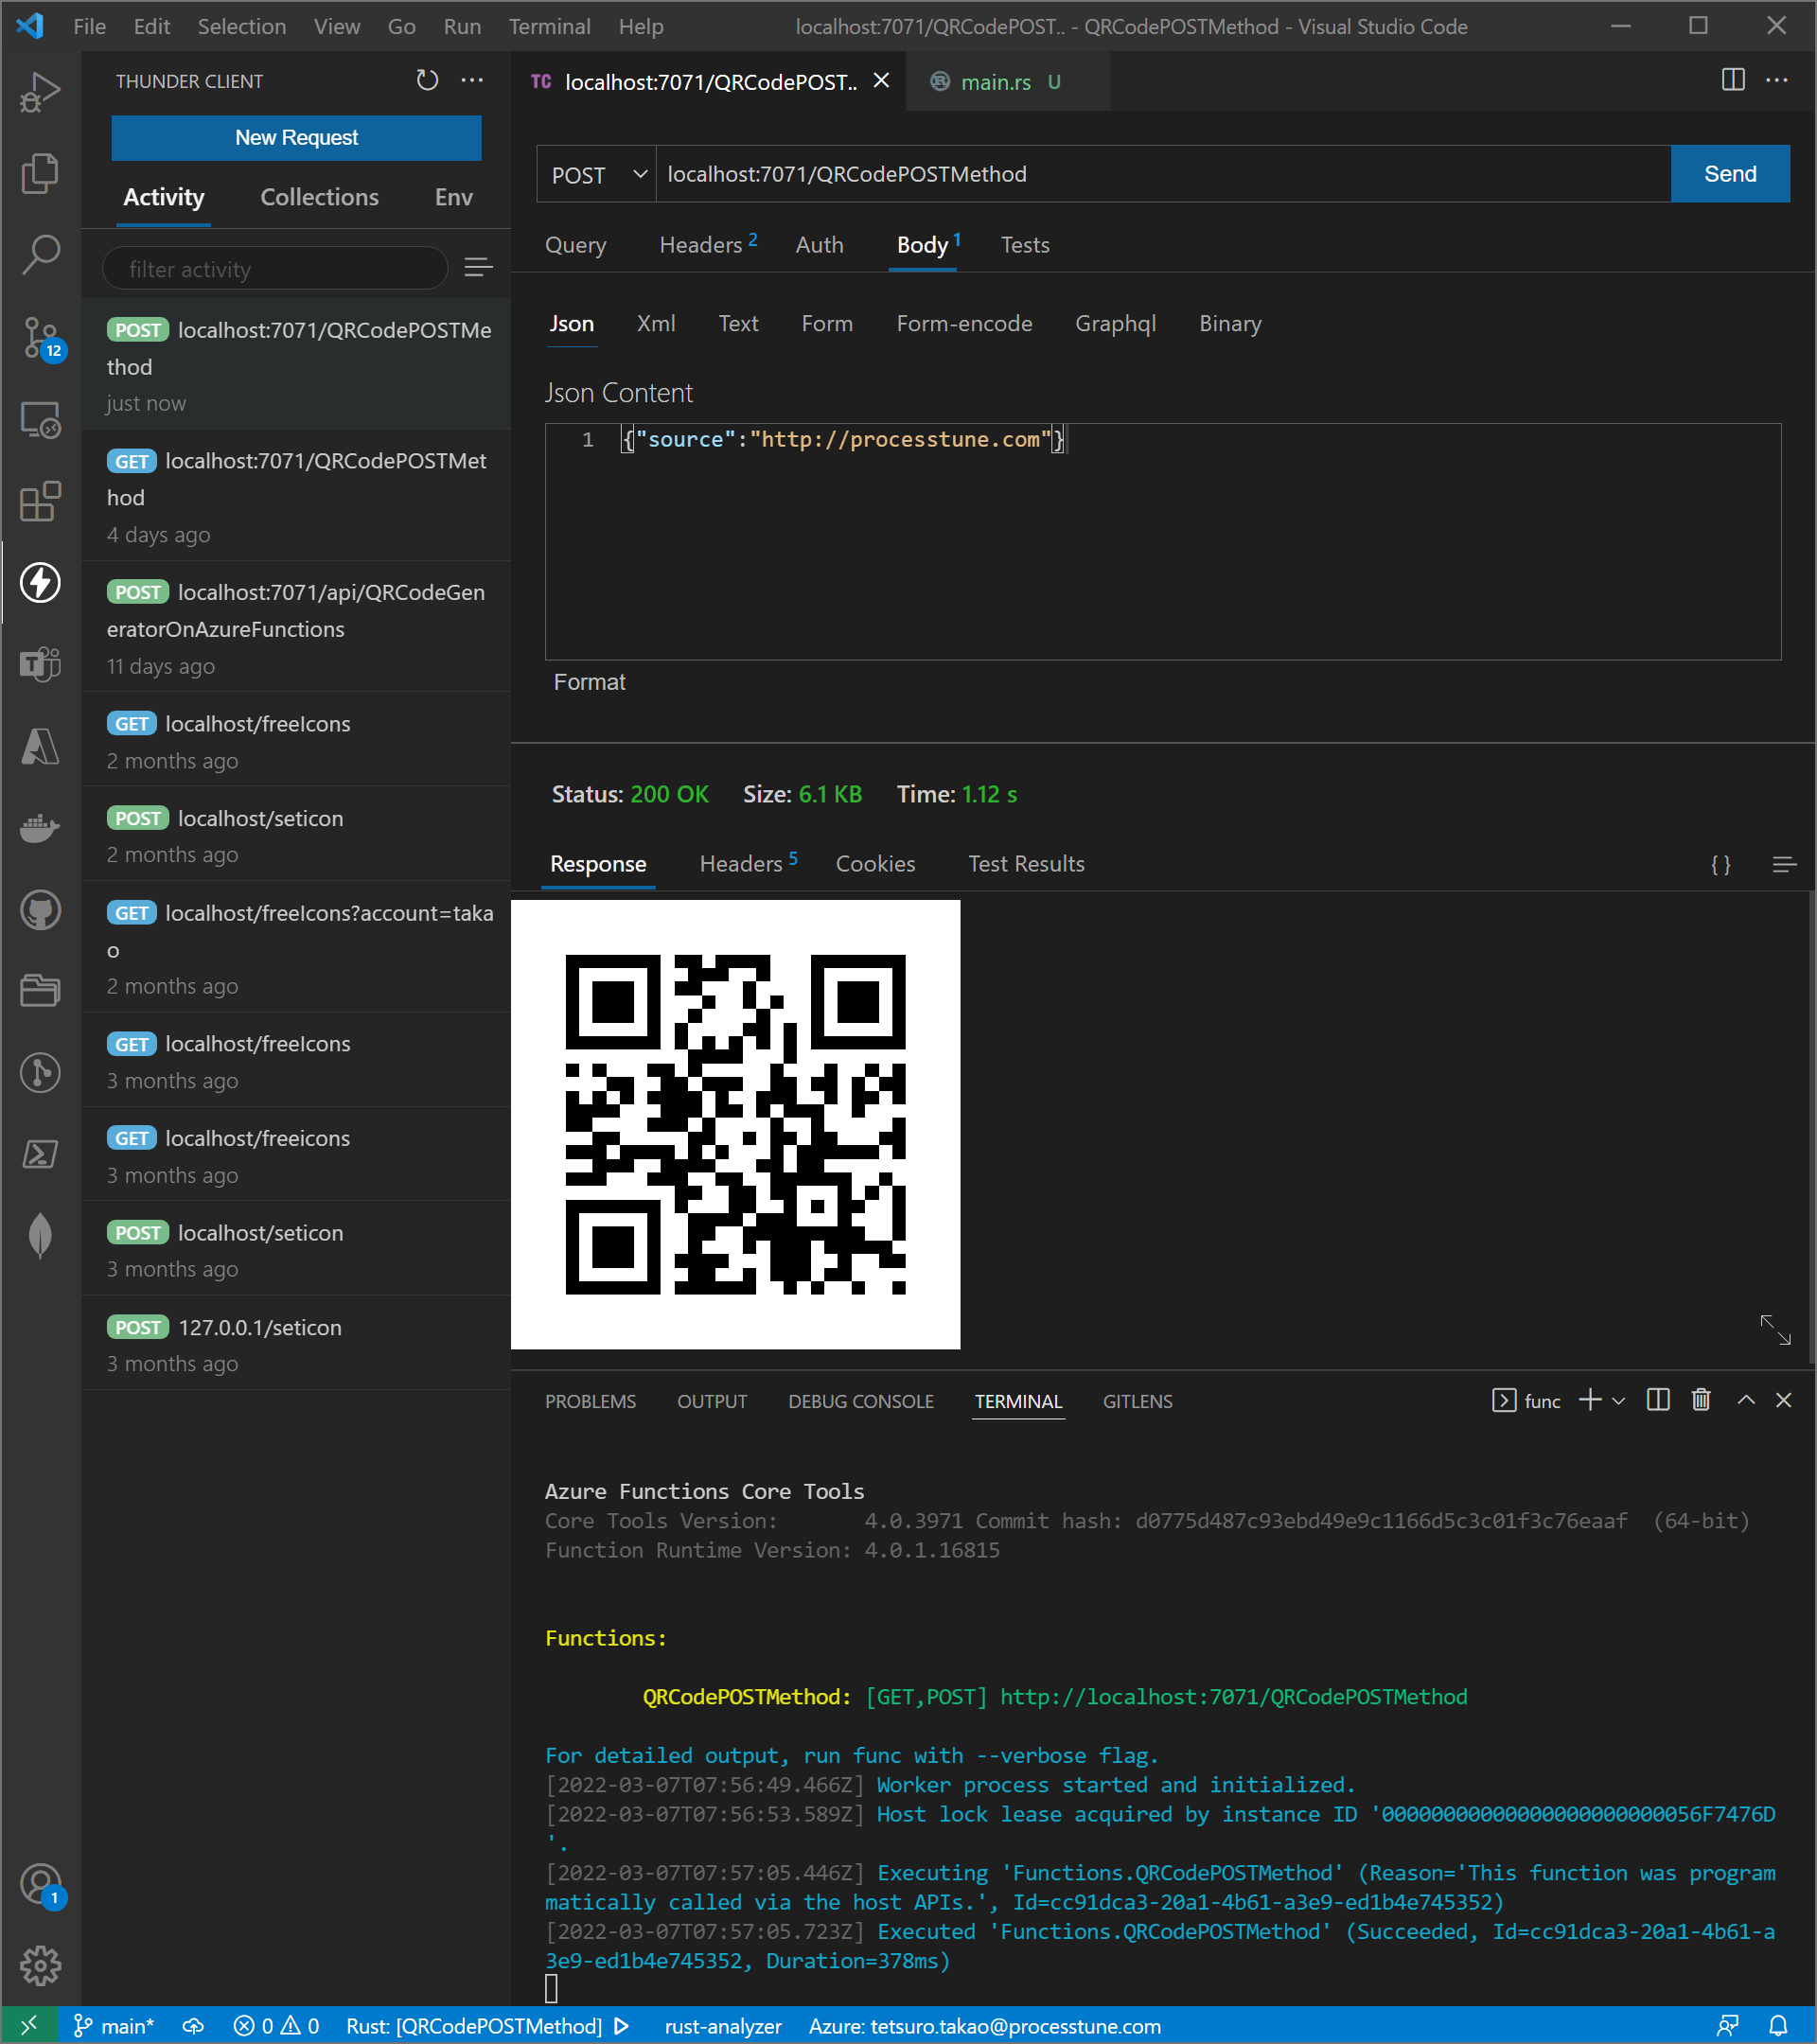
Next, it’s flow of steps that add HTTP post method feature to main.rs, then the feature inject to the route definition. HTTP post method feature is code below, is similar as HTTP get method feature.
    let post_source = warp::post()
    .and(warp::body::json())
    .map(|bodyjson: HashMap<String, String>| {
            Response::builder()
            .header("content-type", "text/html")
            .status(StatusCode::OK)
            .body(format!("QR Code source [{}]", bodyjson.get("source").unwrap()))
    });
Create a header and a body with status of the response using the warp response builder. While create the status, use the warp status object. So define using it at top of the [main.rs] file ([use warp::{http::{Response, StatusCode}, Filter};]).
As last step, define routing. In case of the warp routing object, define the processing when HTTP get method is listened, then if the request is HTTP post method, executes the processing for it. The routing like it, needs allowing HTTP get method and HTTP post method.
In addition, Azure Functions does not allow CORS (Cross-Origin Resource Sharing) as default, although it can change to allow. Evenif Azure Functions allow it aiming to accept request from JavaScript or other cross-origin, it not work well since the warp routing definition that does not allow as default. For that reason, create allowing of CORS using warp CORS object, as expand features in the future. The code below is definition of routing that flows from get request to post request, along with allowing them (CORS, creating header and acceptance of HTTP get/post method request).
    let cors = warp::cors()
        .allow_any_origin()
        .allow_headers(vec!["User-Agent", "Sec-Fetch-Mode", "Referer", "Origin", "Access-Control-Request-Method", "Access-Control-Request-Headers"])
        .allow_methods(vec!["POST", "GET"]);
    let routes = warp::get().and(get_source)
        .or(warp::post().and(post_source)).with(cors);
    warp::serve(routes).run((Ipv4Addr::UNSPECIFIED, port)).await
・Build and Confirming
For confirming HTTP post method call result, build Rust project, copy created assembly to project root and Azure Functions Core Tools starting.
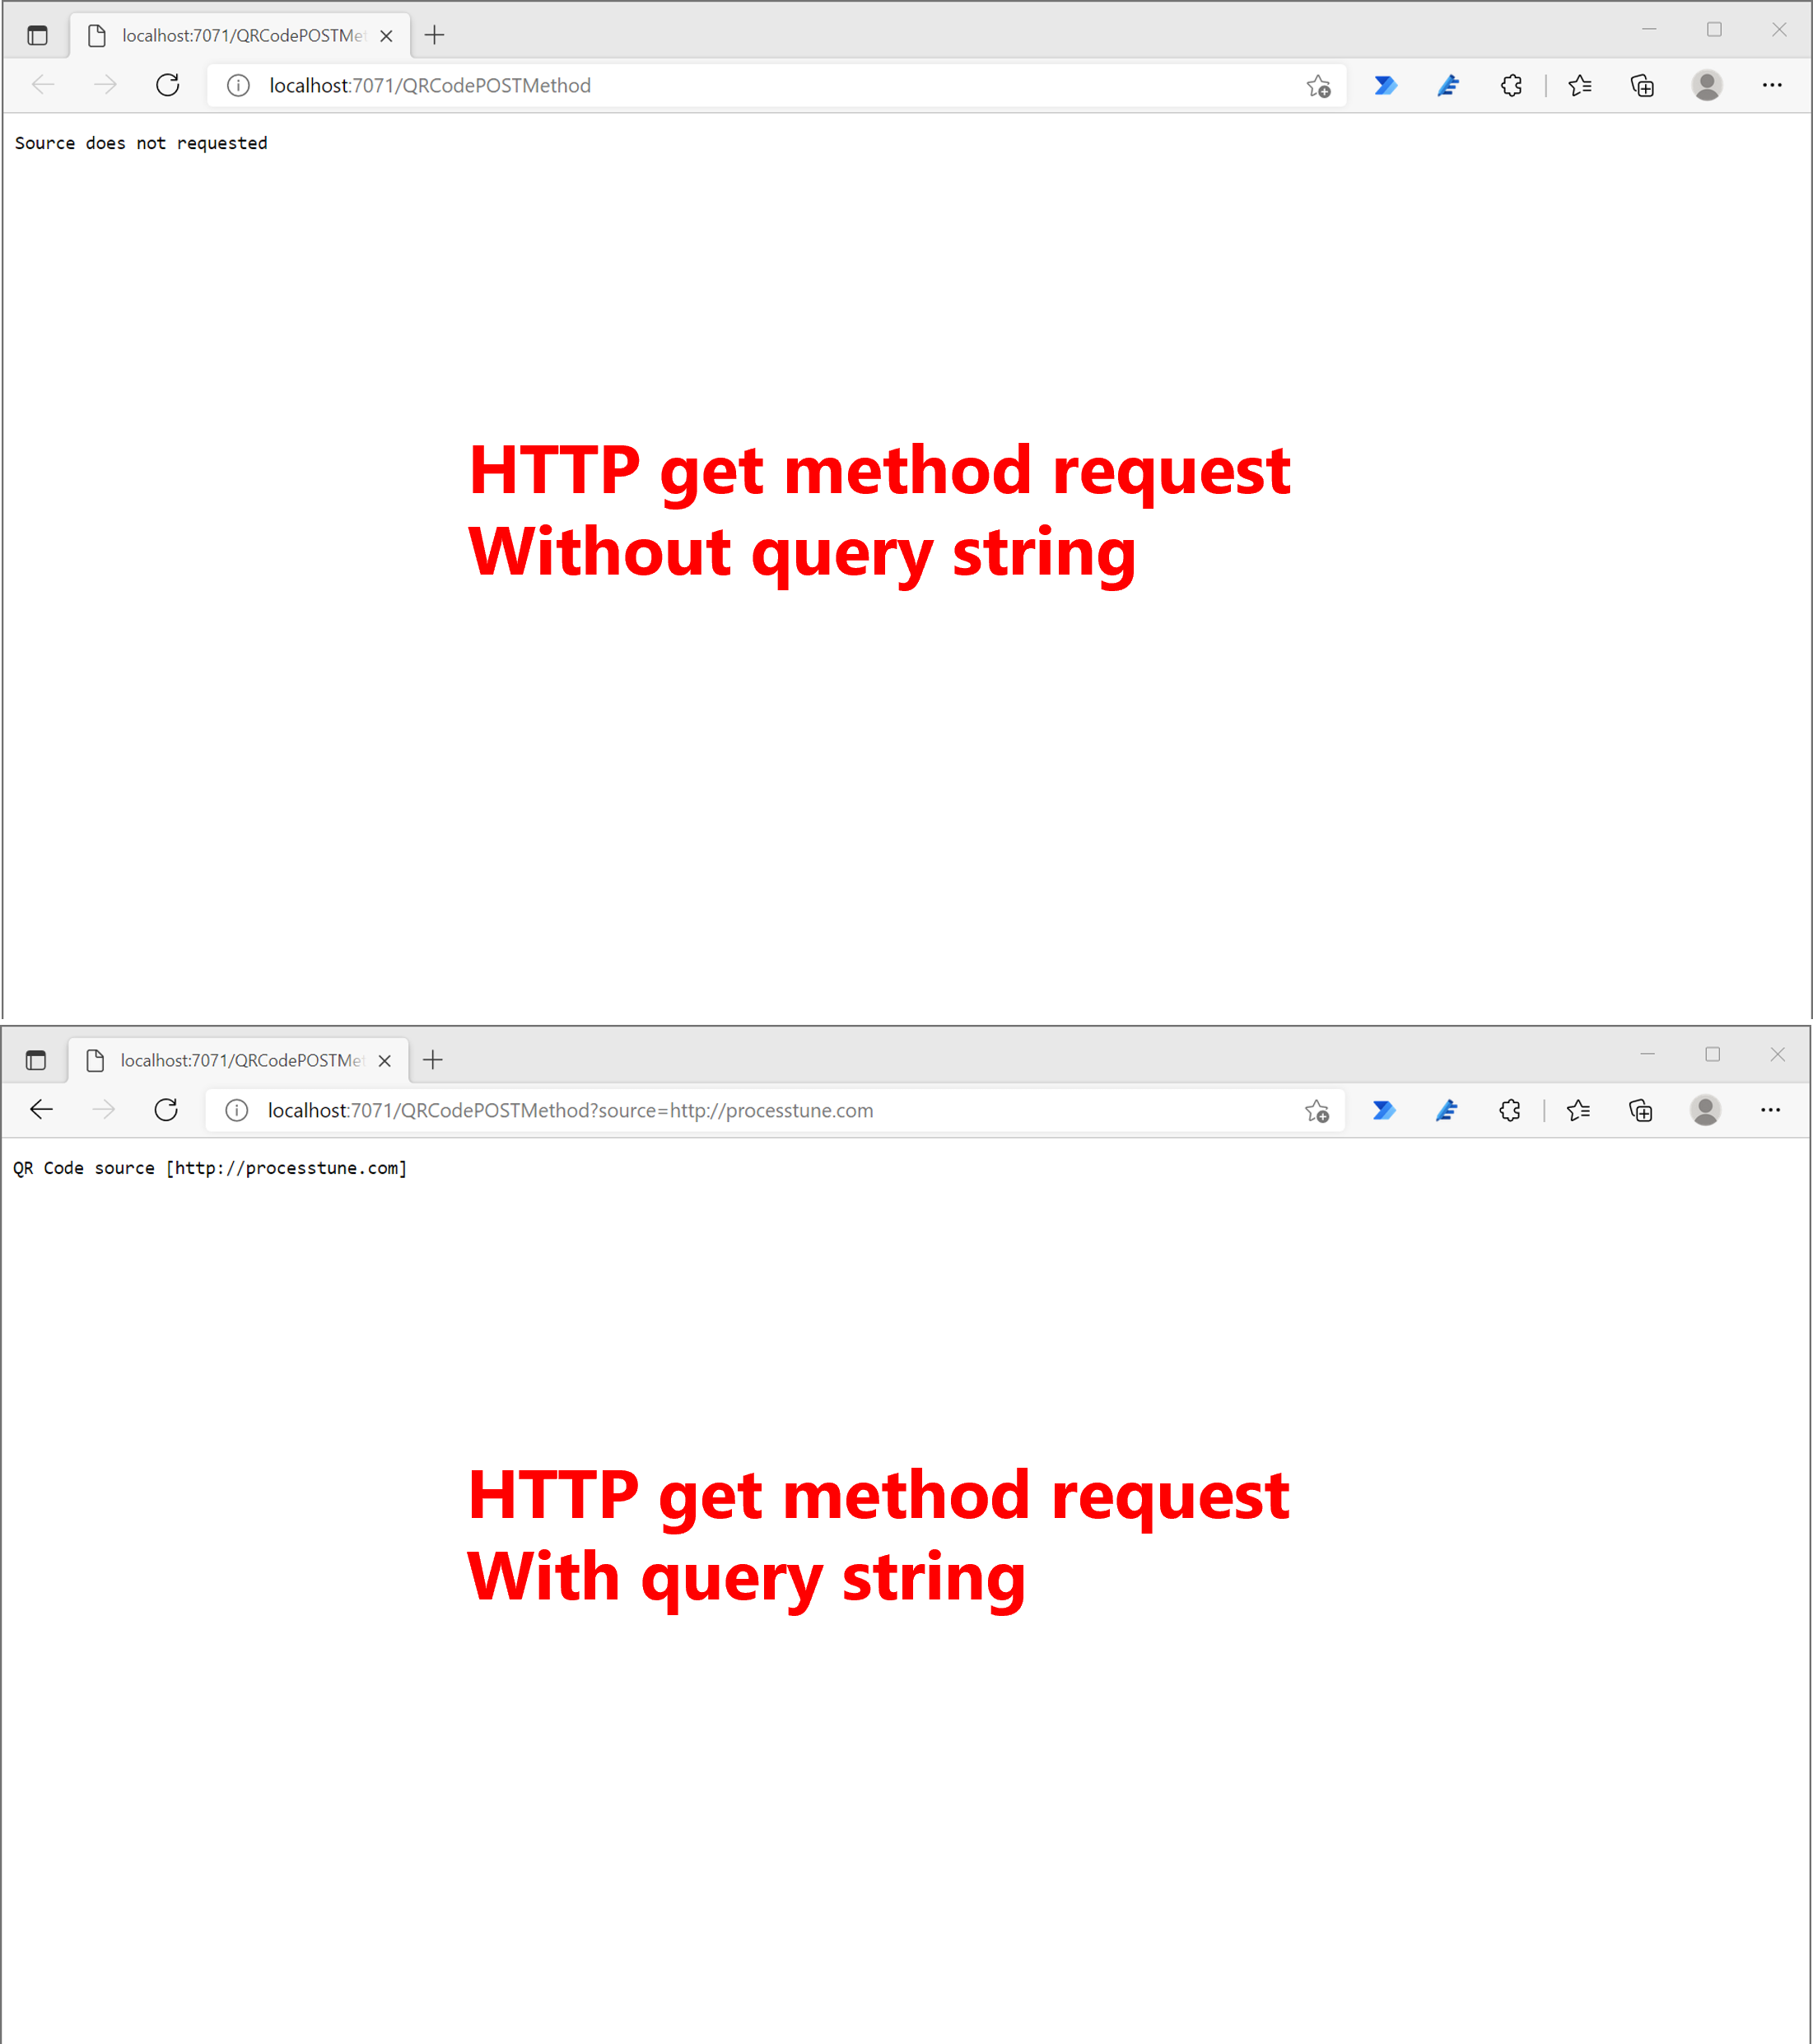
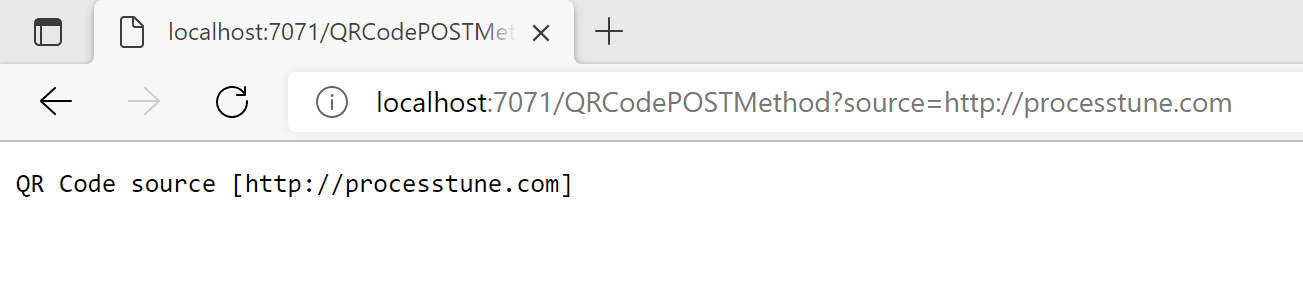
Confirming for HTTP get method request without query string in browser is selection of the link of output starting result. In case of confirming for HTTP get method request with query string, input query string manually at the URL inputbox.
Use Visual Studio Code extension named [Thunder Client] to confirming for HTTP get method request.
・Upload to Azure Functions and Test
Like as the article [How to compile Rust assembly runnable on Linux for deployment to Azure Functions], it’s super easy to do it.
- Delete %projecr name%.exe that used for debugging on local environment.
- Build the project for x86_64-unknown-linux-musl platform that Azure Functions provided.
- Copy builded the assembly from bild destination to project root.
- Modify value [qrcode_generator.exe] of the [defaultExecutablePath] property to [qrcode_generator] on the [host.json] file.
- Upload the assembly to Azure Functions using Azure Functions extention of Visual Studio Code.
- Test Functions app at Azure portal.
In the [Integrated terminal] >rm qrcode_generator.exe
In the [Integrated terminal] >cargo build –release –target=x86_64-unknown-linux-musl
In the [Integrated terminal] >cp target\x86_64-unknown-linux-musl\release\qrcode_generator .
{…, “customHandler”: { “description”: { “defaultExecutablePath”: “qrcode_generator.exe”, …}, …}}
the [Integrated terminal] output…
14:40:22 BlogSampleFunctions: Starting deployment…
14:40:23 BlogSampleFunctions: Creating zip package…
14:40:23 BlogSampleFunctions: Uploading zip package to storage container…
14:40:24 BlogSampleFunctions: Zip package size: 2.13 MB
14:40:26 BlogSampleFunctions: Deployment successful.
14:40:36 BlogSampleFunctions: Syncing triggers…
14:40:38 BlogSampleFunctions: Querying triggers…
14:40:40 BlogSampleFunctions: HTTP Trigger Urls:
QRCodePOSTMethod: https://blogsamplefunctions.azurewebsites.net/qrcodepostmethod

・Add QR Code generating feature
There is the link to the Rust program as base code at the article [QR code create with Rust language runnable on Azure Functions].
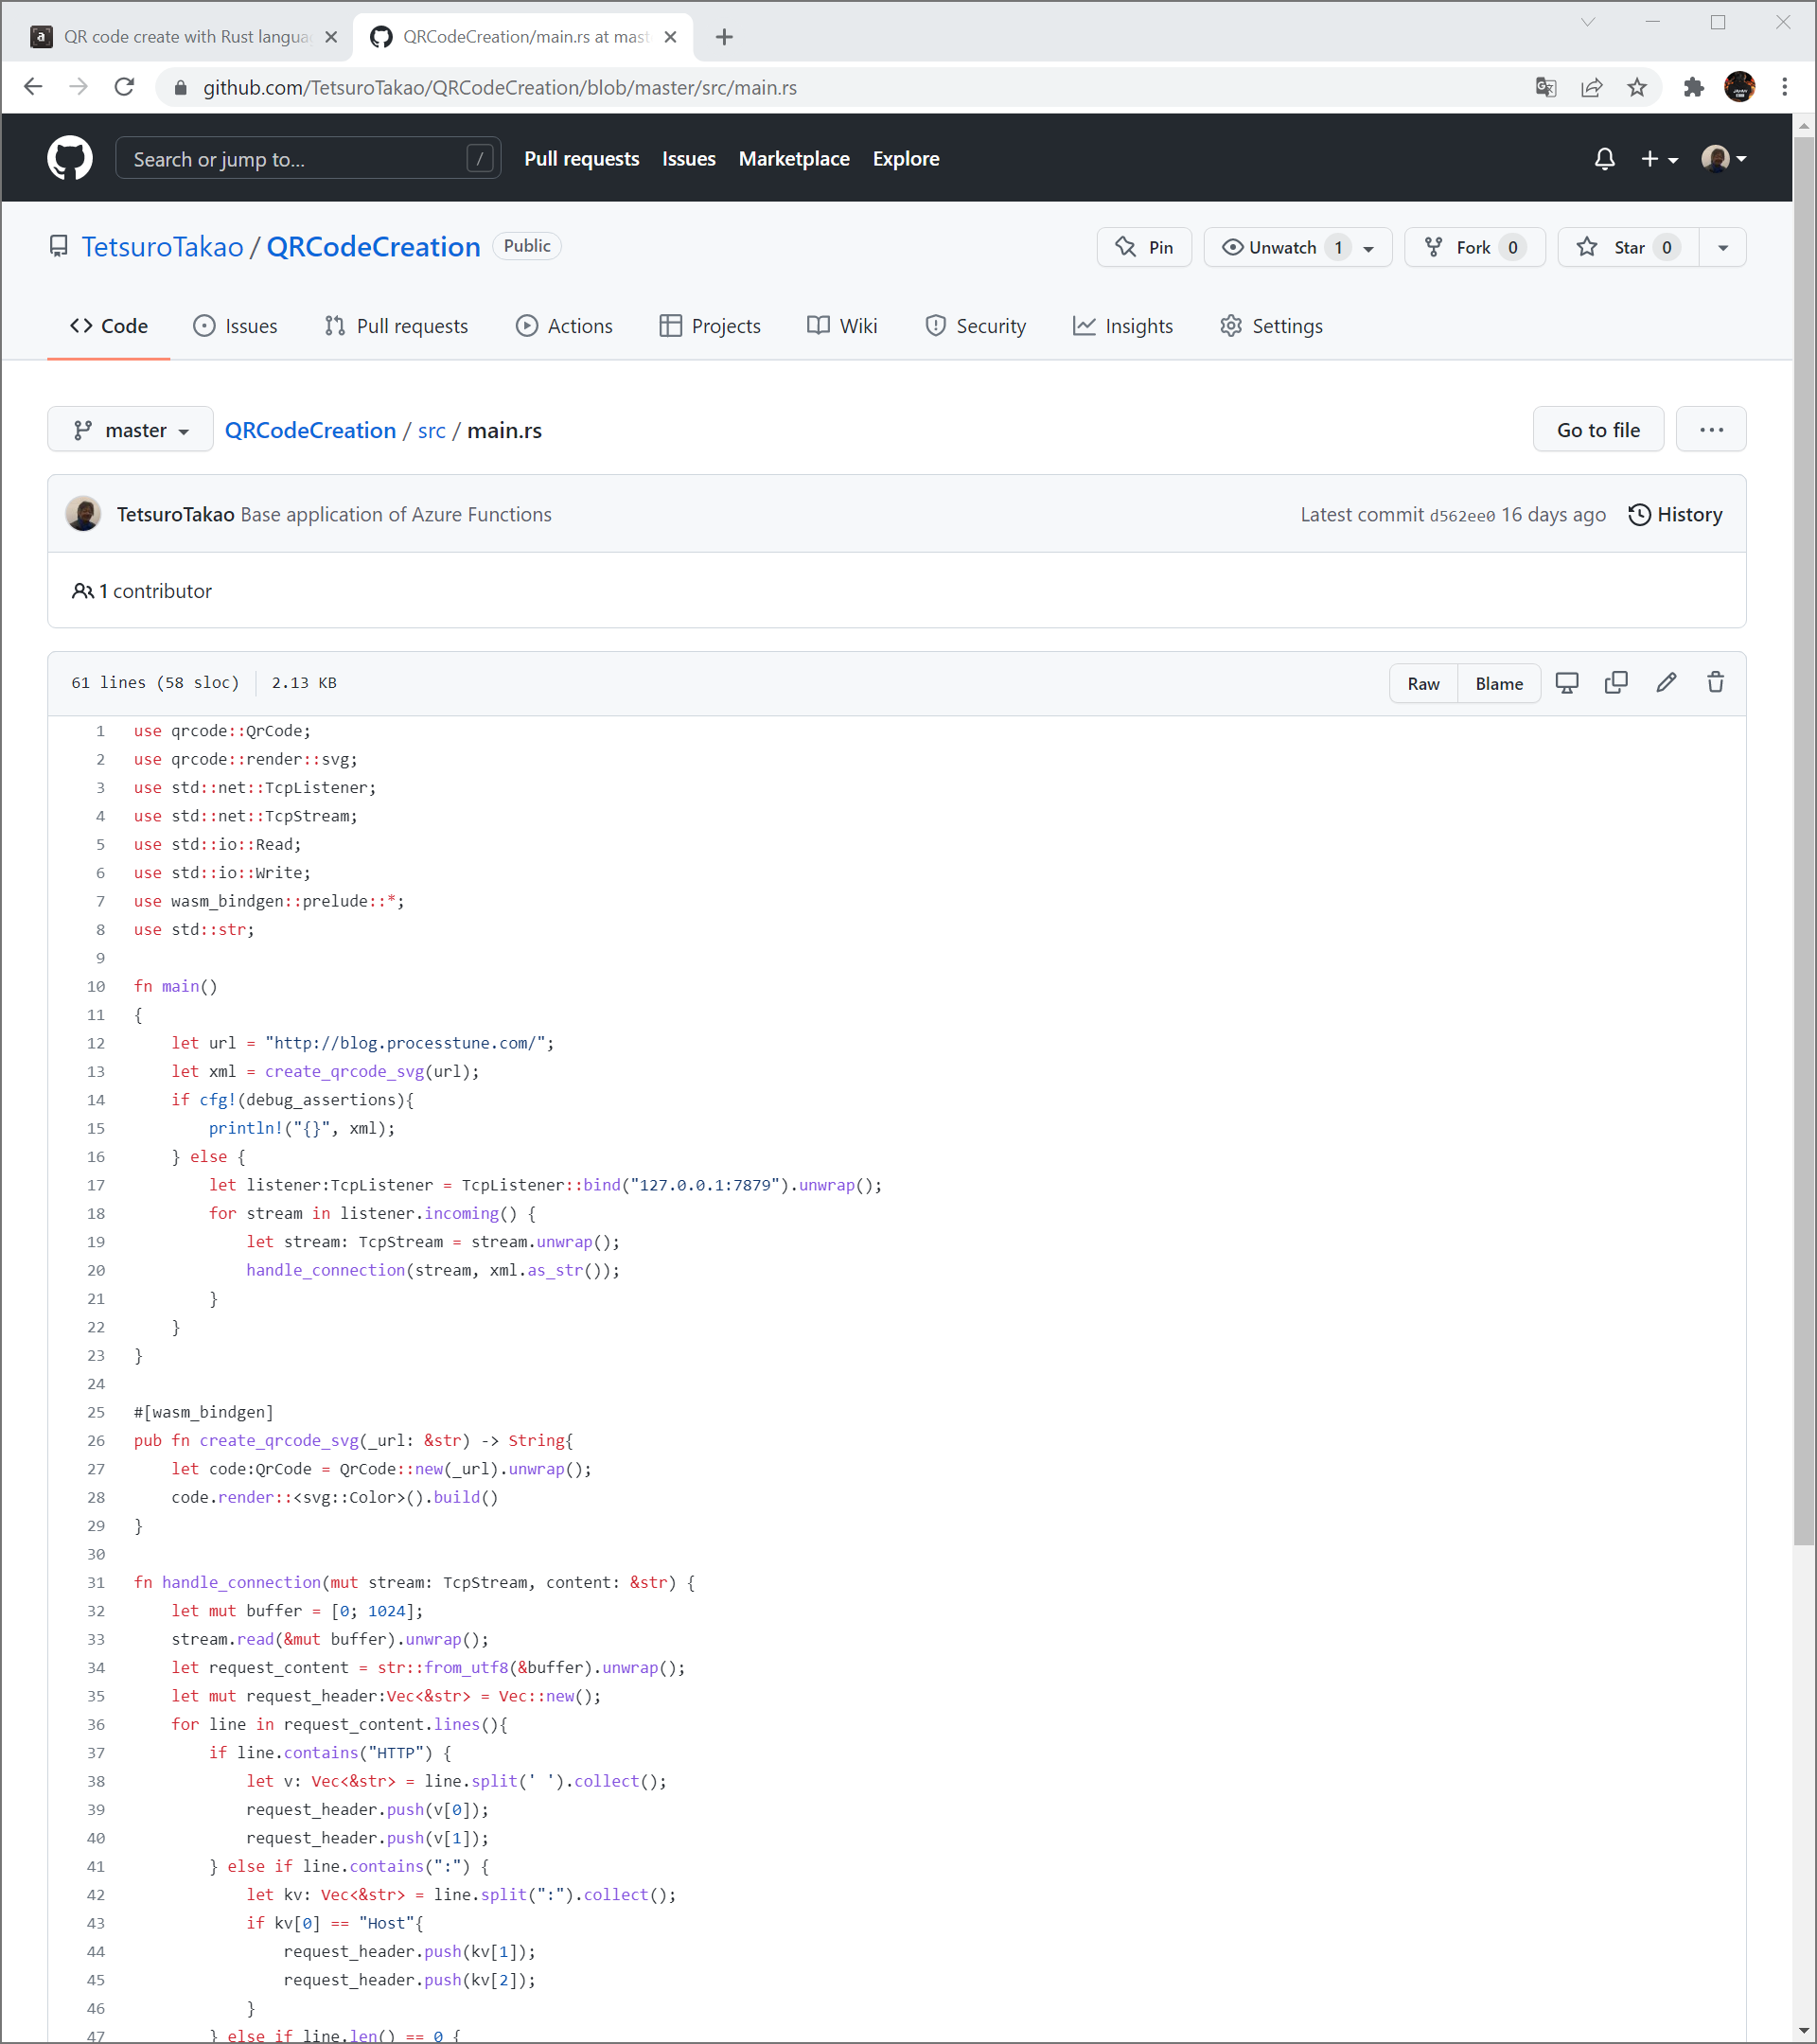
The code has very simple (is two row code) function that generate QR code using a library of Rust ecosystem. The function argues string as source of QR code and return svg string (XML format). The XML is able to display on browser.
pub fn create_qrcode_svg(_url: &str) -> String{
    let code:QrCode = QrCode::new(_url).unwrap();
    code.render::<svg::Color>().build()
}
For now, the code is not need function. So as temporary, inject the code above inject into the HTTP post listener feature of main procedure.
    let post_source = warp::post()
        .and(warp::body::json())
        .map(|bodyjson: HashMap<String, String>| {
            let _url = bodyjson.get("source").unwrap();
            let code:QrCode = QrCode::new(_url).unwrap();
            let qrcode = code.render::<svg::Color>().build();
            Response::builder()
                .header("content-type", "image/svg+xml")
                .status(StatusCode::OK)
                .body(qrcode)
    });
Injected two lines in the map process needs the [_url] varieble, so use the [bodyjson.get(“source”).unwrap()] statement of existing post listener feature. And render directly the result (strings of the [SVG] XML) of the [code.render::
If aim to response as HTML (does not response as API or RPC), does not use the [Response::builder] object, but also can use the [warp::reply::html] object for create filter feature more easly.
Reply the body content to the request with the status code and the [content-type] header. For example in case of modifing the HTTP get listener feature, filter is returned as below.
let url:&str = match p.get("source") {
Some(q)=> q,
None => "http://blog.processtune.com/"
};
let code:QrCode = QrCode::new(url).unwrap();
let qr = code.render::<svg::Color>().build();
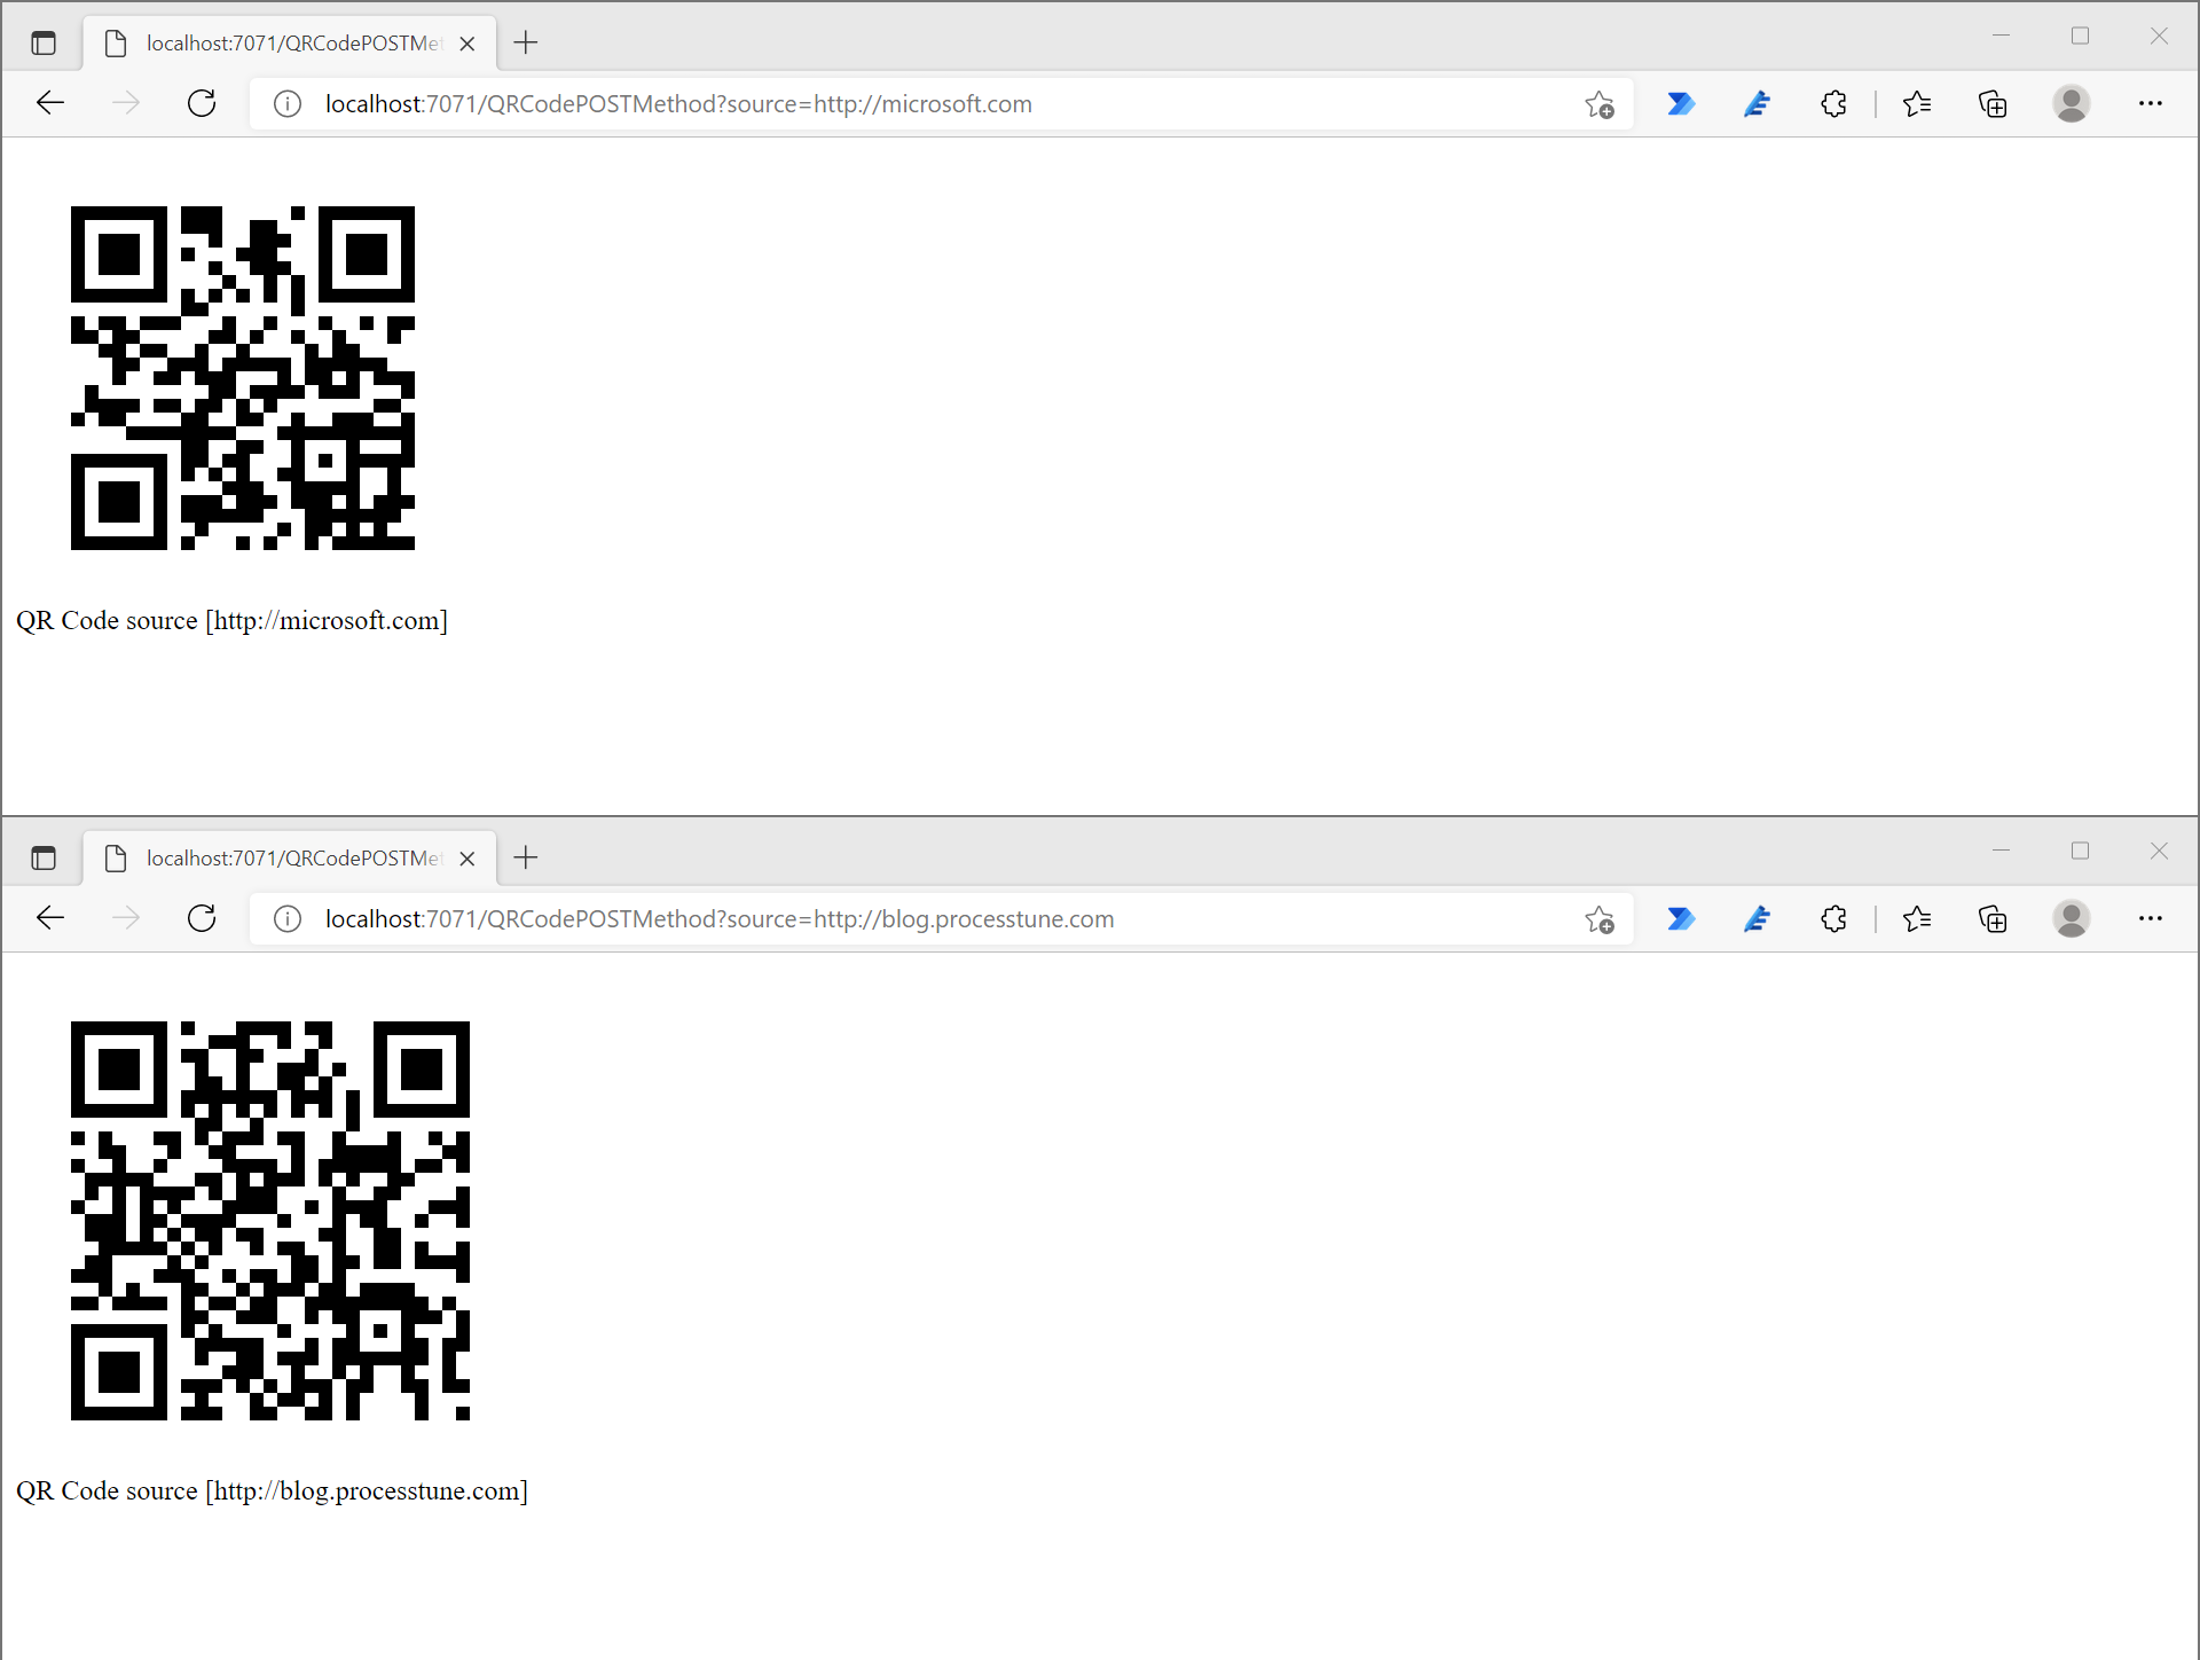
let content = format!("{}<br /><span>QR Code source [{}]</span>", qr, &url);
let reply = warp::reply::html(content);
let reply = warp::reply::with_status(reply, StatusCode::OK);
let reply = warp::reply::with_header(reply, "content-type", "text/html");
reply
No responses yet