
Azure Functions is one of great services of serverless computing. It is useful for microservices solution, event-driven messaging middleware and so on. Its functions run on Linux, use C standard library named ‘musl'(see musl libc) for system call of Linux.
A runnable Rust assembly of Azure Functions is create use ‘cargo build’ command that compiles source code to assembly, compile process is structed with front-end compiler and back-end compiler.
At first, front-end compiler generates intermidiate language from source code written on Windows, then back-end compiler use its intermidiate language to make runnable assemblyies that capable system call on Linux. This process is helped by toolchain management tool ‘rustup’.
There is little bit complexity to struct these development enviromment, so this article describes it step by step.
In the article [Rust QR code generator App of Azure Functions] describes how to modify the simple of this article (simple rust project) to QR code generator.
Added at 17th Dec. 2021 :
Please read Microsoft Official document [Quickstart: Create a Go or Rust function in Azure using Visual Studio Code].
>>Rust sample project to create QR Code, Base program to deploy to Azure Functions (created by previous article.)
・Step 1. Rust install and rustup settings comformation
Install Rust (see Install Rust), then comfirm rustup toolchain conditions, it shown if put [rustup show] command in integrated terminal of Visual Studio Code (or Windows terminal).
Runtime environment of Azure Functions is [x86_64-unknown-linux-musl], so if it needs, use [rustup target add stable-x86_64-unknown-linux-musl] command to install and use [cargo build] command to build it. Below figure is sample of [rustup show] result.
Default host: x86_64-pc-windows-msvc
rustup home:  %User root%\.rustup

installed toolchains
--------------------

stable-x86_64-pc-windows-msvc (default)
stable-x86_64-unknown-linux-gnu
stable-x86_64-unknown-linux-musl

installed targets for active toolchain
--------------------------------------

wasm32-unknown-unknown
x86_64-pc-windows-msvc
x86_64-unknown-linux-musl

active toolchain
----------------

stable-x86_64-pc-windows-msvc (default)
rustc 1.56.1 (59eed8a2a 2021-11-01)
This sample environment has installed [x86_64-unknown-linux-musl] target, and [stable-x86_64-pc-windows-msvc] toolchain is target default (default of Rust install on Windows). This sample development environment is Windows and use native ABI (Application Binary Interface) named MSVC (see the article for Windows Rust developers). So developers who use Visual Studio (includes Visual Studio Code) for development have to do nothing. If not, use Microsoft C++ Build Tools to compile Linux assembly easily.
The musl is C standerd compiler of MIT license, it will be linked as statical, so should modify the [.cargo/config] file. The [.cargo/config] file is at [%User root%\.cargo\config] as global settings on Windows. However you don’t always want to generate Linux assembly use MSVC ABI, so I recommend that its file create at Rust project root folder.
Toolchain uses rust-lld linker when compile for Musl libraly.
The cargo.exe reads [.cargo/config] file to compile source code use the rust-lld.exe, and the cargo.exe expect the file is written as TOML file format. The [\] string in TOML format is special string, so [.cargo/config] file should be written path strings as escaped file path use [”’] strings. Addition, cargo.exe needs full path infromation of its linker for compile.
In case of without Microsoft C++ Build Tools, Visual Studio and Visual Studio Code
[target.x86_64-unknown-linux-musl]
linker = ”’%User root%\.rustup\toolchains\stable-x86_64-pc-windows-msvc\lib\rustlib\x86_64-pc-windows-msvc\bin\rust-lld.exe”’
In case of using Microsoft C++ Build Tools, Visual Studio or Visual Studio Code
[target.x86_64-unknown-linux-musl]
linker = “rust-lld”
It’s easy to set path of a linker using MSVC.
・Step 2. Deployment
At first, download Rust sample project created by previous article and modify it to runnable on Linux. previous article. For it, create [.cargo/config] in the project and set rust-lld to the linker like above, then type [cargo build –release –target=x86_64-unknown-linux-musl] on the [Integrated terminal]. Addition, modify [.funcignore] file to prevent upload files of target folder.

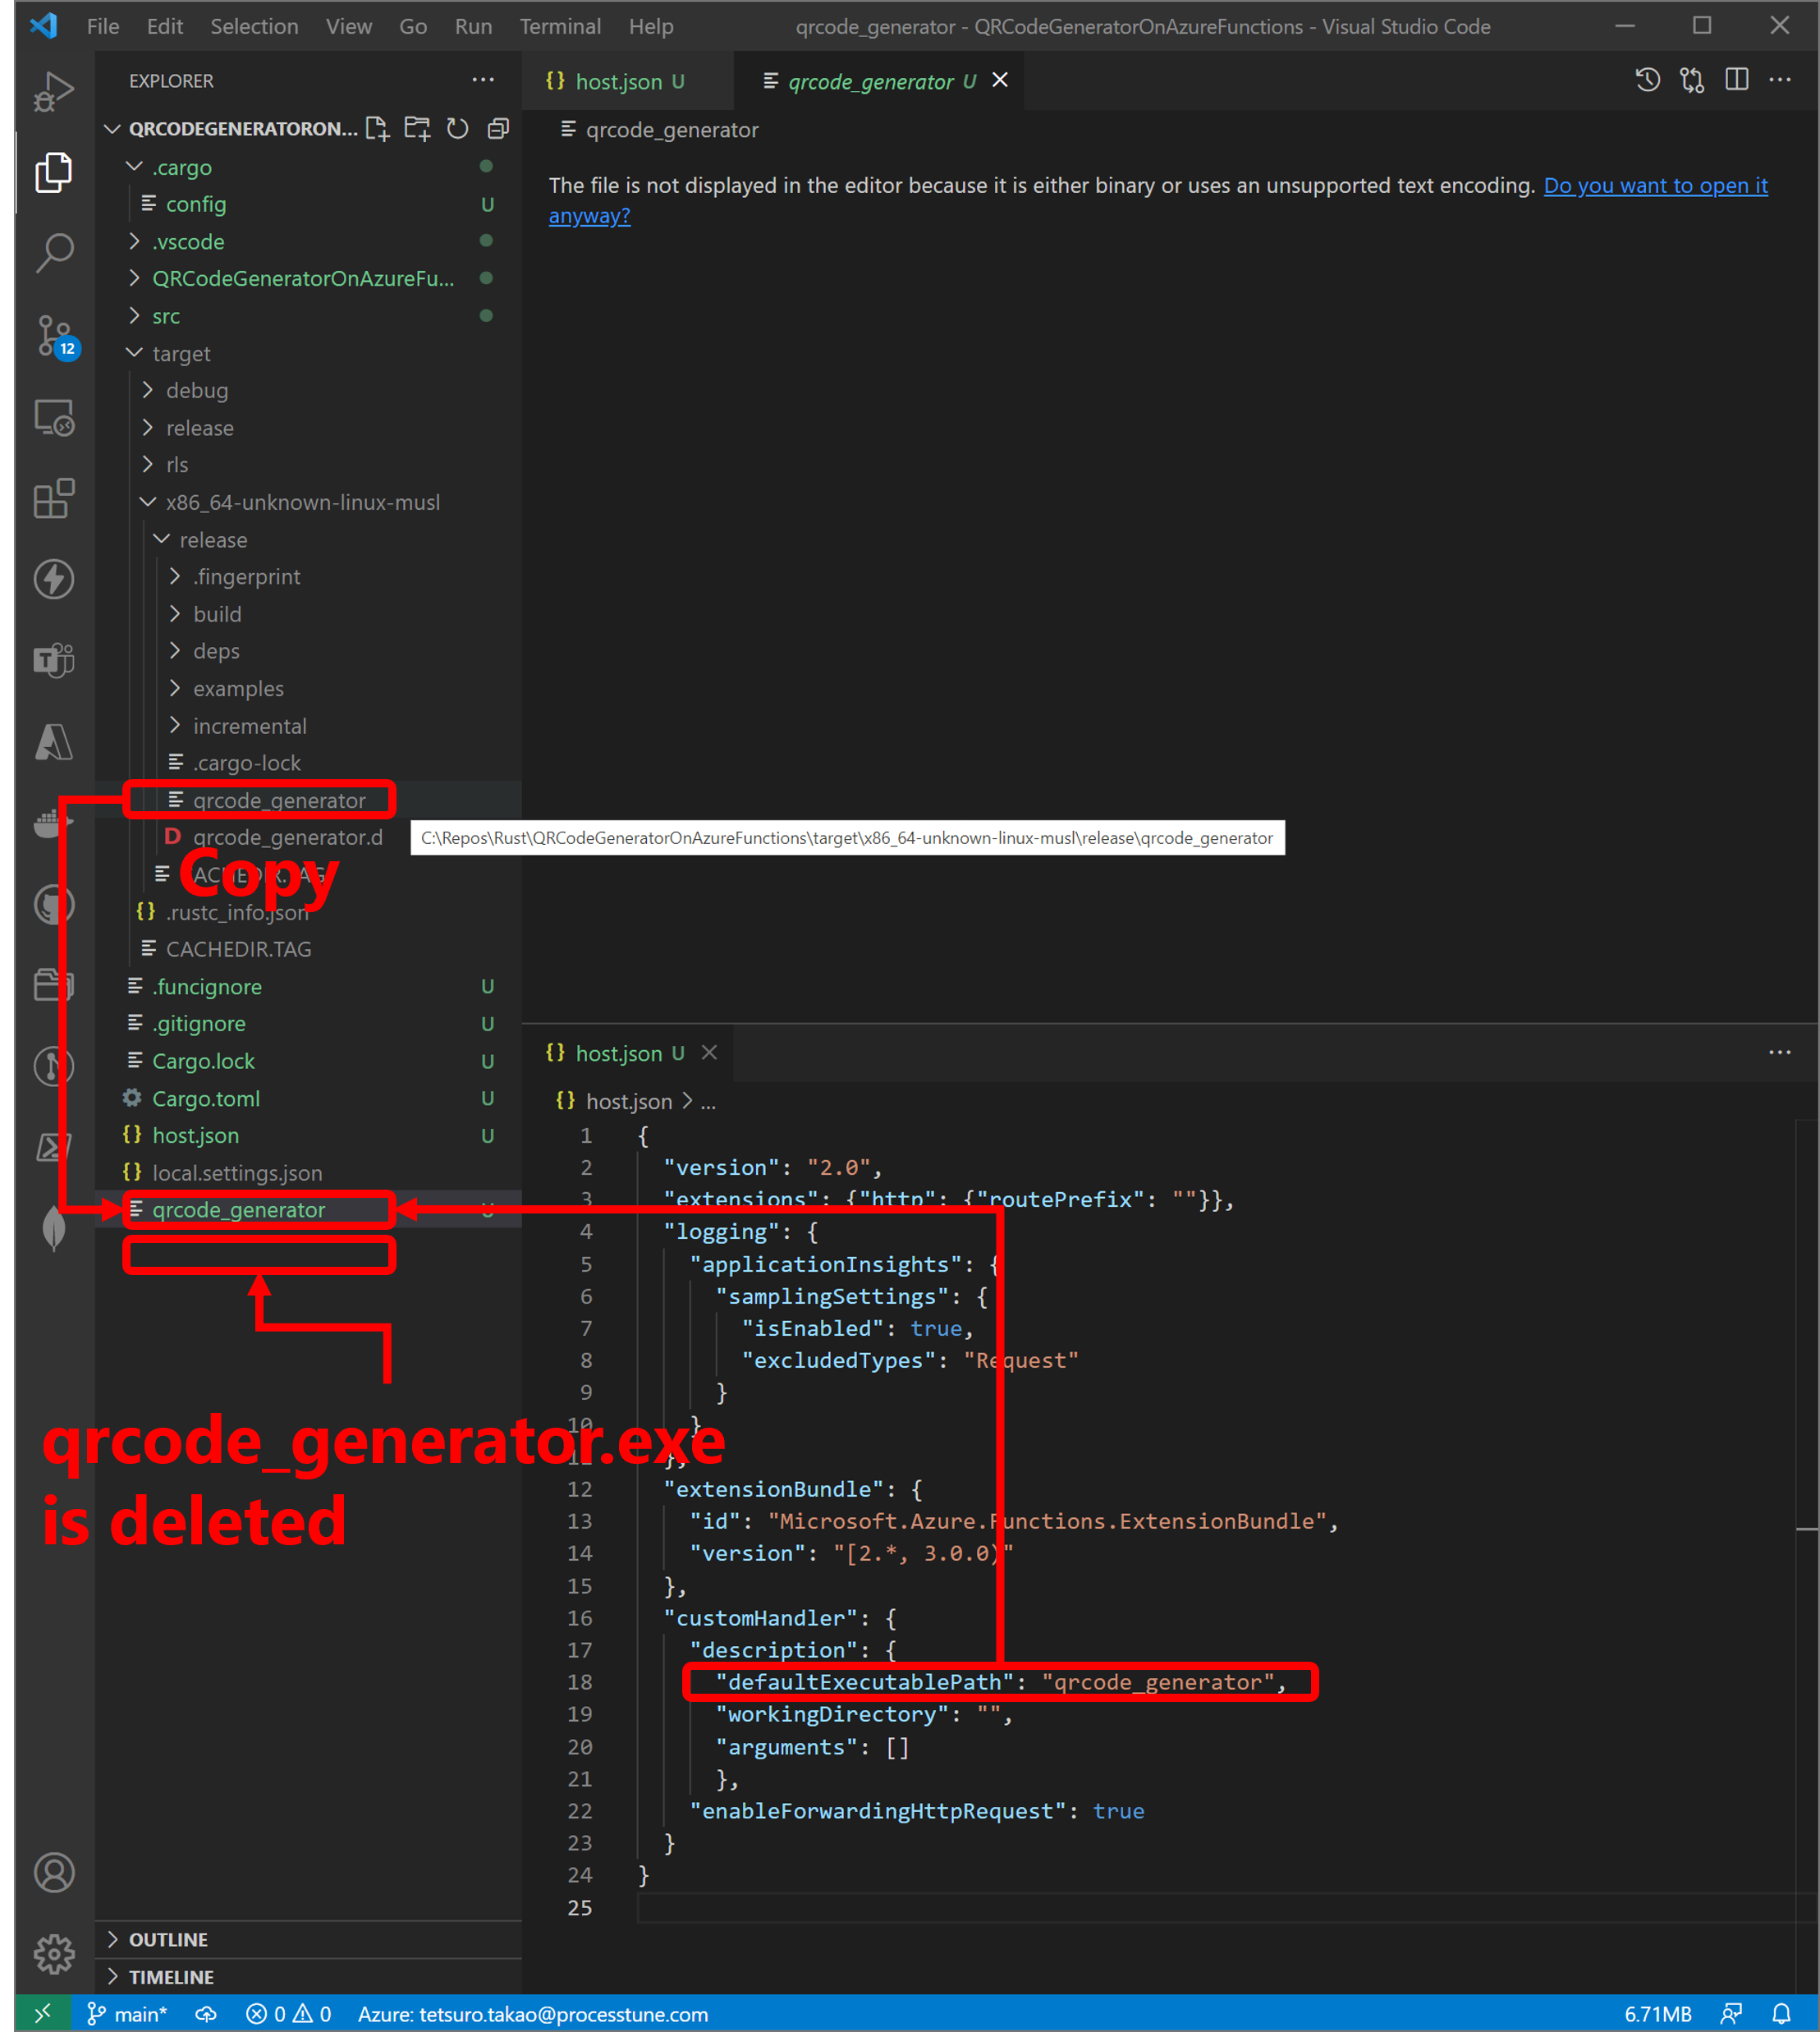
Next, the [%Project root%\target\x86_64-unknown-linux-musl\release\qrcode_generator] file is not uploaded, because Azure Functions Extension uploads a file at project root. Now the [qrcode_generator.exe] is at project root folder, it is execute file for local debug on Windows, so delete it and copy [%Project root%\target\x86_64-unknown-linux-musl\release\qrcode_generator] file to the project root.
Azure Functions extension recognizes only one executable file which [%project name%.exe] file or [%project name%] file. So delete [%project name%.exe] file when upload the executable file to Azure Functions, and copy [%project name%] file to %project root%.
For local debug on Windows, there is [qrcode_generator.exe] value in the [host.json] file to the project root. So modify value of the [defaultExecutablePath] property to [qrcode_generator] at the [description] property of the [customHandler] property for using on Azure Functions (Left figure).
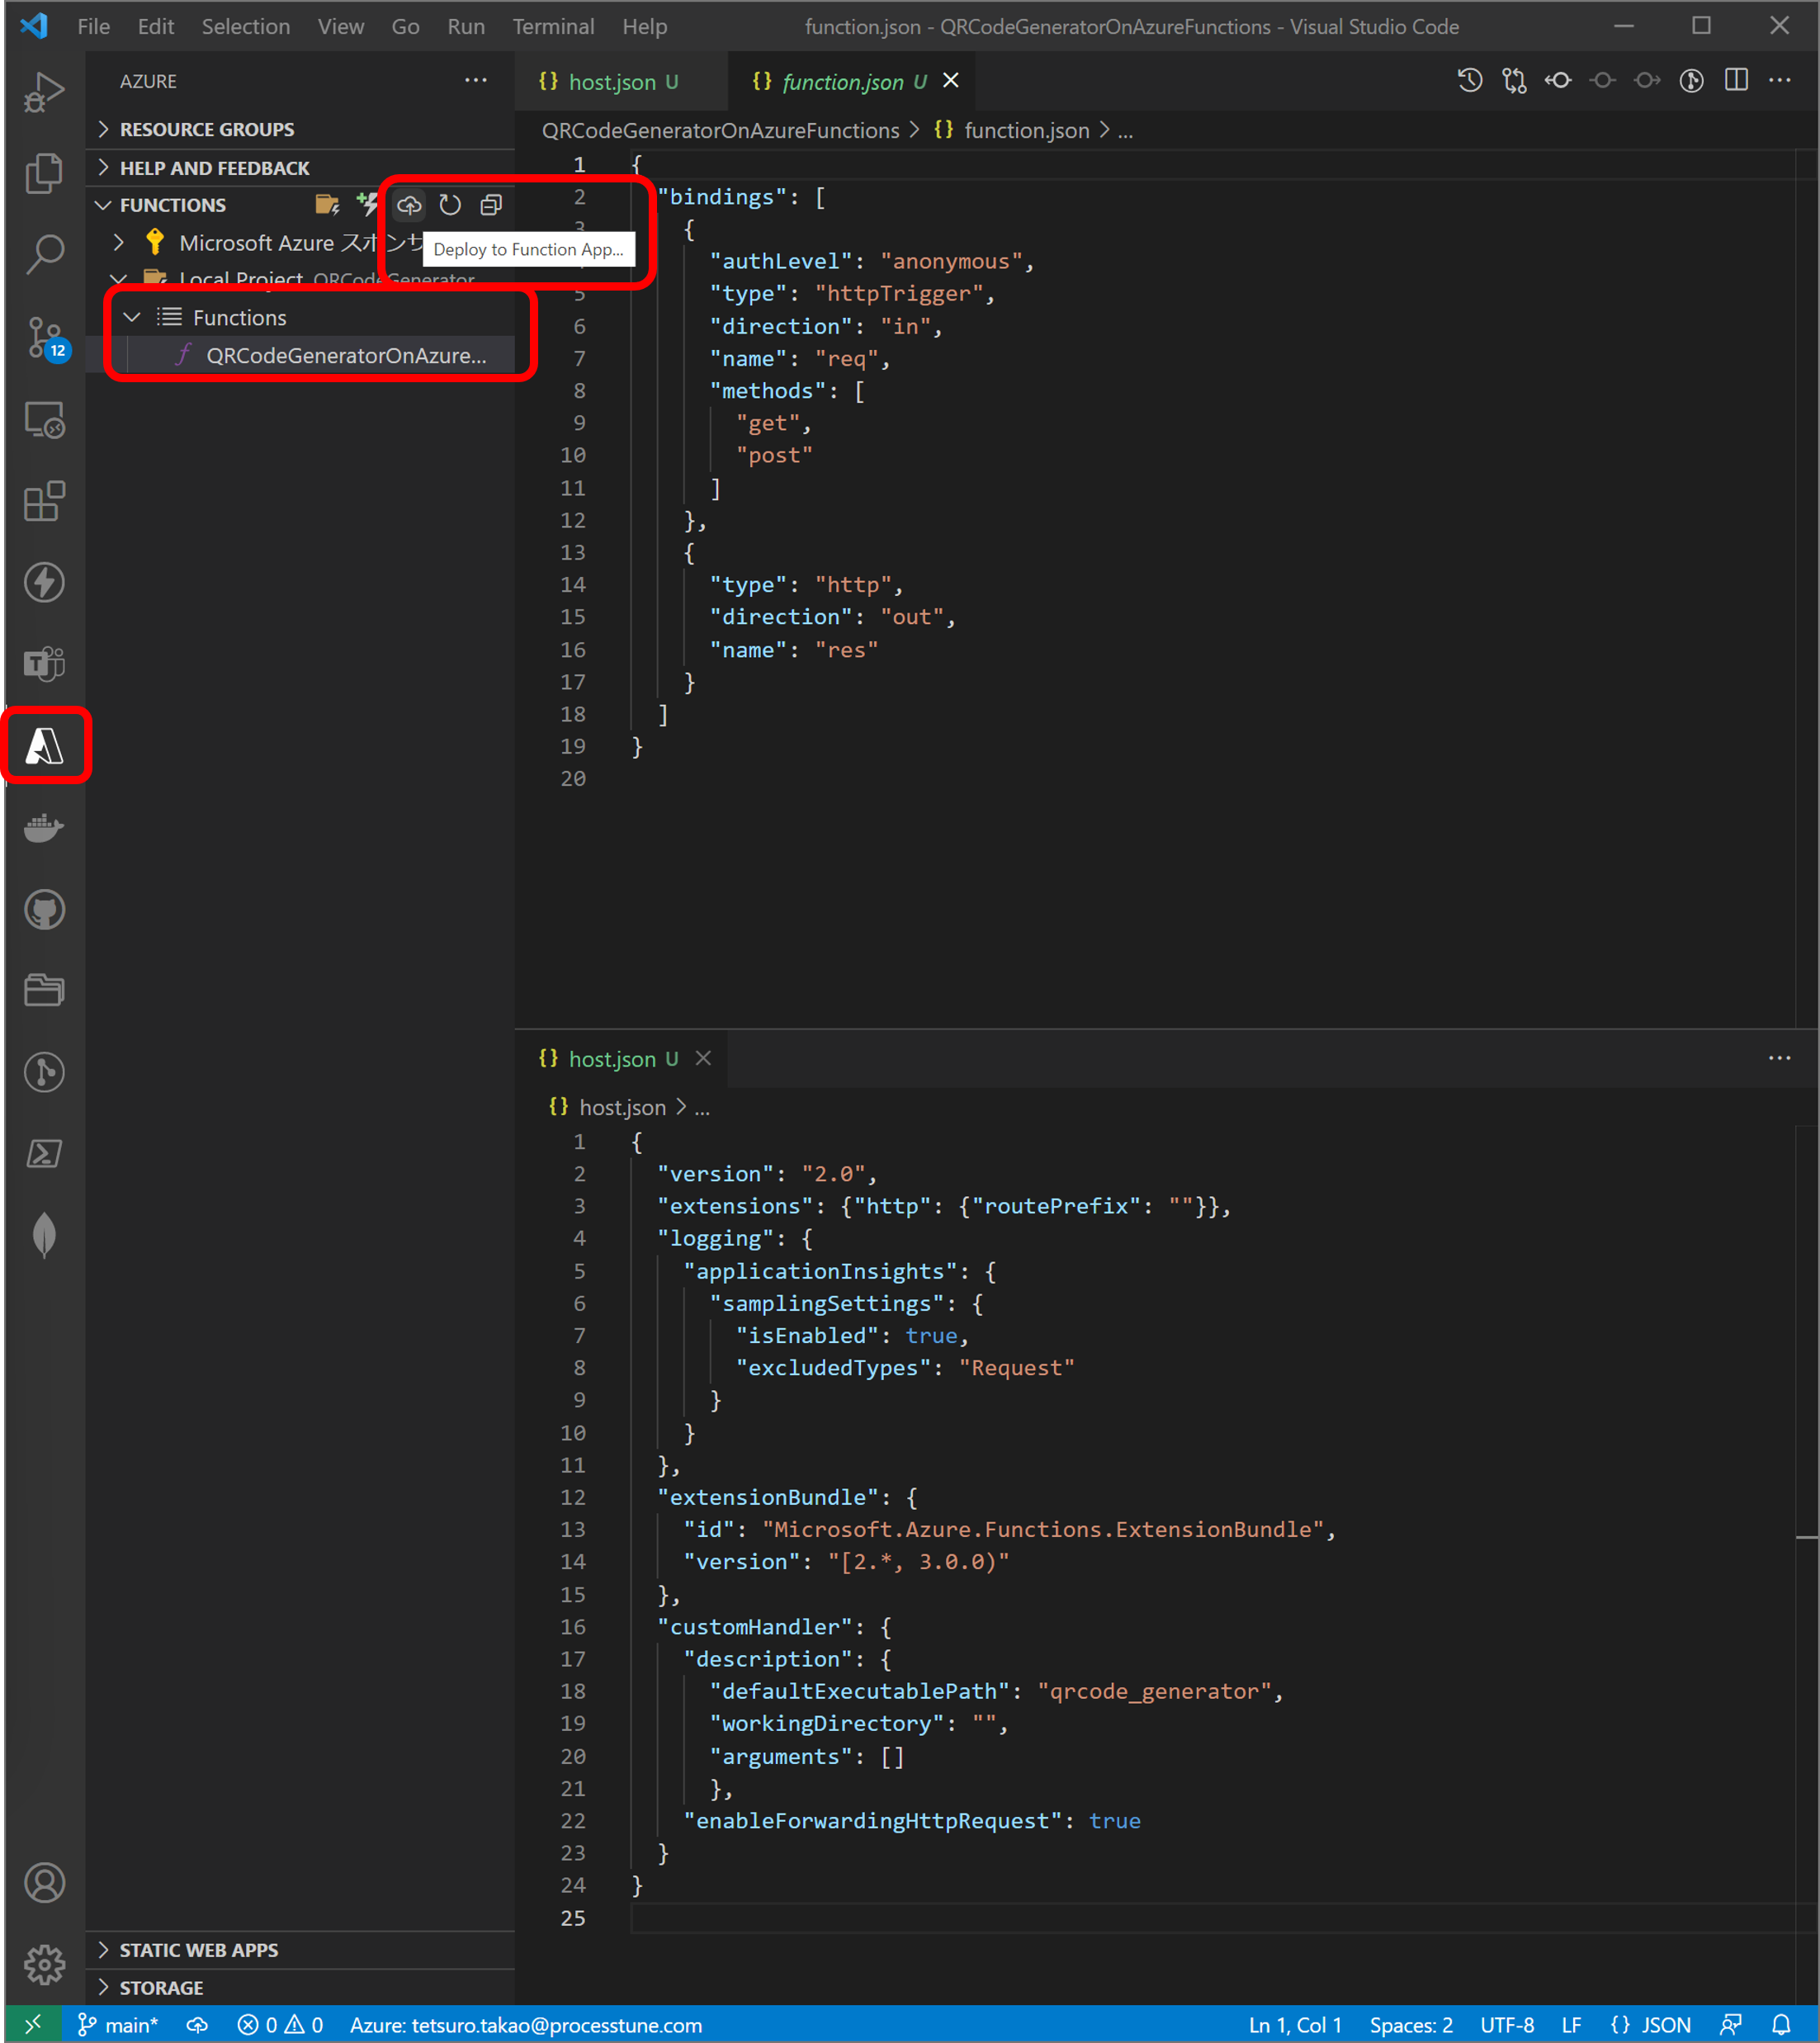
After these preparation of uploading to Azure Functions, Select the [Deploy to Functions App…] icon of the [Azure] extension. (Right figure).
・Step 3. Test on Azure Functions
The [Command palette] shows after select the [Deploy to Functions App…] icon of the [Azure] extension. And already created a Functions app when create local project using the [Azure] extension, so select the name of the Functions app from list. Then proceed confirmation dialog, if the process ended, show conformation of completing, so select the [View output] button to confirm the [OUTPUT] console (Left figure).
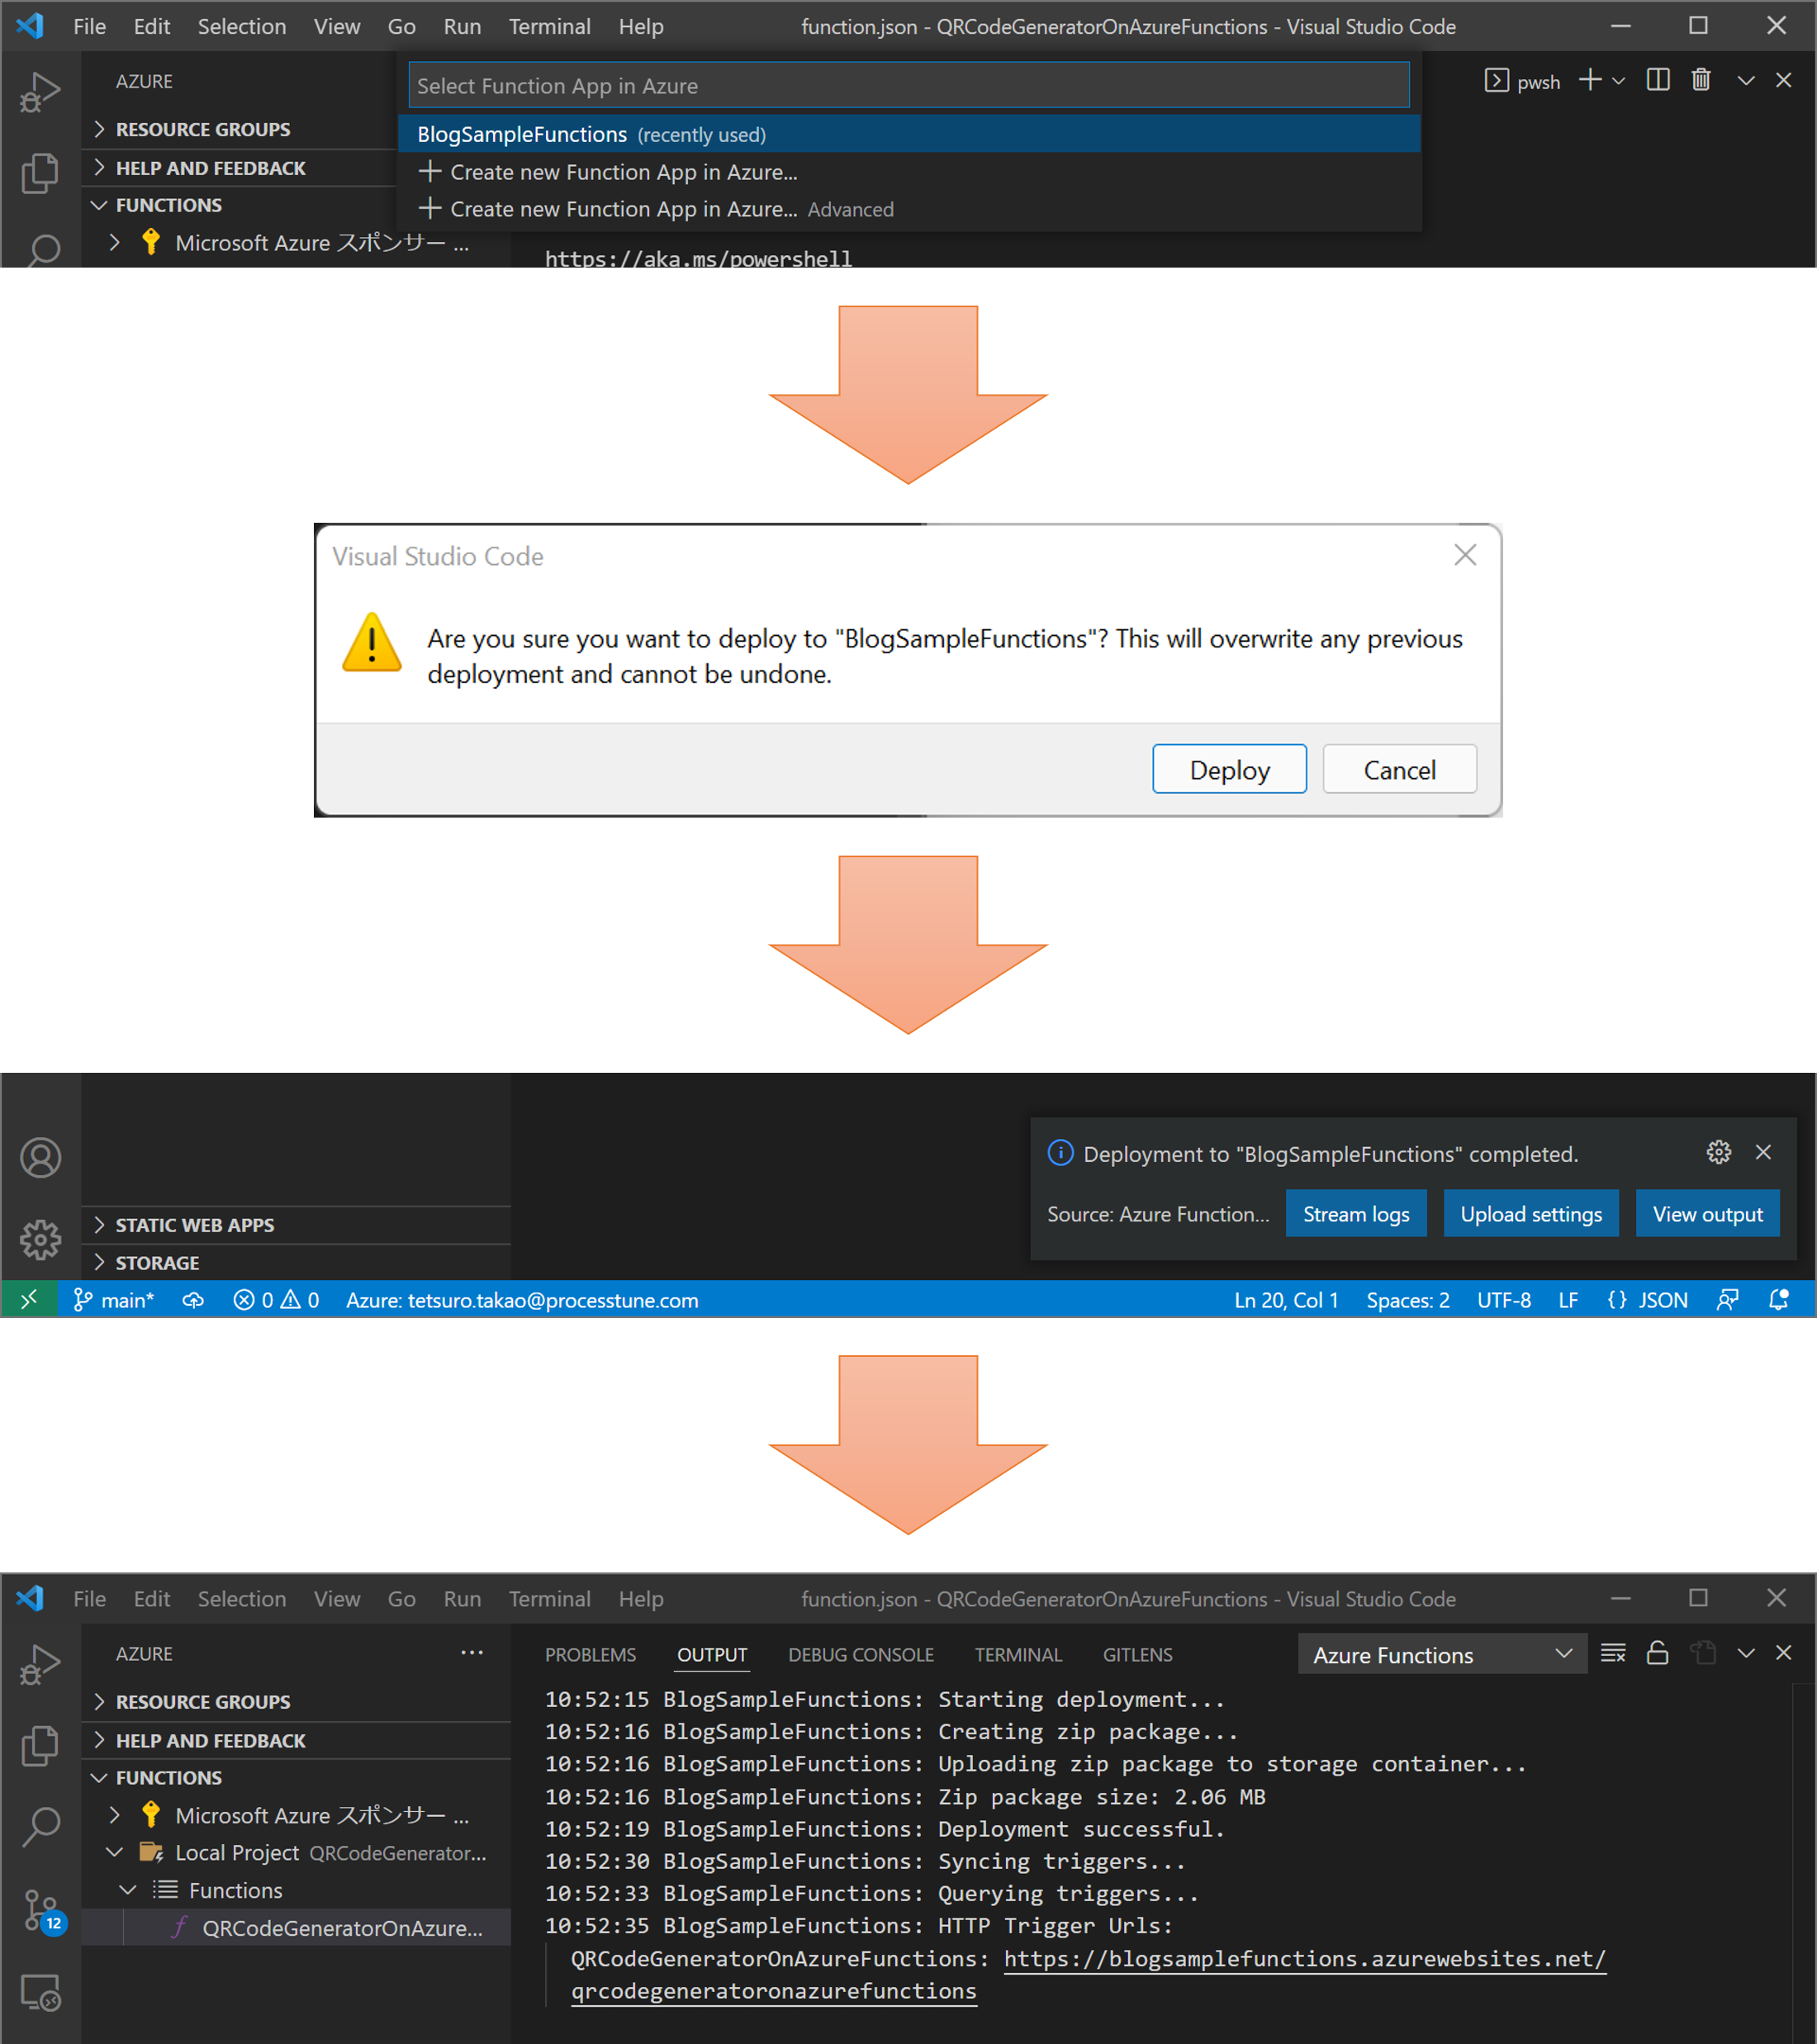

Open Azure Functions on the [Azure portal] for the test (Right figure).
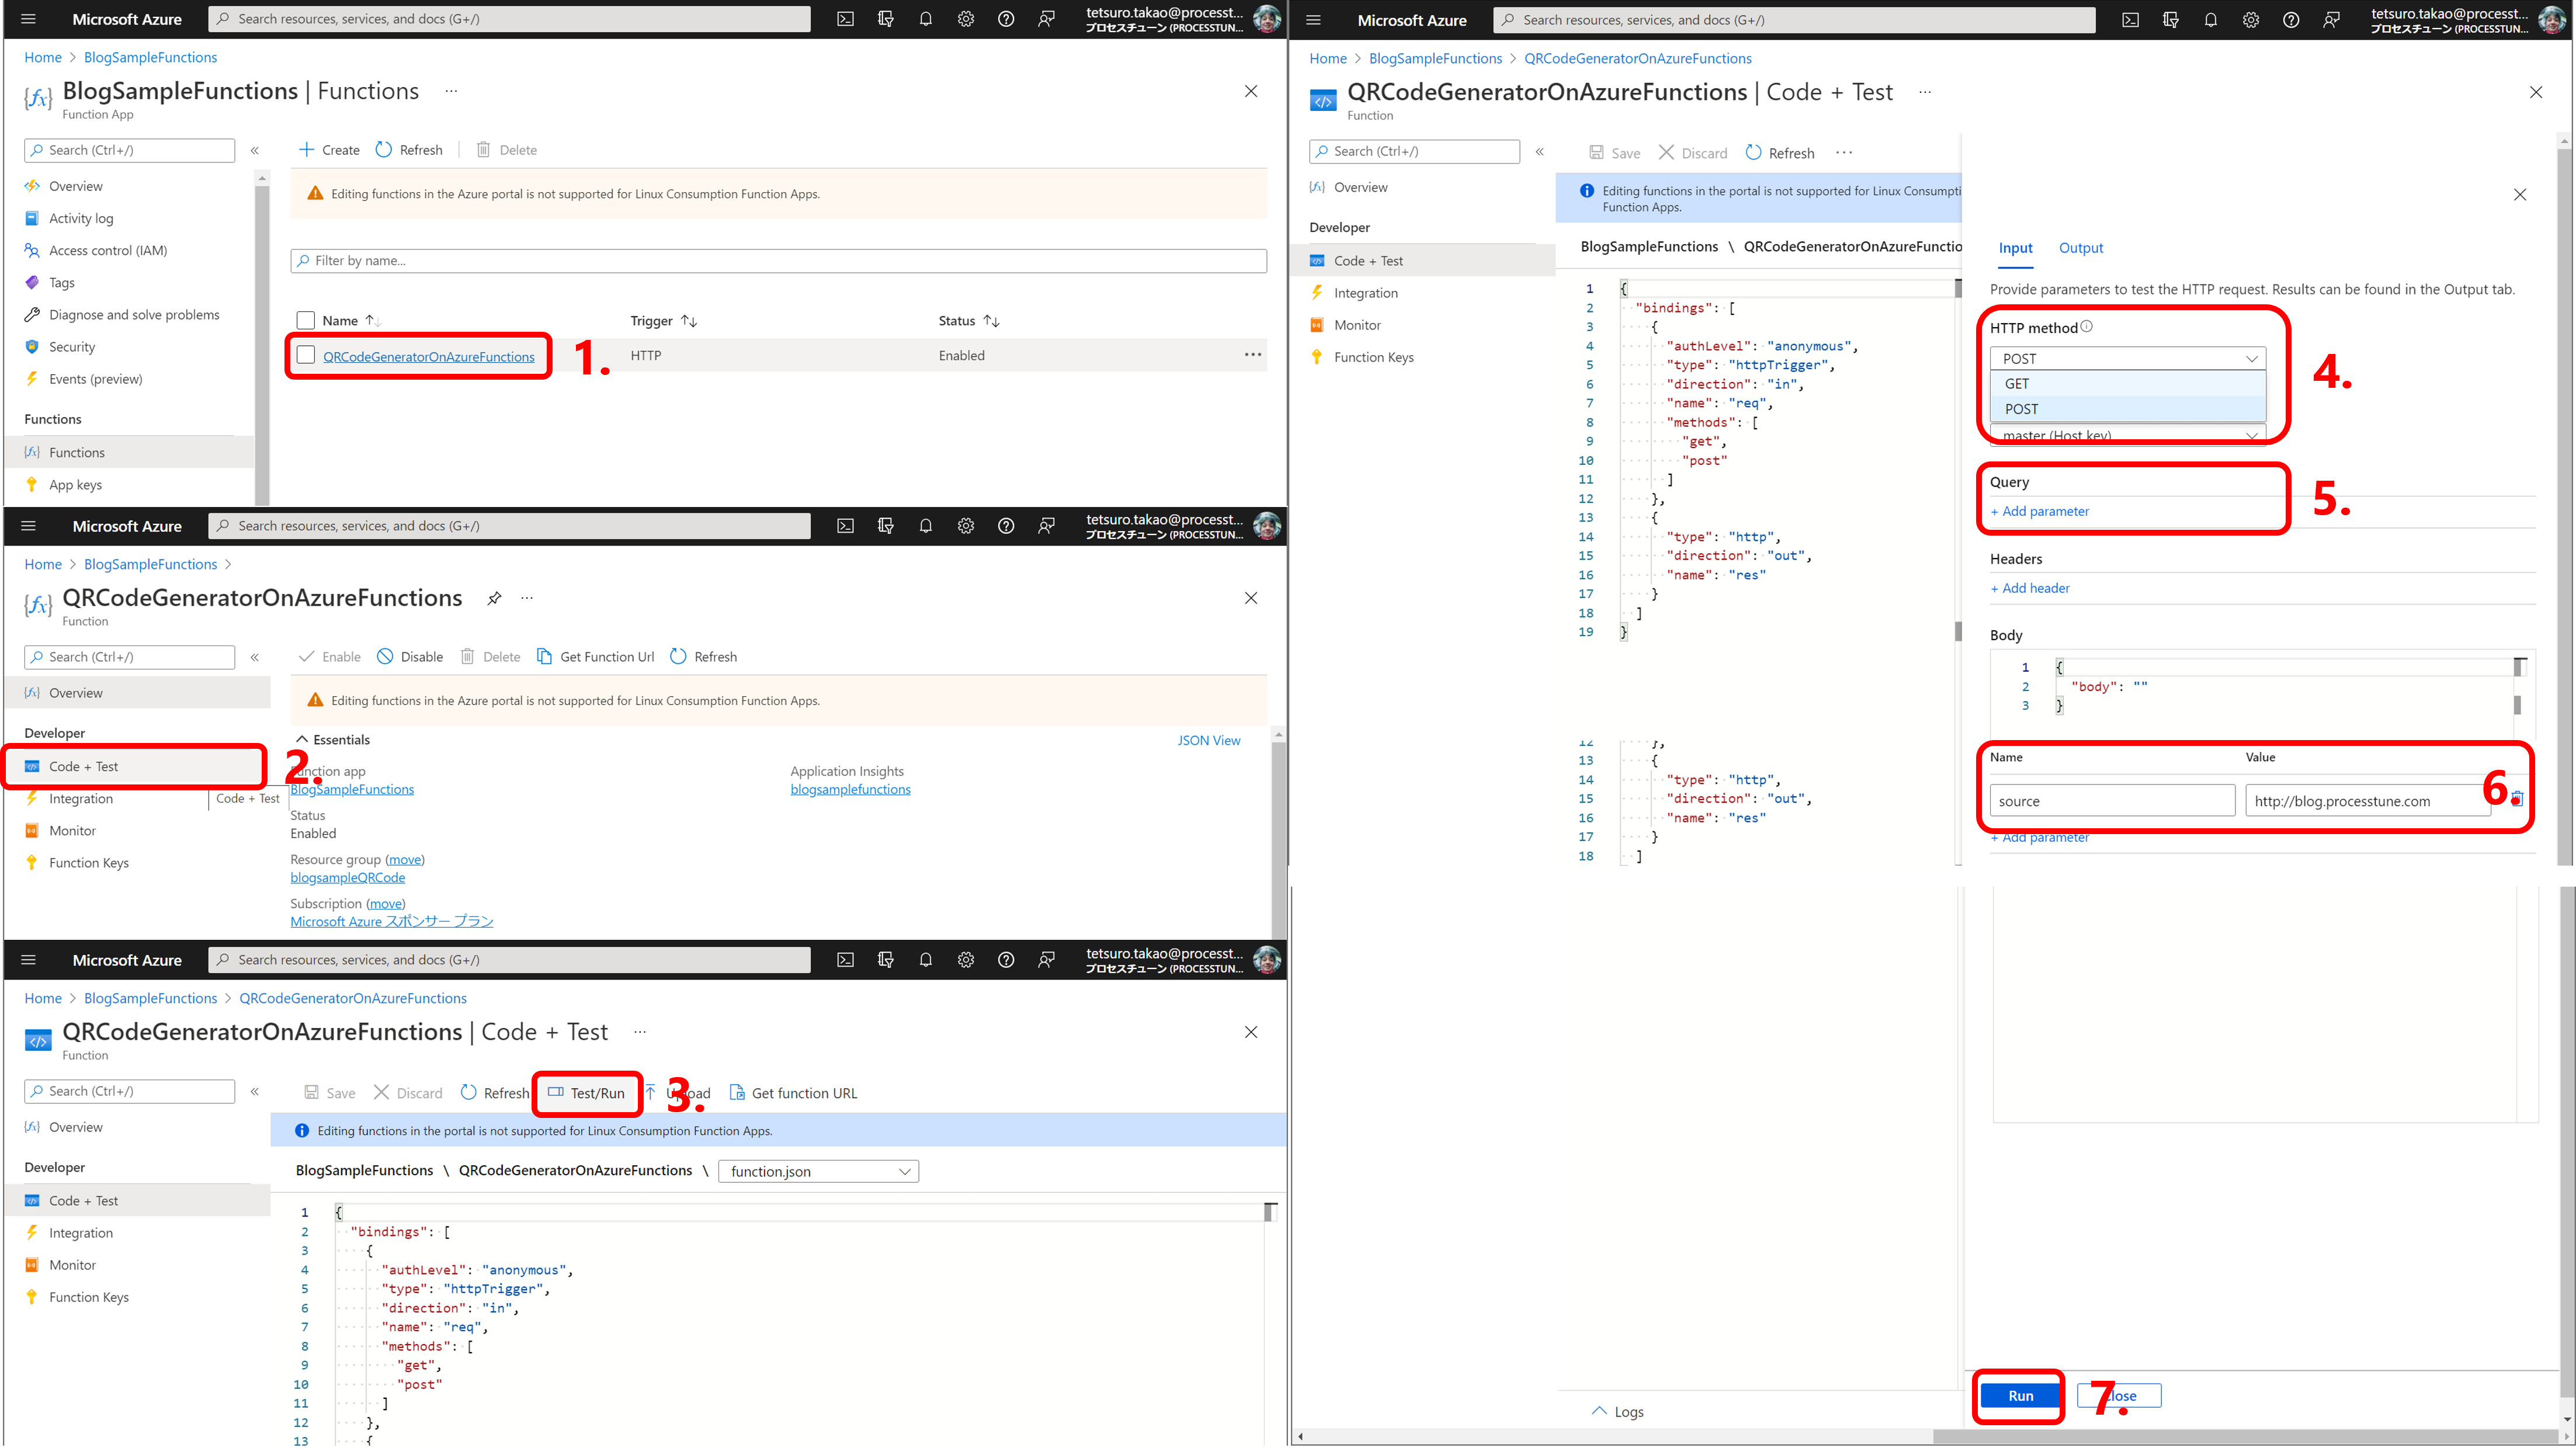
Steps of the test (figure below)
The display change when the [Functions] section selected, then select target function name (1. [QRCodeGenerationOnAzureFunctions] on the figure)
Select the [Code + Test] section in displayed target function (2.)
Select the [Test/Run] tab when navigated display to [Code + Test] (3.)
Select the [GET] item of the [HTTP method] list on the [Input] tab area of [Code + Test], because uploaded Function app has only get method of warp (4.)
Add parameter use the [Name] textbox and the [Value] textbox (6.) showed when select the [Add parameter] link (5.)
At last, select the [Run] button for the test.
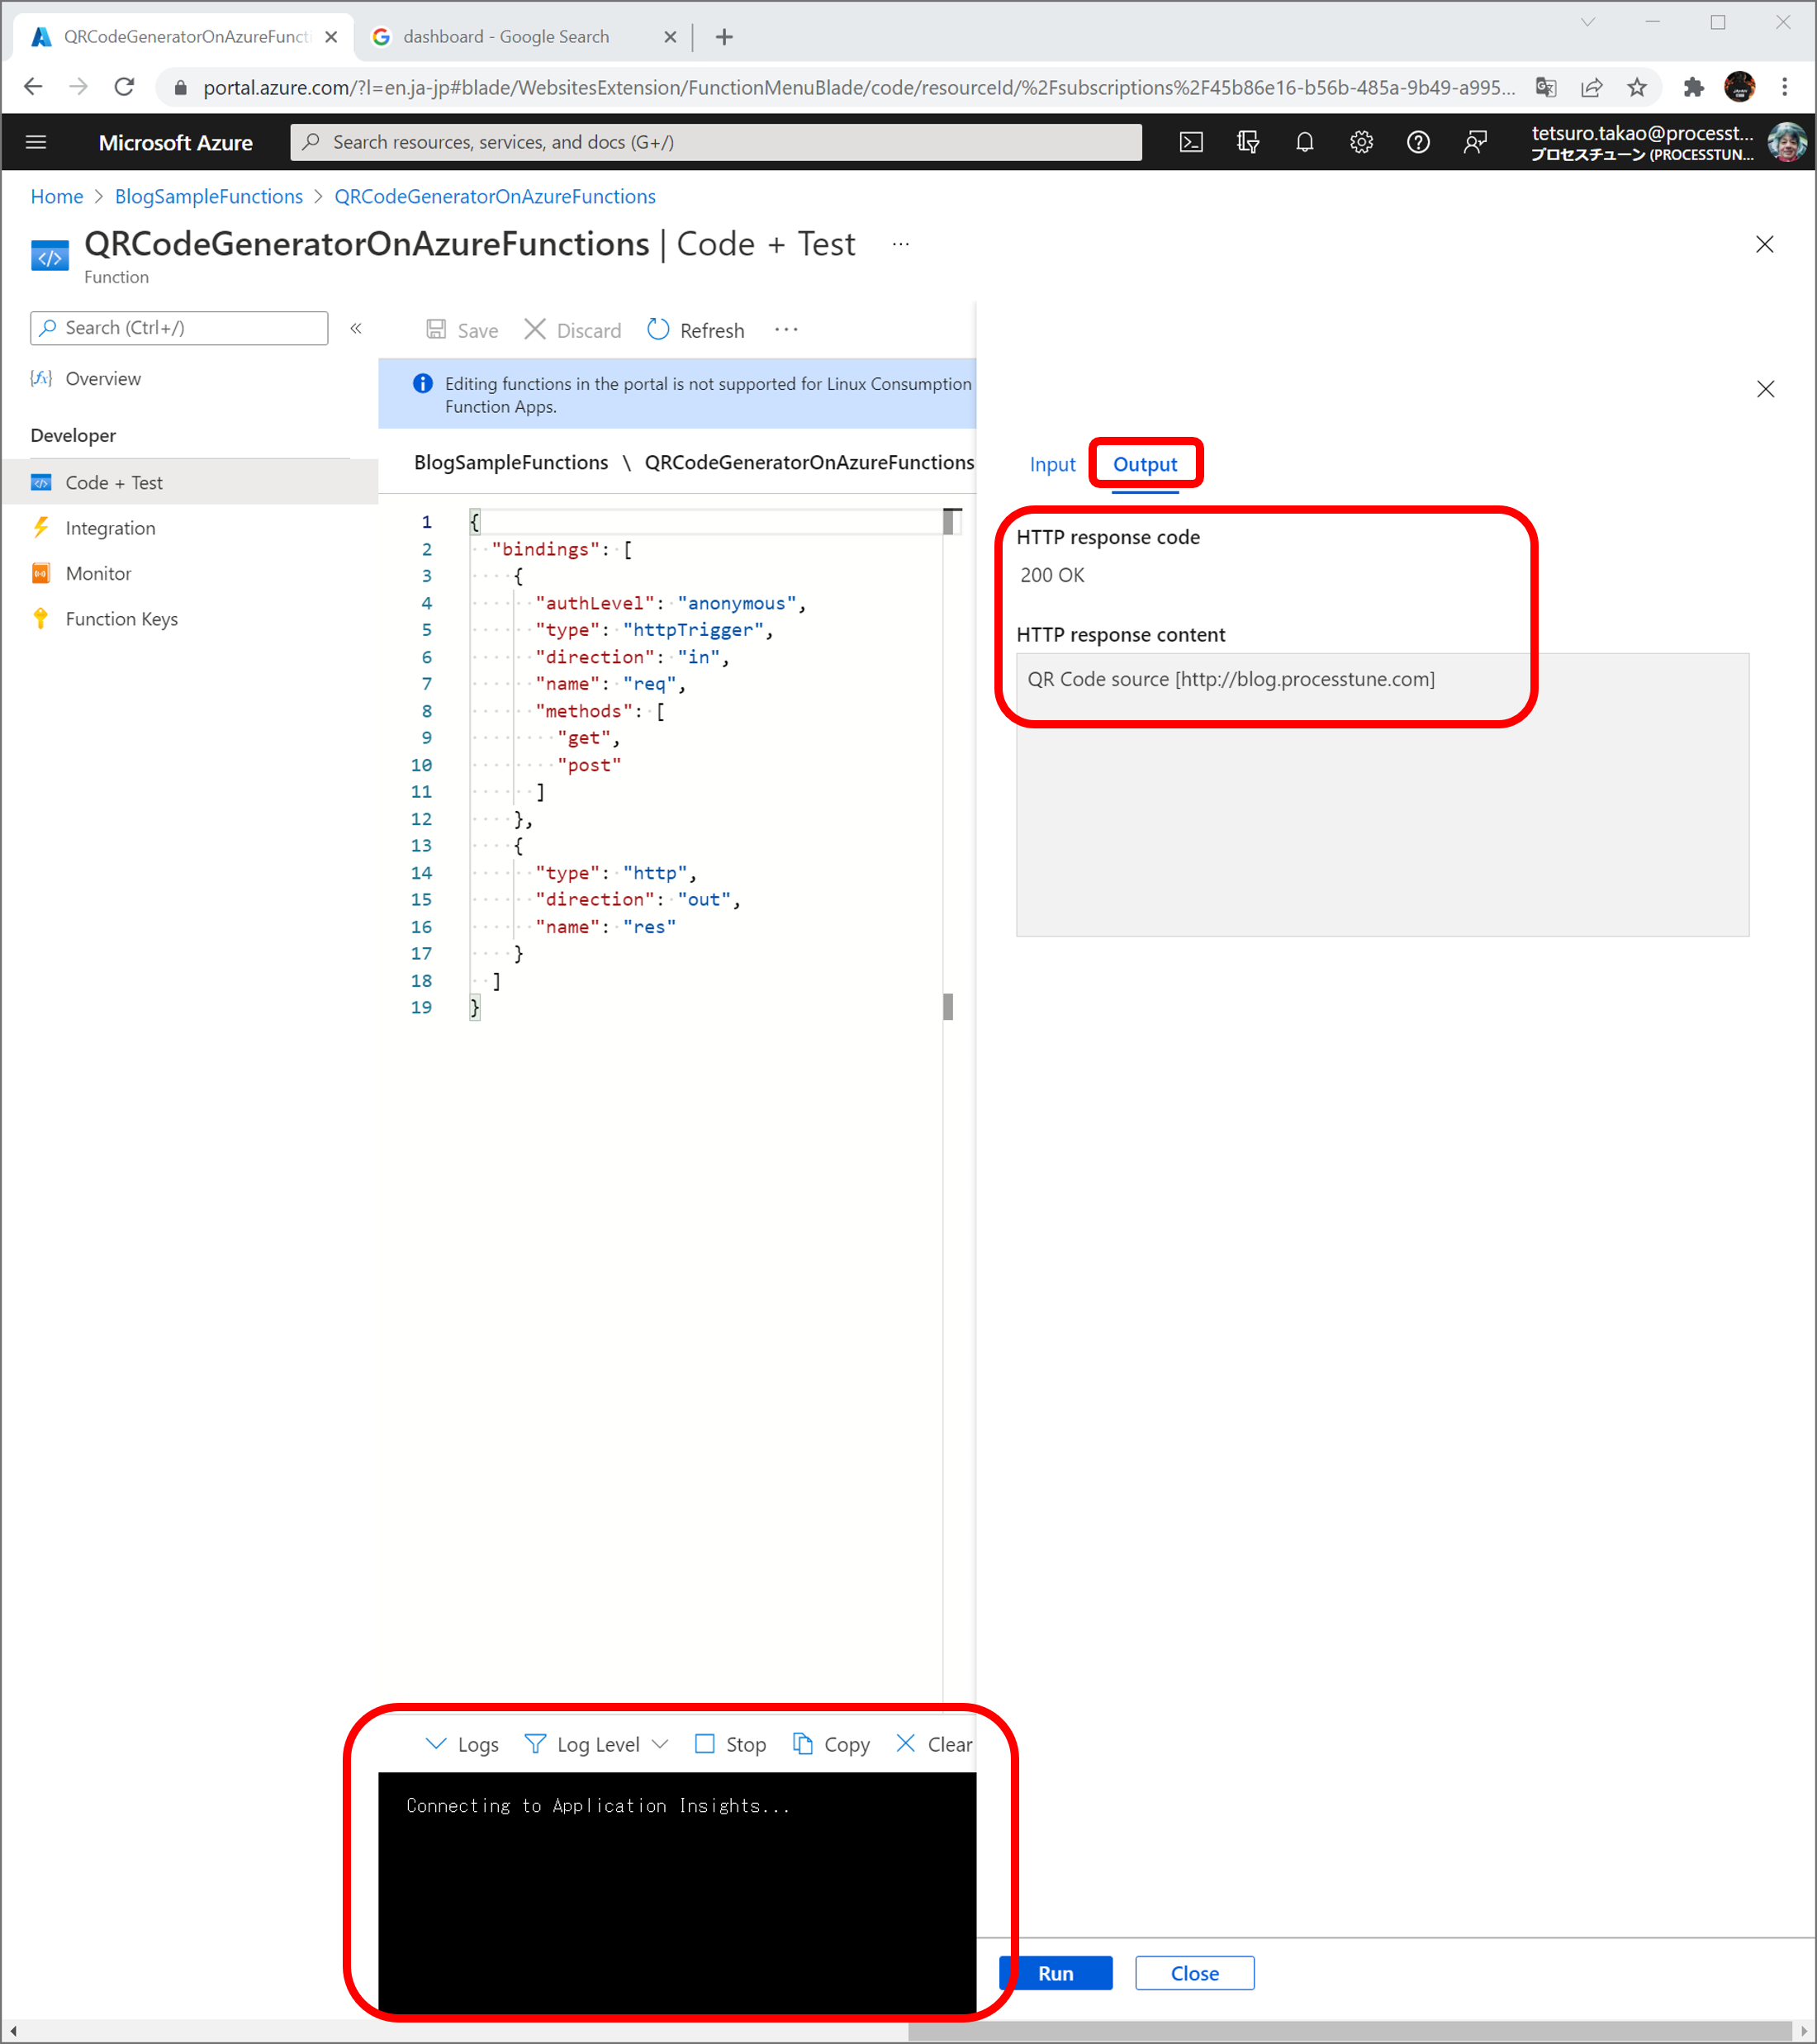
A status of the test process on console showed out, then the display is changed to the [Output] tab area of [Code + Test] in automate. So confirm result of the test is that the [HTTP response code] is [200 OK] and the [HTML response content] is outputted.
>>Sample project (this article created)
No responses yet