
Previous article [ASP.NET Core Options Pattern] describes overview of ASP.NET Core Options Pattern that enables information encapsulation and separation of business logic interest. This feature makes that an application extends some features without affecting existing features.
This article using previous sample code to describe a process of extending feature with ASP.NET Core Options Pattern.
Please select the link [Sample project of previous article] below to download it to refer to code of this article.
>>Sample project of previous article
>>Sample project of this article
• Preparation of this article
In previous article, did not describe steps of implementation, but describe overview of process of development. So, this article describes extending application using the Options Pattern with steps of implementation.
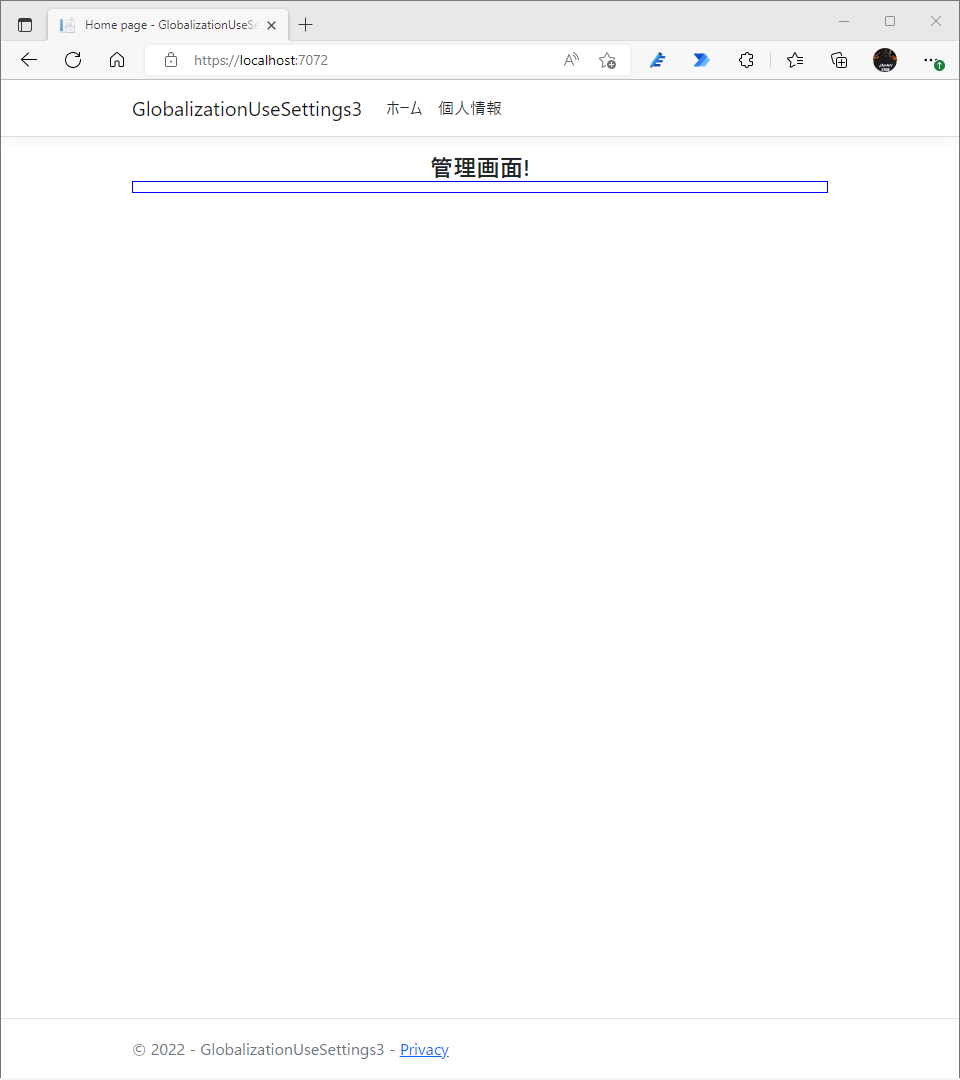
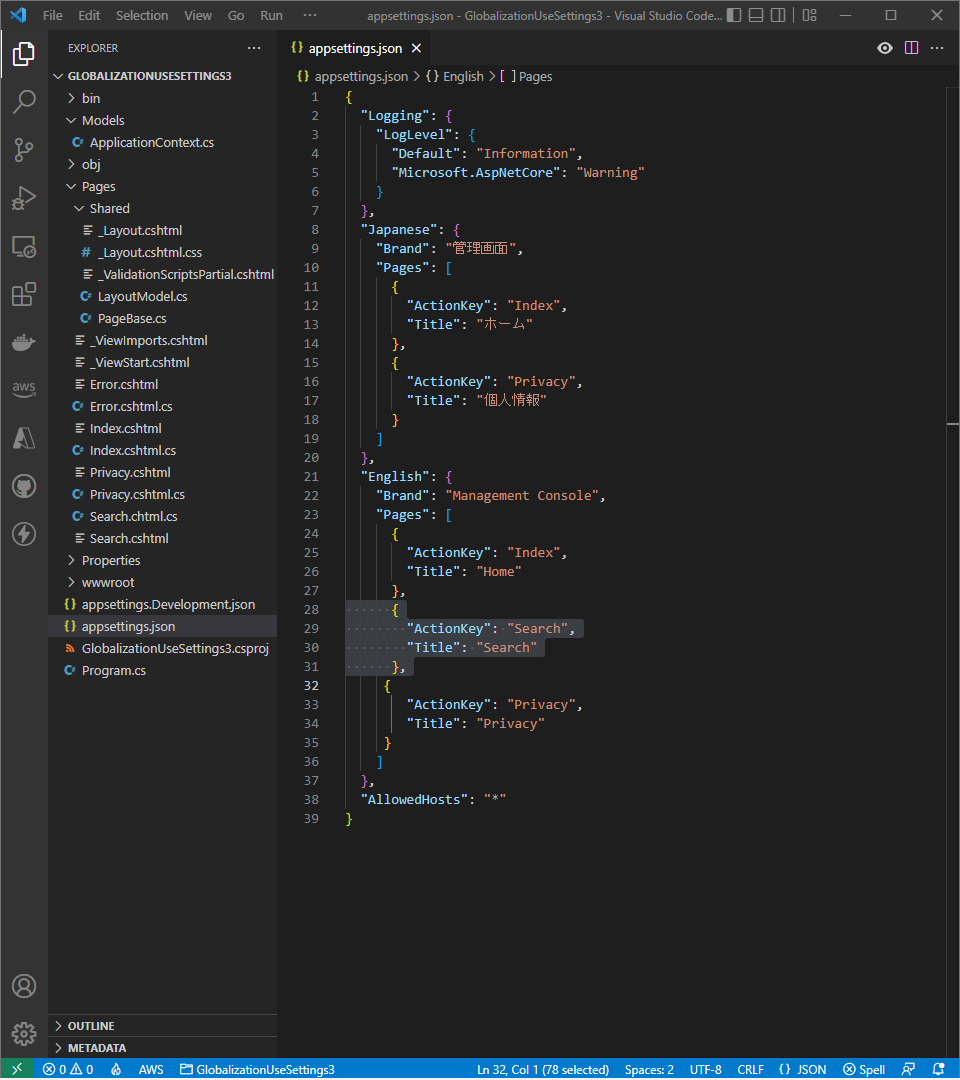
The sample of implementation uses the ‘appsettings.json’ file as a settings that includes two sections of languages the ‘English’ section and the ‘Japanese’ section create screens of an application. This article describes that adding an item of the sections of settings does not affect to another section of the settings.
As concretely, a navigation menu of sample application is created from the settings. Even if adding menu item of the navigation menu in the English screen does not affect to the Japanese screen.
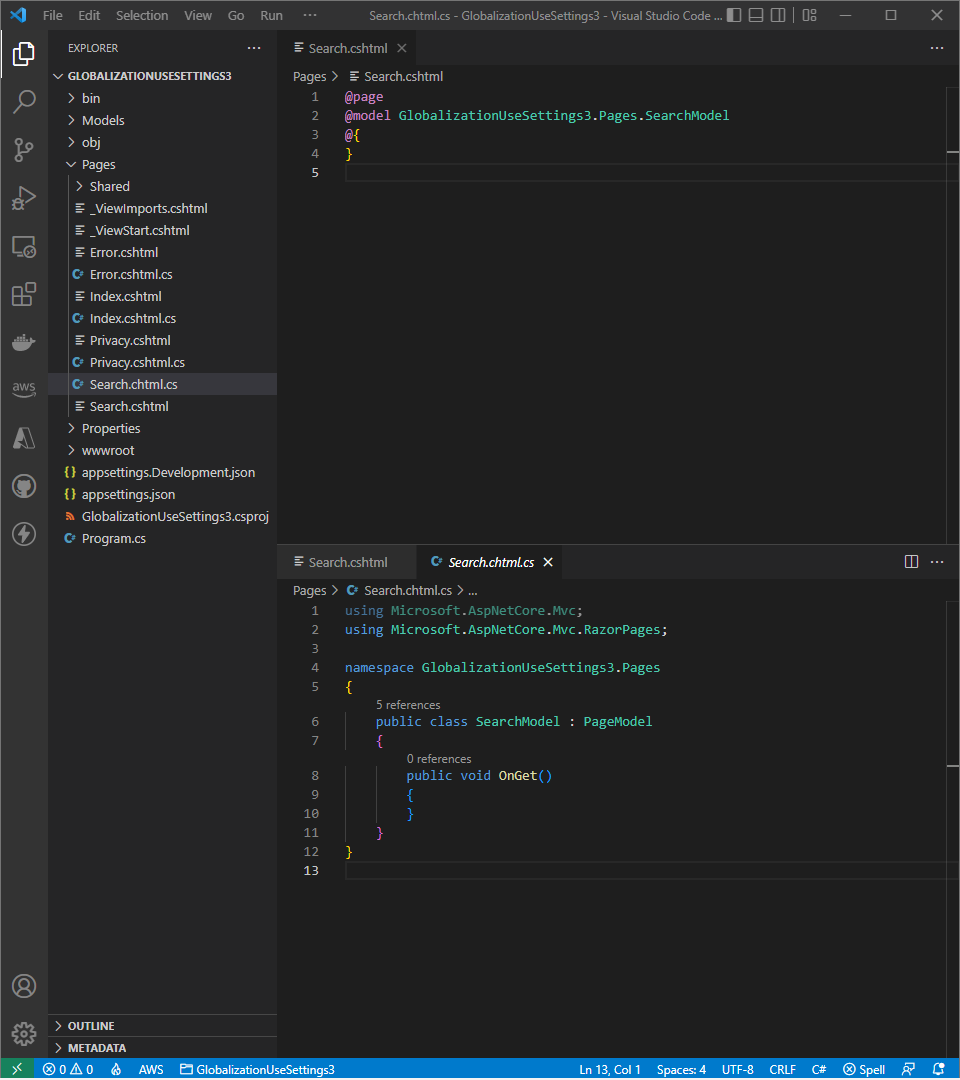
As the screen that navigate from the ‘Index’ screen, this sample includes the ‘Search’ screen made from the ‘Search.cshtml’ file and the ‘Search.cshtml.cs’ file of the ‘Pages’ folder.
Implementation steps are 1. Create .NET ‘webapp’ project, 2. Prepare settings JSON, 3. Prepare a class that has same structure as settings JSON to use the Options Pattern, 4. Add configuration service to the host using the Generic Host feature of .NET, the service has same structure as settings JSON, because the Options Pattern creates a service that uses the class that made at step [3] as DI (Dependency Injection), 5. Use the settings values through the service at each controller (or non-MVC Razor pages).
• Create .NET ‘webapp’ project - Step 1
>Start Visual Studio Code ([code .] at any directory to create the project in Windows terminal)
>Open the terminal window in Visual Studio Code (Press [CTRL + @] in terminal pain)
>Create new 'webapp' project(Put [dotnet new webapp] in terminal pain)
• Prepare settings JSON - Step 2
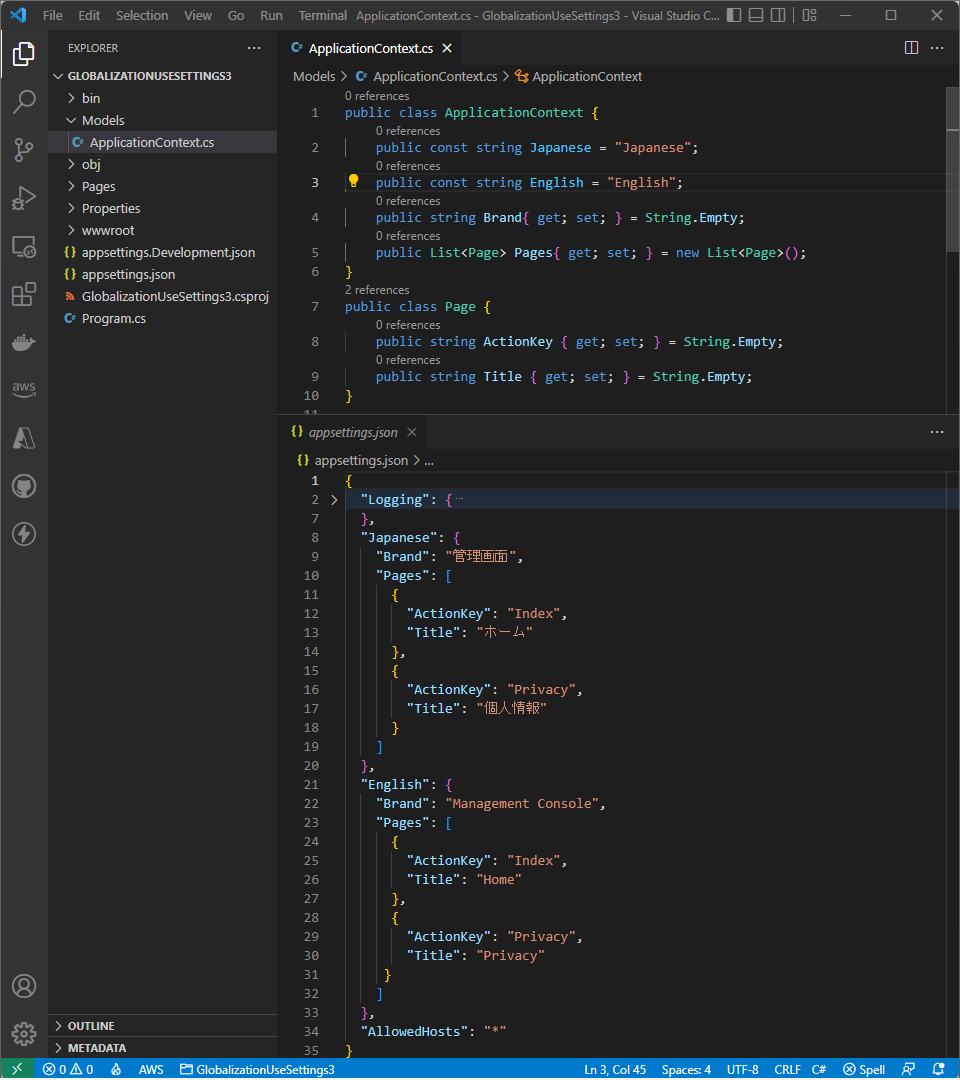
>Copy from the Sample project, or type below in appsettings.json of the project
[%project root directory%\appsettings.json]
{
"Japanese": {
"Brand": "管理画面",
"Pages": [
{
"ActionKey": "Index",
"Title": "ホーム"
},
{
"ActionKey": "Privacy",
"Title": "個人情報"
}
]
},
"English": {
"Brand": "Management Console",
"Pages": [
{
"ActionKey": "Index",
"Title": "Home"
},
{
"ActionKey": "Privacy",
"Title": "Privacy"
}
]
}
}
• A class that has same structure as settings JSON – Step 3
The ‘appsettings.json’ file has the ‘Japanese’ section and the ‘English’ section, the Options Pattern represents it as constant string. The ‘ApplicationContext’ class below provides two objects that identifyed using name ‘English’ and ‘Japanese’, each object has the ‘Brand’ property, and the ‘Pages’ property that is collection of the ‘Page’ object which has the ‘ActionKey ‘ property and the ‘Title’ property.
This procedure for specification is the Options Pattern specific that reduces same statement of the class to define same structure. Please compare the ‘appsettings.json’ above and the ‘ApplicationContext’ class below.
[%project root directory%\Models\ApplicationContext.cs]
public class ApplicationContext {
    public const string Japanese = "Japanese";
    public const string English = "English";
    public string Brand{ get; set; } = String.Empty;
    public List Pages{ get; set; } = new List();
}

public class Page {
    public string ActionKey { get; set; } = String.Empty;
    public string Title { get; set; } = String.Empty;
}
The ‘ApplicationContext’ class as the ‘ApplicationContext.cs’ file create in the ‘Models’ folder that create new at the project.
• Add configuration service to the host – Step 4
In the ‘Program.cs’ file of the project root, adds statement ‘builder.Services.Configure
[%project root directory%\Program.cs]
var builder = WebApplication.CreateBuilder(args);
builder.Services.AddRazorPages();
// Add this code
builder.Services.Configure(builder.Configuration);
// Only this one code
var app = builder.Build();
if (!app.Environment.IsDevelopment())...
...
app.Run();
• Use the settings values at each controller (or non MVC razor pages) – Step 5
Each method of a Controller if MVC, or OnGet method of the Razor pages if it’s not MVC could provides settings values to client UI.
Sample is non MVC Razor page, so move to Pages directory using [cd pages] command in the ‘terminal’ pain and type [dotnet new pages -na %namespace%] to add a page in Pages folder of the project, make its page able to navigate from Index in follow step. Replace the part [%namespace%] to the namespace of development environment that can copy from the ‘Index.cshtml.cs’.
Modify a name of the model ‘PagesModel’ to ‘SearchModel’ in the ‘Pages.cshtml’ file, and file name to ‘Search.cshtml’. And modify class name ‘PagesModel’ to ‘SearchModel’ in the ‘Pages.cshtml.cs’ and file name to ‘Search.cshtml.cs'(refer to the figure below left).
Next step is modifying ‘Index’ screen, because of this web app starts from the ‘Index’ screen.
Put configuration service into class-scoped variable at class constructor of the ‘Index.cshtml.cs’, to use in OnGet method. Put settings values to ViewData at OnGet method using class-scoped variable (refer to the figure below right).
The ‘GetSection’ method of configuration service provides settings value of specific section (this sample is ‘English’ section) to bind to class-scoped variable that structed as same with the ‘appsettings.json’. Then put settings values in ViewData using a type, in OnGet method. Thus, this coding style is very effectively.
[%project root directory%\Pages\Index.cshtml.cs] public SearchModel(ILoggerlogger, IConfiguration configuration) { Context = new ApplicationContext(); configuration.GetSection(ApplicationContext.English).Bind(Context); // Use below code if you want show Japanese settings values. // configuration.GetSection(ApplicationContext.Japanese).Bind(Context); } public void OnGet() { ViewData["Brand"] = Context.Brand; ViewData["Pages"] = Context.Pages; var current = Context.Pages.Where(p => p.ActionKey == "Index") .FirstOrDefault(); if(current != null){ ViewData["Title"] = current.Title; } } [%project root directory%\Pages\Index.cshtml] <div class="text-center"> <h4>@ViewData["Brand"]! <div style="border:thin solid #00f;text-align:left;padding:5px;"></div> </div>
• Navigate from Index to Search
Definition in the ‘Index.cshtml.cs’ file is lost affect when navigate to the ‘Search’ screen, thus definition like this has to set to global scope of application. For it, create new file ‘PageBase.cs’ at the ‘Shared’ folder of the ‘Pages’ folder of project root, then copy all code of the ‘Index.cshtml.cs’ file to it. After it, modify as below code. Let literal code ‘Index’ that represents current screen as it is, only modify ‘IndexModel’ to ‘PageBaseModel’ here.
[%project root directory%\Pages\Shared\PageBase.cs]
using Microsoft.AspNetCore.Mvc;
using Microsoft.AspNetCore.Mvc.RazorPages;

namespace GlobalizationUseSettings3.Pages
{
    // public class IndexModel:PageModel
    public class PageBaseModel:PageModel
    {
        private readonly ILogger _logger;
        private readonly ApplicationContext Context;

        // public IndexModel(ILogger<IndexModel> logger, IConfiguration configuration, string language)
        public PageBaseModel(ILogger<PageBaseModel> logger, IConfiguration configuration)
        {
            _logger = logger;
            Context = new ApplicationContext();
            configuration.GetSection(language).Bind(Context);
       }

        public void OnGet()
        {
            ViewData["Brand"] = Context.Brand;
            ViewData["Pages"] = Context.Pages;
            var current = Context.Pages.Where(p => p.ActionKey == "Index").FirstOrDefault();
            if(current != null){
                ViewData["Title"] = current.Title;
            }
        }
    }
}
In the ‘Index.cshtml.cs’ file, modify the ‘IndexModel’ class that is extend of the ‘PageModel’ class to extend of the ‘PageBaseModel’ class as below code. And let’s change the screen language to Japanese in this time.
[%project root directory%\Pages\Index.cshtml.cs]
using Microsoft.AspNetCore.Mvc;
using Microsoft.AspNetCore.Mvc.RazorPages;

namespace GlobalizationUseSettings3.Pages;

// public class IndexModel : PageModel
public class IndexModel : PageBaseModel
{
    // private readonly ILogger _logger;
    // private readonly ApplicationContext Context;

    // public IndexModel(ILogger logger, IConfiguration configuration)
    public IndexModel(ILogger logger, IConfiguration configuration)
                : base(logger, configuration, ApplicationContext.Japanese)
    {
        // _logger = logger;
        // Context = new ApplicationContext();
        // configuration.GetSection(ApplicationContext.English).Bind(Context);
    }

    // public void OnGet()
    // {
    //     ViewData["Brand"] = Context.Brand;
    //     ViewData["Pages"] = Context.Pages;
    //     var current = Context.Pages.Where(p => p.ActionKey == "Index").FirstOrDefault();
    //     if(current != null){
    //         ViewData["Title"] = current.Title;
    //     }
    // }
}
Next step is control of the current page title and adding navigation menu item for the ‘Search’ screen.
To obtain current screen, get the ‘HttpContext’ object of HTTP request and get values of the ‘RouteData’ object of the ‘HttpContext’ object. This ‘RouteData’ object includes URL address string as relatively of current screen. On the other hands, strings for title of screens set in the ‘appsettings.json’ file is mapped to the ‘ApplicationContext’ class. Thus the ‘Title’ property of the ‘Page’ object use for current screen is able to identify in the ‘Pages’ collection of the ‘ApplicationContext’ class if acquired URL address string match to the ‘ActionKey’ property of the ‘Page’ object. Delete ‘/’ string to compare acquired URL address string with the ‘ActionKey’ property of the ‘Page’ object use the ‘RegularExpression’ object.
Modify the ‘OnGet()’ method of the ‘PageBase.cs’ file like as below code.
[%project root directory%\Pages\Shared\PageBase.cs]
using System.Text.RegularExpressions;
...
        public void OnGet()
        {
            ViewData["Brand"] = Context.Brand;
            ViewData["Pages"] = Context.Pages;
            // var current = Context.Pages.Where(p => p.ActionKey == "Index").FirstOrDefault();
            // if(current != null){
            //     ViewData["Title"] = current.Title;
            // }
            var p = Request.HttpContext.GetRouteData()!.Values["Page"]!.ToString();
            var rx = new Regex(@"\w.*",RegexOptions.Compiled | RegexOptions.IgnoreCase);
            var m = rx.Matches(p!).FirstOrDefault()!.Value;
            ViewData["Title"] = Context.Pages.Where(p => p.ActionKey == m).FirstOrDefault()!.Title;
        }
Last step of navigate to the ‘Search’ scree is Modify the ‘_Layout.cshtml’ file to create navigation menu item for ‘Search’ screen.
Like as a title of current screen, This menu item is also created from the ‘Page’ object defined in the ‘ApplicationContext’ class. The ‘Page’ class has the ‘ActionKey’ property and the ‘Title’ property, use this ‘ActionKey’, set at the ‘asp-page-handler’ attribute of HTML anchor tag as the URI of the ‘Search’ screen.
<a class="nav-link text-dark" asp-page="@item.ActionKey">@item.Title</a>
Settings values set to the ‘Pages’ of ViewData in constructor of the ‘PageBase’ class are collection of a pair the ‘ActionKey’ property and the ‘Title’ property. Thus, modify the ‘_Layout.cshtml’ file as below code creates list items of HTML unordered list tag.
<ul class="navbar-nav flex-grow-1">
    @* <li class="nav-item">
        <a class="nav-link text-dark" asp-area="" asp-page="/Index">Home</a>
    </li>
    <li class="nav-item">
        <a class="nav-link text-dark" asp-area="" asp-page="/Privacy">Privacy</a>
    </li> *@
    @foreach (var item in pages!)
    {
        <li class="nav-item">
            @if(ViewData["Title"]!.ToString()==item.Title) {
                <span style="padding:.5rem;display:inline-block;">@item.Title</span>
            }
            else{
                <a class="nav-link text-dark" asp-page="@item.ActionKey">@item.Title</a>
            }
        </li>
    }
</ul>
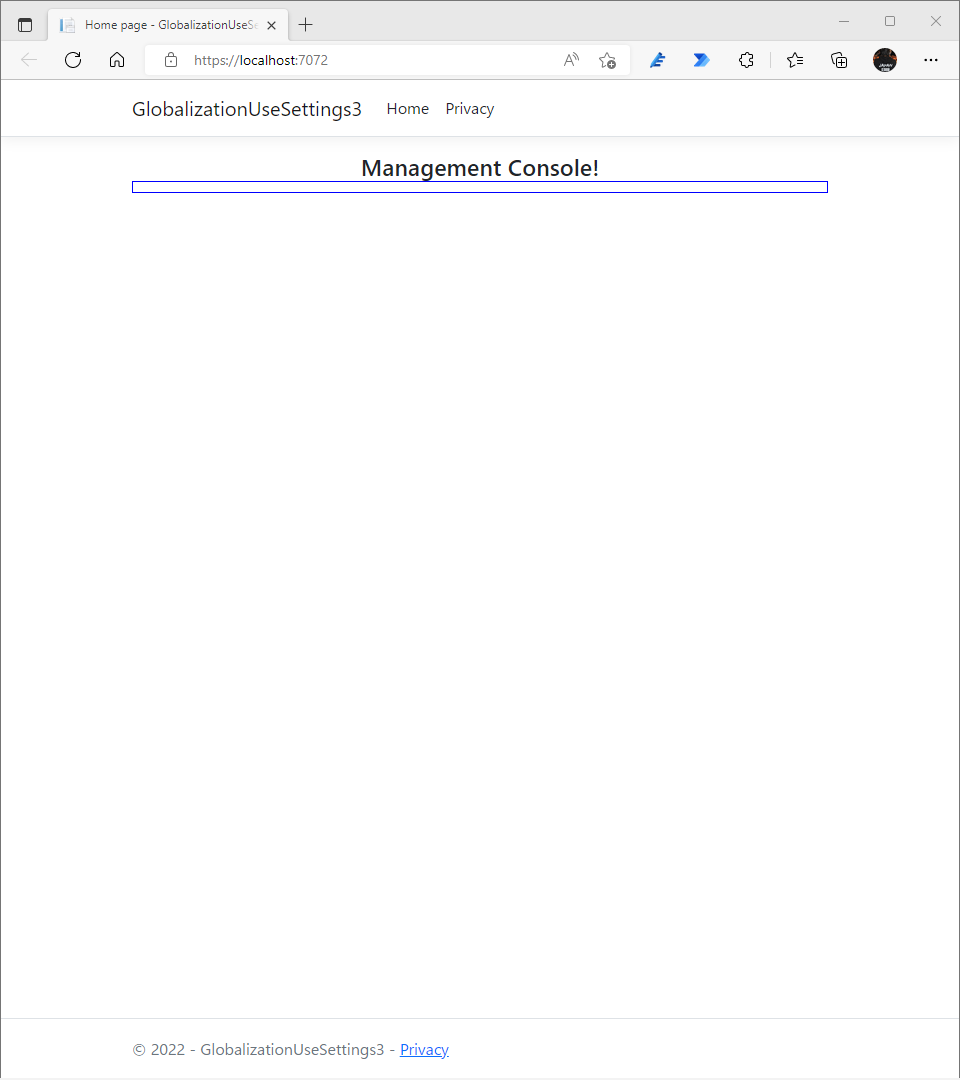
In this mechanism, modifying the ‘appsettings.json’ file changes navigate menu immediately. Add ‘Search’ page settings only in the ‘English’ section, it does not affect to the ‘Japanese’ section.

No responses yet