
The Options Pattern can build a hierarchical settings values structure. In the previous article [ASP .NET Core Options Pattern], a settings values of The .NET Generic Host that created by the host builder were registered to the host as a service as it is, and were used in the UI layer although, the Options Pattern in .NET Core must be applied the Options Pattern as the configuration service before registered to the host.
In the WPF application, customizing startup flow at the App.xaml.cs can apply the Options pattern to the service before the MainWindow showed.
・Development steps for .NET Core Options Pattern
[Step 1] The .NET Generic Host built with the host builder can be used for both web applications and desktop native applications, so settings values as configuration service that applies the Options Pattern is able to use on each screen with using the Generic Host that define in the constructor of the App class.
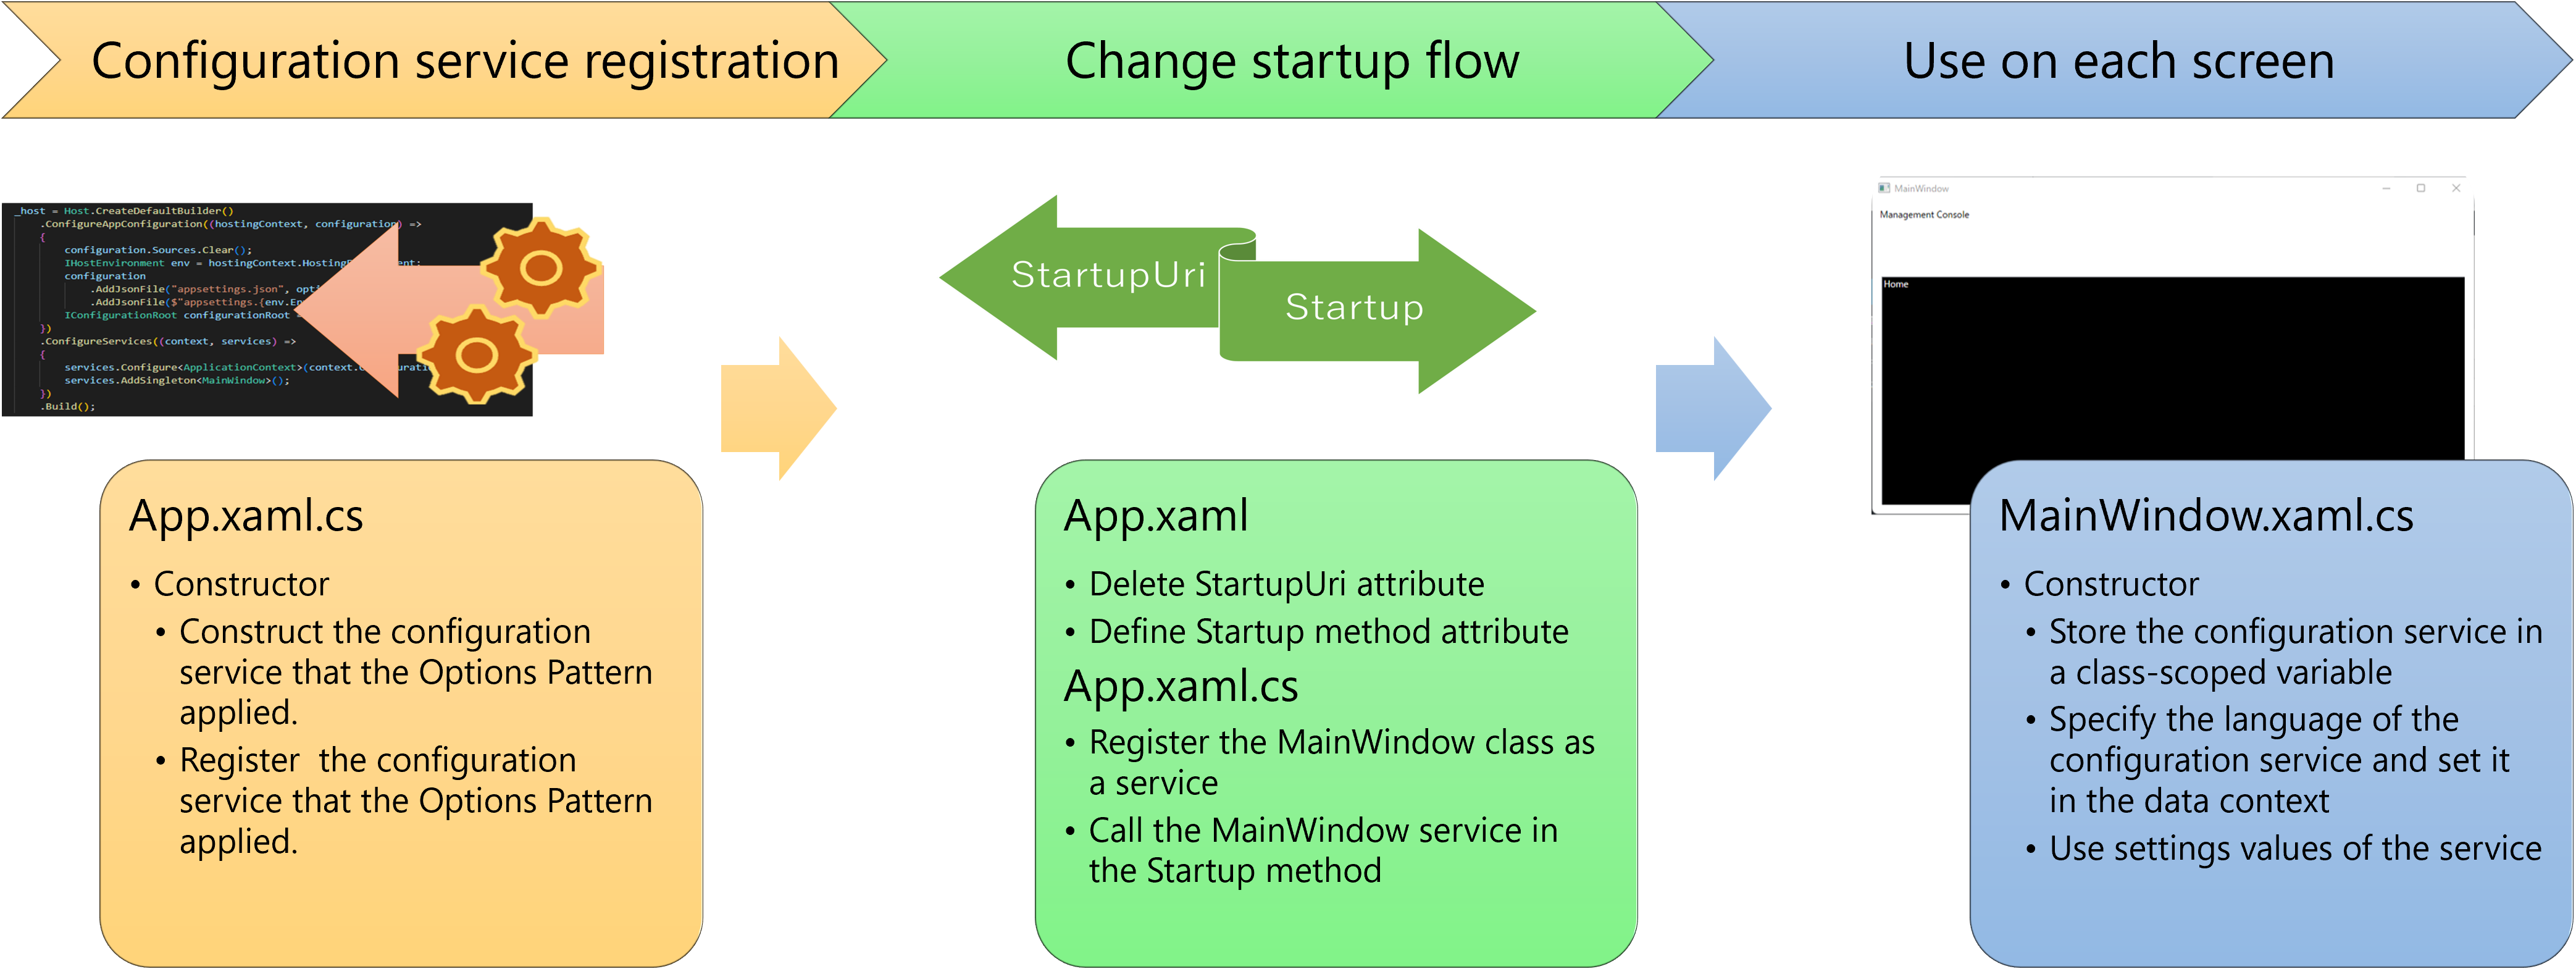
[Step 2] On each screen, the configuration service that the Options Pattern is applied is able to use in the constructor of the screen. This mechanism is the same as when passing the settings values as configuration service that is applied the Options Pattern to the constructor of the controller in the ASP.NET Core Options Pattern, so this article means also recap of the ASP.NET Core Options Pattern.
The App class has to service the configuration service with the Options Pattern applied before calling the MainWindow class, so stop calling the MainWindow.xaml in the App.xaml and call MainWindow after building the configuration service in the App.xaml.cs will do so.
[Step 3] Define a startup method name to the Startup attribute in App.xaml, and create the Startup method in App.xaml.cs, then show the MainWindow screen in the Startup method. The MainWindow screen is registered as a service when the host is constructed, and the MainWindow service is displayed in the Startup method.
This article explains this flow.
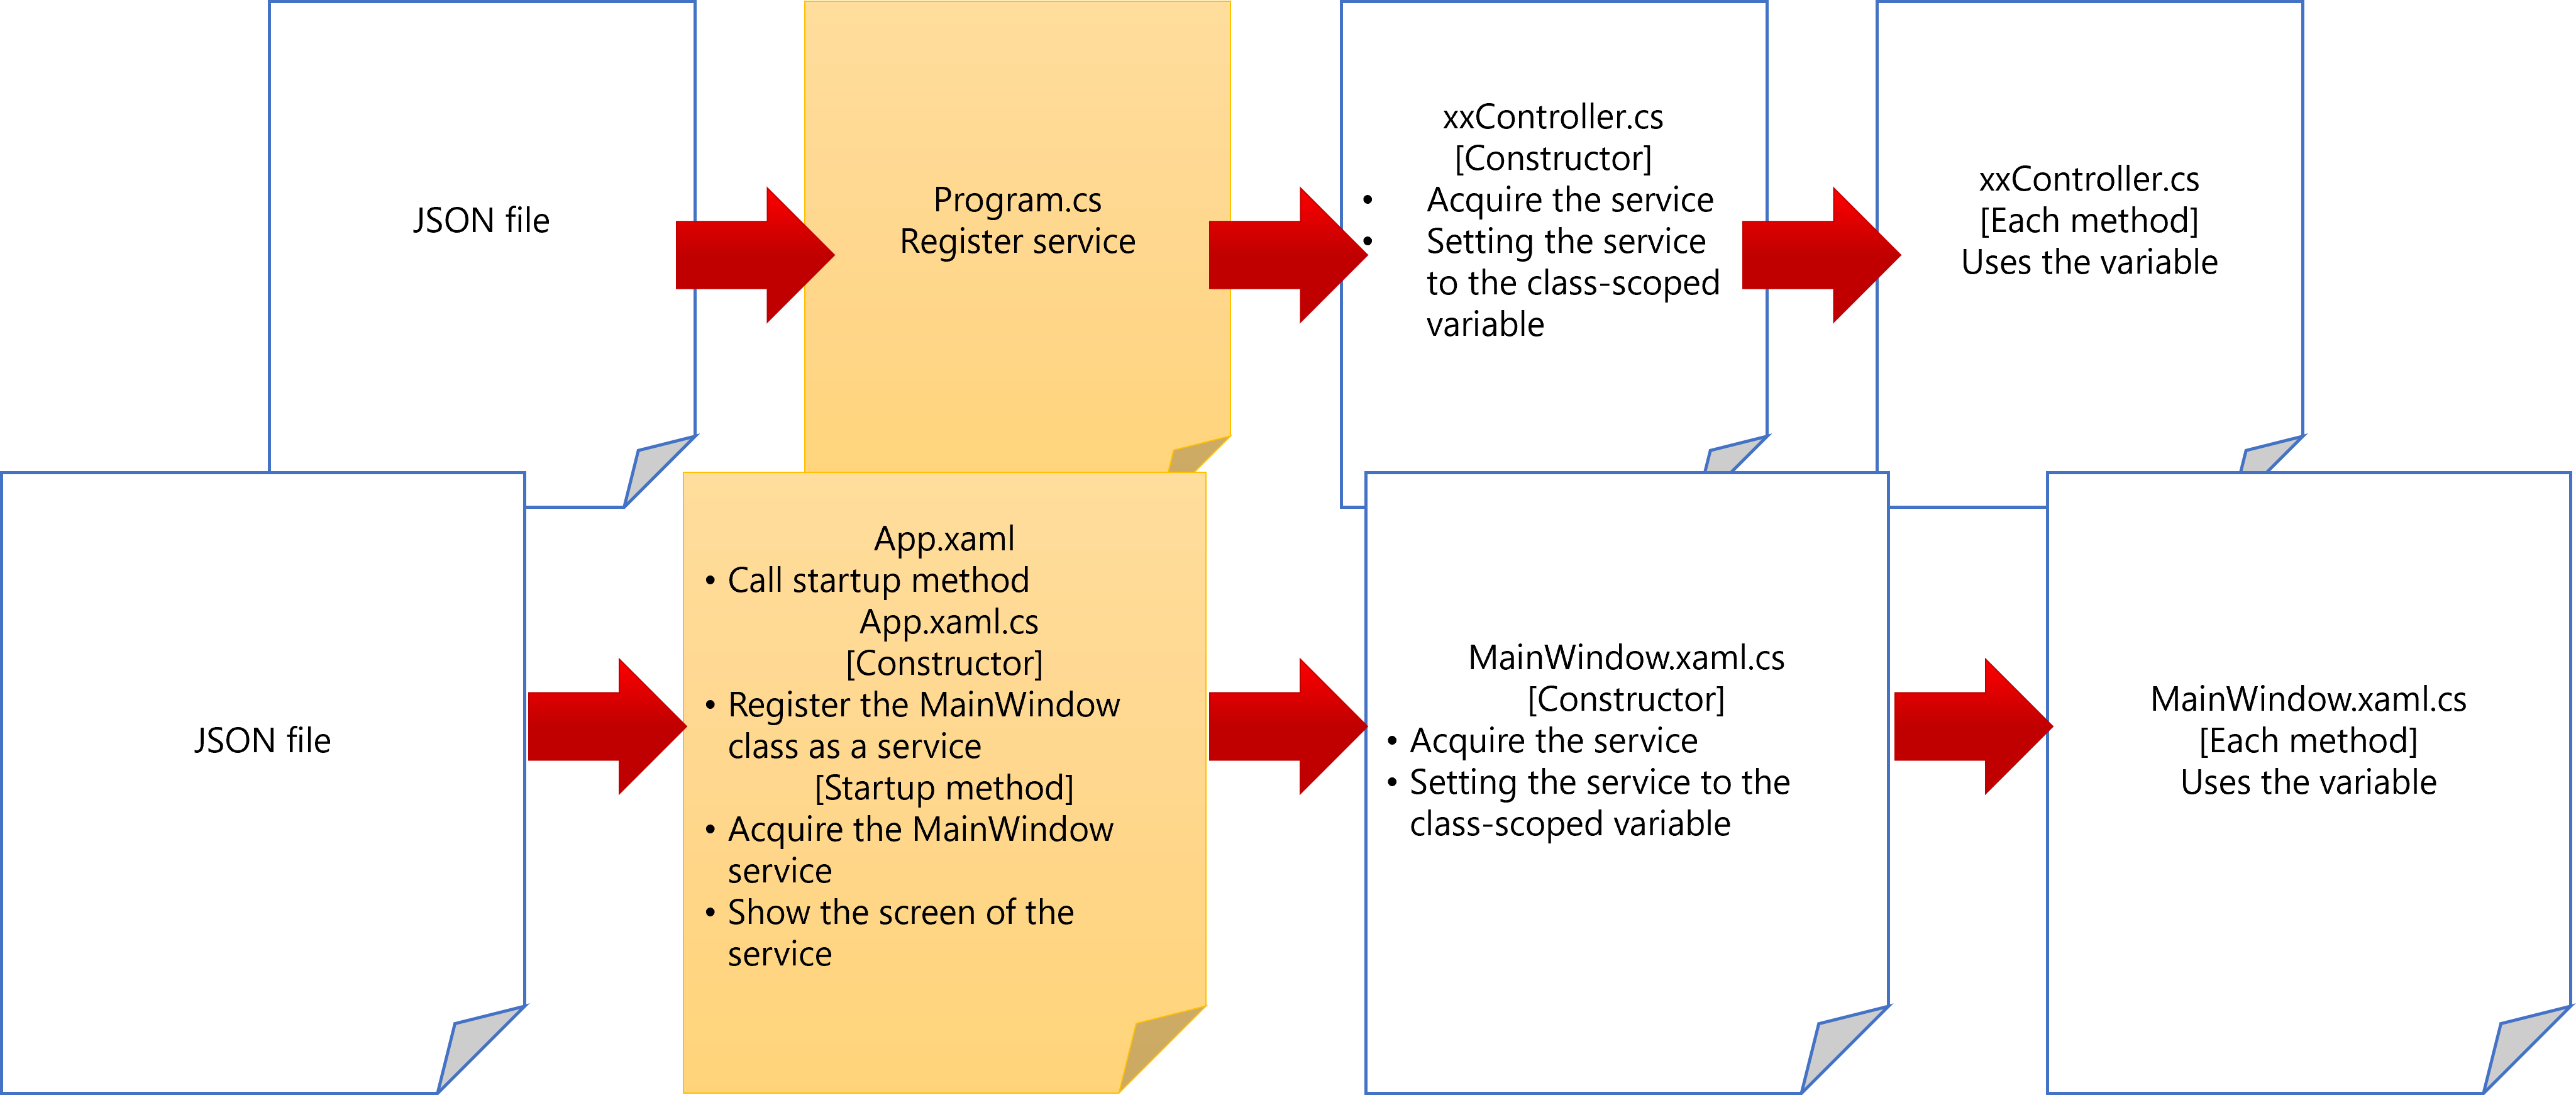
・ASP.NET Core Options Pattern recap
In the case of Program.cs of ASP.NET Core, the settings values of the JSON file is able to specify as configurations of the host. So it can register to the Generic Host as the configuration service directly. In the case of WPF, this creation of host builder to read JSON file part is a little troublesome.
First, for the JSON that was automatically loaded by the Generic Host in ASP.NET Core must be loaded explicitly, since files other than JSON can also be handled, please refer to the official document [Configuration providers in .NET] also.
Another thing is that the application startup flow is customized and insert the service registration process before show the MainWindow. Let’s go into a little more detail.
The Generic Host in ASP.NET Core was defined in Program.cs, on the other hand, in the case of the WFP application is defined in App.xaml.cs.
There are two steps to registering the Generic Host configuration as a service.
Use the ‘Microsoft.Extensions.Hosting’ namespace, loading a JSON file into the Generic Host configuration using the ‘ConfigureAppConfiguration’ method of the Generic Host is the one, and another, registering the Generic Host configuration as a service using ‘ConfigureServices’ method of the Generic Host.
As for the flow of processing, use the ‘Microsoft.Extensions.Hosting’ namespace, clear the source of the configuration of the host obtained by the ‘ConfigureAppConfiguration’ method of the Generic Host, and load the appsettings.json file.
the ‘optional’ argument is a flag for appsettings.json reading, and if ‘true’ is specified, it will work even if there is no file.
the ‘reloadOnChange’ argument is ‘true’ and reloads appsettings.json when it changes.
The configuration constructed in this way can be obtained with the ‘Configuration’ property of the ‘context’ argument in the ConfigureServices’ method of the host, so register it as a configuration service to the ‘services’ argument that was also obtained.
Use the ‘Microsoft.Extensions.DependencyInjection’ namespace, the Options Pattern is able to use while the type specification of the ‘Configure’ method of the service of the host that can be received by the ‘ConfigureServices’ method of the host. This mechanism is the ‘IOptions’ interface of the ‘TOptions’ type of the configuration service provides Dependency Injection feature to insert customised type into the configuration service. In the time, specifying the type of the ApplicationContext class that has the same structure as the JSON file.
App.xaml.cs
    public partial class App : Application
    {
        private IHost _host;
        public App()
        {
            _host = Host.CreateDefaultBuilder()
                .ConfigureAppConfiguration((hostingContext, configuration) =>
                {
                    configuration.Sources.Clear();
                    IHostEnvironment env = hostingContext.HostingEnvironment;
                    configuration
                        .AddJsonFile("appsettings.json", optional: true, reloadOnChange: true)
                        .AddJsonFile($"appsettings.{env.EnvironmentName}.json", true, true);
                })
                .ConfigureServices((context, services) =>
                {
                    services.Configure<ApplicationContext>(context.Configuration);
                    services.AddSingleton<MainWindow>();
                    // services.AddTransient<MainWindow>();
                })
                .Build();
        }
The ‘AddSingleton’ method of services of the Generic Host and the ‘AddTransient’ method( commented) controls lyfecycle of the service.
The section [Lifetime and registration options] of Microsoft official document [Dependency Injection in ASP.NET Core] introduces how to validate ‘AddTransient’, ‘AddScoped’, and ‘AddSingleton’ method with an operation ID attached to the service instance.
The ‘AddTransient’ method adds a unique instance per session, the ‘AddScoped’ method adds a per-request instance, and the ‘AddSingleton’ method adds an application-unique service instance to the application host.
In this time, the ‘MainWindow’ service uses an instance unique to the application, but the data context and configuration service described later have a strong dependency on MainWindow, so use AddTransient when serving multiple users.
・Customize startup flow
The flow up to MainWindow display can be customized by defining App.xaml and App.xaml.cs.
In App.xaml, remove the ‘StartupUri’ attribute and specify the method name that operates at startup to the ‘Startup’ attriute. In this example, it is ‘Application_Startup’, so the ‘Application_Startup’ method create in the ‘App.xaml.cs’ file later. The ‘Application_Exit’ method as the application exit method at the time of termination also create in the ‘App.xaml.cs’ file.
Next, in order to display the ‘MainWindow’ screen in the ‘Application_Startup’ method of App.xaml.cs, register the ‘MainWindow’ class as the host service in advance.
The ‘MainWindow’ class registered as a service in the host can be obtained as one of the services of host that are holded in the ‘_host’ variable of the App class global scope in App.xaml.cs.
The “GetRequiredService” method returns InvalidOperationException (if there is no service) or ObjectDisposedException (if the service has been destroyed), unlike “GetService” which returns null in an exception, so support flow can set in subsequent processing. Used when such operations are expected. At that time, it is the scope of the service that must be considered that described above (refer to [Application lyfecycle]).
In the ‘Application_Startup’ method, the MainWindow screen is displayed by the “Show” method of the service that is obtained from the ‘GetRequiredService’ method of the ‘_host’ variable.
App.xaml.cs
        private async void Application_Startup(object sender, StartupEventArgs e)
        {
            await _host.StartAsync();
            _host.Services.GetRequiredService().Show();
        }

        private async void Application_Exit(object sender, ExitEventArgs e)
        {
            await _host.StopAsync(TimeSpan.FromSeconds(5));
            _host.Dispose();
        }
・Use settings values as the Options Pattern
To confirm startup flow, start Visual Studio Code in any folder and display the terminal with CTRL + @.
Create a project with ‘dotnet new wpf’ command in the terminal.
To install each extension of Microsoft.Extensions.Hosting, Microsoft.Extensions.Configuration and Microsoft.Extensions.DependencyInjection from Nuget, copy .NET CLI command below and paste it into the terminal.
The setting values can use in all of methods of MainWindow.xaml.cs, because the configuration service of the host is stored into the variable of the global scope of the MainWindow class at the constructor of the class in this sample. Although, for convenience of explanation, every statement is defined in the constructor.
Thus that it can be used later for clicks, mouseovers, select list selections, etc. if it needs.
In this article, we want to complete everything in the constructor, so binding using INotifyPropertyChanged is performed, but before explaining the ViewModel, explains the structure of using service of the host first.
Set the data context in MainWindow.xaml. Here we are using a class named ‘MainWindowViewModel’. Since the data context specification on the xaml side is set to Window, the property is bound as it is. Application works without the attribute “UpdateSourceTrigger=PropertyChanged”. If the data context inherits from INotifyPropertyChanged, the PropertyChangedEventHandler’s delegate is executed by default.
MainWindow.xaml
<Window x:Class="GenericHostWPF.MainWindow"
        xmlns="http://schemas.microsoft.com/winfx/2006/xaml/presentation"
        xmlns:x="http://schemas.microsoft.com/winfx/2006/xaml"
        xmlns:d="http://schemas.microsoft.com/expression/blend/2008"
        xmlns:mc="http://schemas.openxmlformats.org/markup-compatibility/2006"
        xmlns:local="clr-namespace:GenericHostWPF"
        mc:Ignorable="d"
        Title="MainWindow" Height="450" Width="800">
    <Window.DataContext>
        <local:MainWindowViewModel />
    </Window.DataContext>
    <Grid>
        <TextBlock x:Name="Message" Margin="10,10,500,0" TextWrapping="Wrap" Text="{Binding Message, UpdateSourceTrigger=PropertyChanged}"
            VerticalAlignment="Top"/>
        <TextBox x:Name="MessageArea" HorizontalAlignment="Left" Height="312" Margin="12,100,12,12" TextWrapping="Wrap" Text="{Binding Log}"
            VerticalAlignment="Top" Width="773" Background="Black" Foreground="White"/>
    </Grid>
</Window>
Store this in the global scope variable ‘datacontext’ of the class in the constructor of MainWindow.xaml.cs and put the setting value into the property of this view model.
For the setting value, bind the Japanese section of the ‘config’ argument obtained in the constructor to the global scope variable ‘applicationContext’ so that it can be used in other methods.
The ‘applicationContext’ variable provides layered properties using the property ‘Brand’ or the ‘Title’ property of each ‘Page’ object and so on.
MainWindow.xaml.cs
    public partial class MainWindow : Window
    {
        private MainWindowViewModel dataContext = new ();
        private ApplicationContext applicationContext = new();
        private IConfiguration configRoot;
        public MainWindow(IConfiguration config)
        {
            configRoot = config;
            InitializeComponent();
            config.GetSection(ApplicationContext.English).Bind(applicationContext);
            dataContext = (MainWindowViewModel)this.DataContext;
            dataContext.Message = applicationContext.Brand;
            dataContext.Log = applicationContext.Pages.First().Title;
        }
    }

Each property stores a value in a private variable and takes it out. If the value is the same, do nothing and call the delegate’s method if there is a change.
No responses yet