
Microsoft Azure provides hosting feature of the gRPC service as Azure App Service, Azure Container Apps and Azure Kubernetes Service.
This article describes how to deploy the gRPC service that is created in the article [ASP.NET Core gRPC & gRPC communication tools] to Azure App Service.
>>Sample project to deploy to Azure App Service
• Create the Web App Service using Azure portal
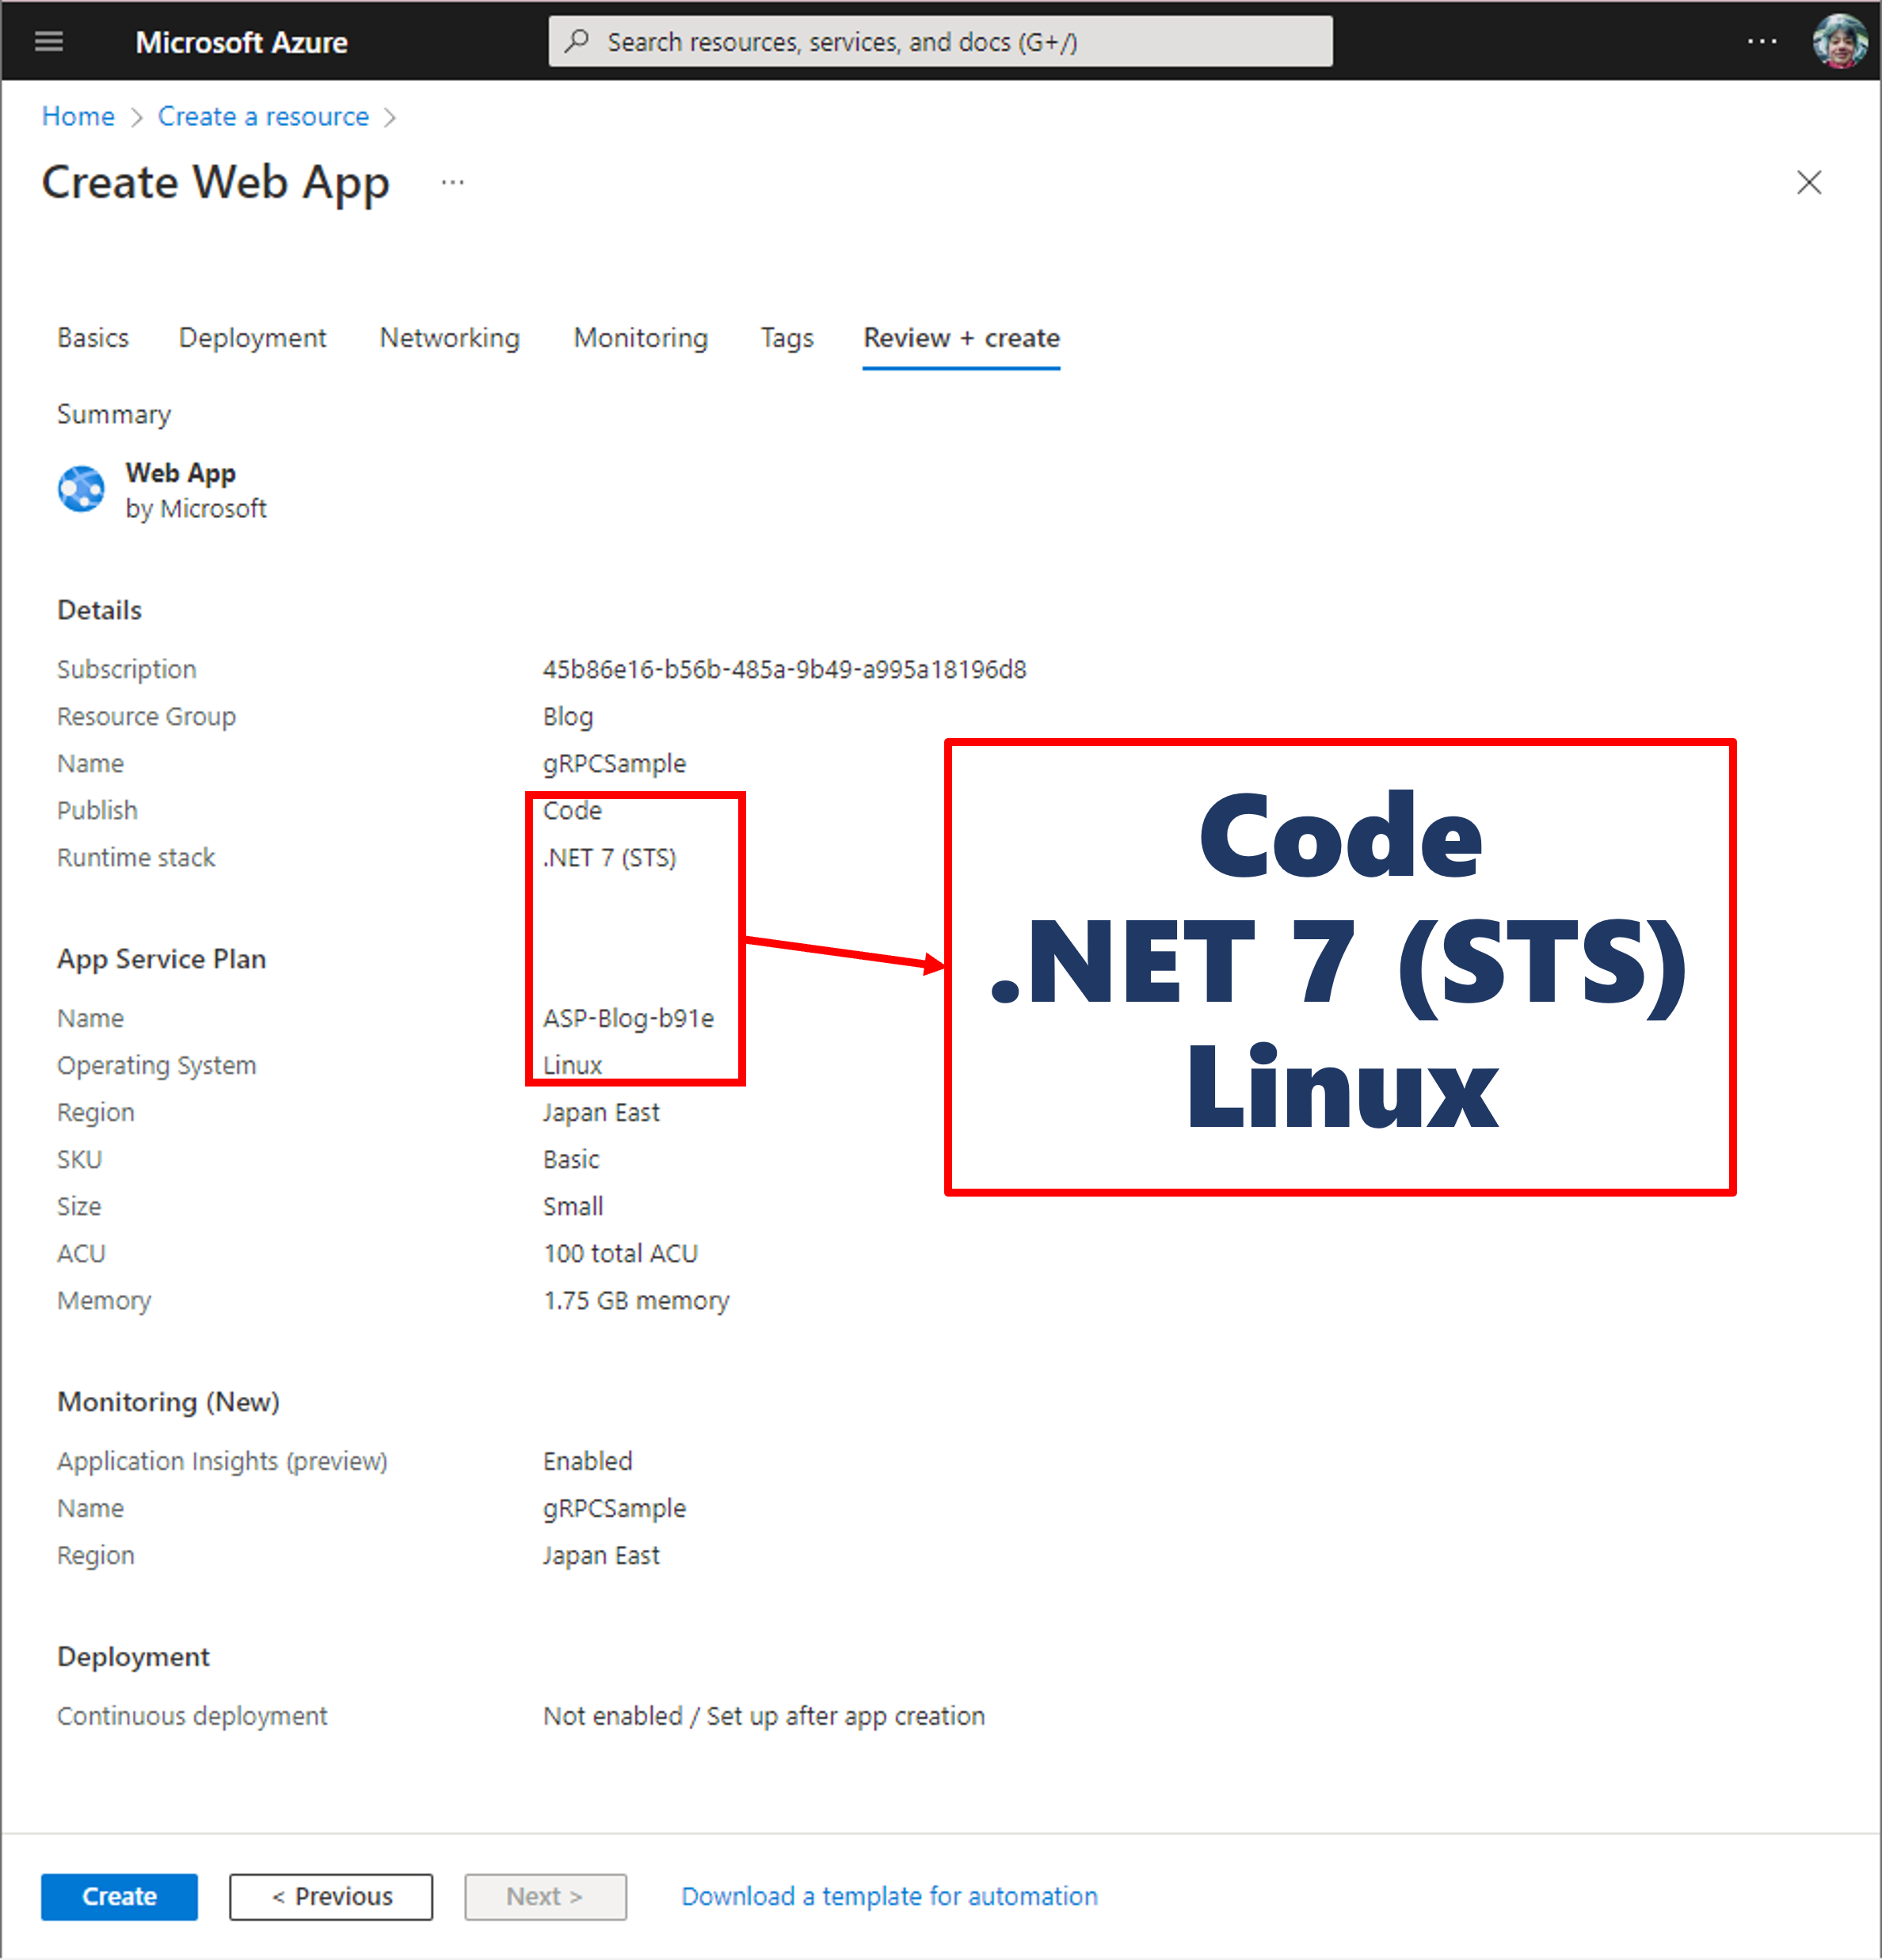
Open Azure portal and select the [Create a resource] then select the Web App [Create] link, and set values as figure below.
Set values of settings with select the [Configuration] of the [Settings] section of the left pane after selecting the Web App Service (or select the [Go to resource] when complete creating the service) created it.
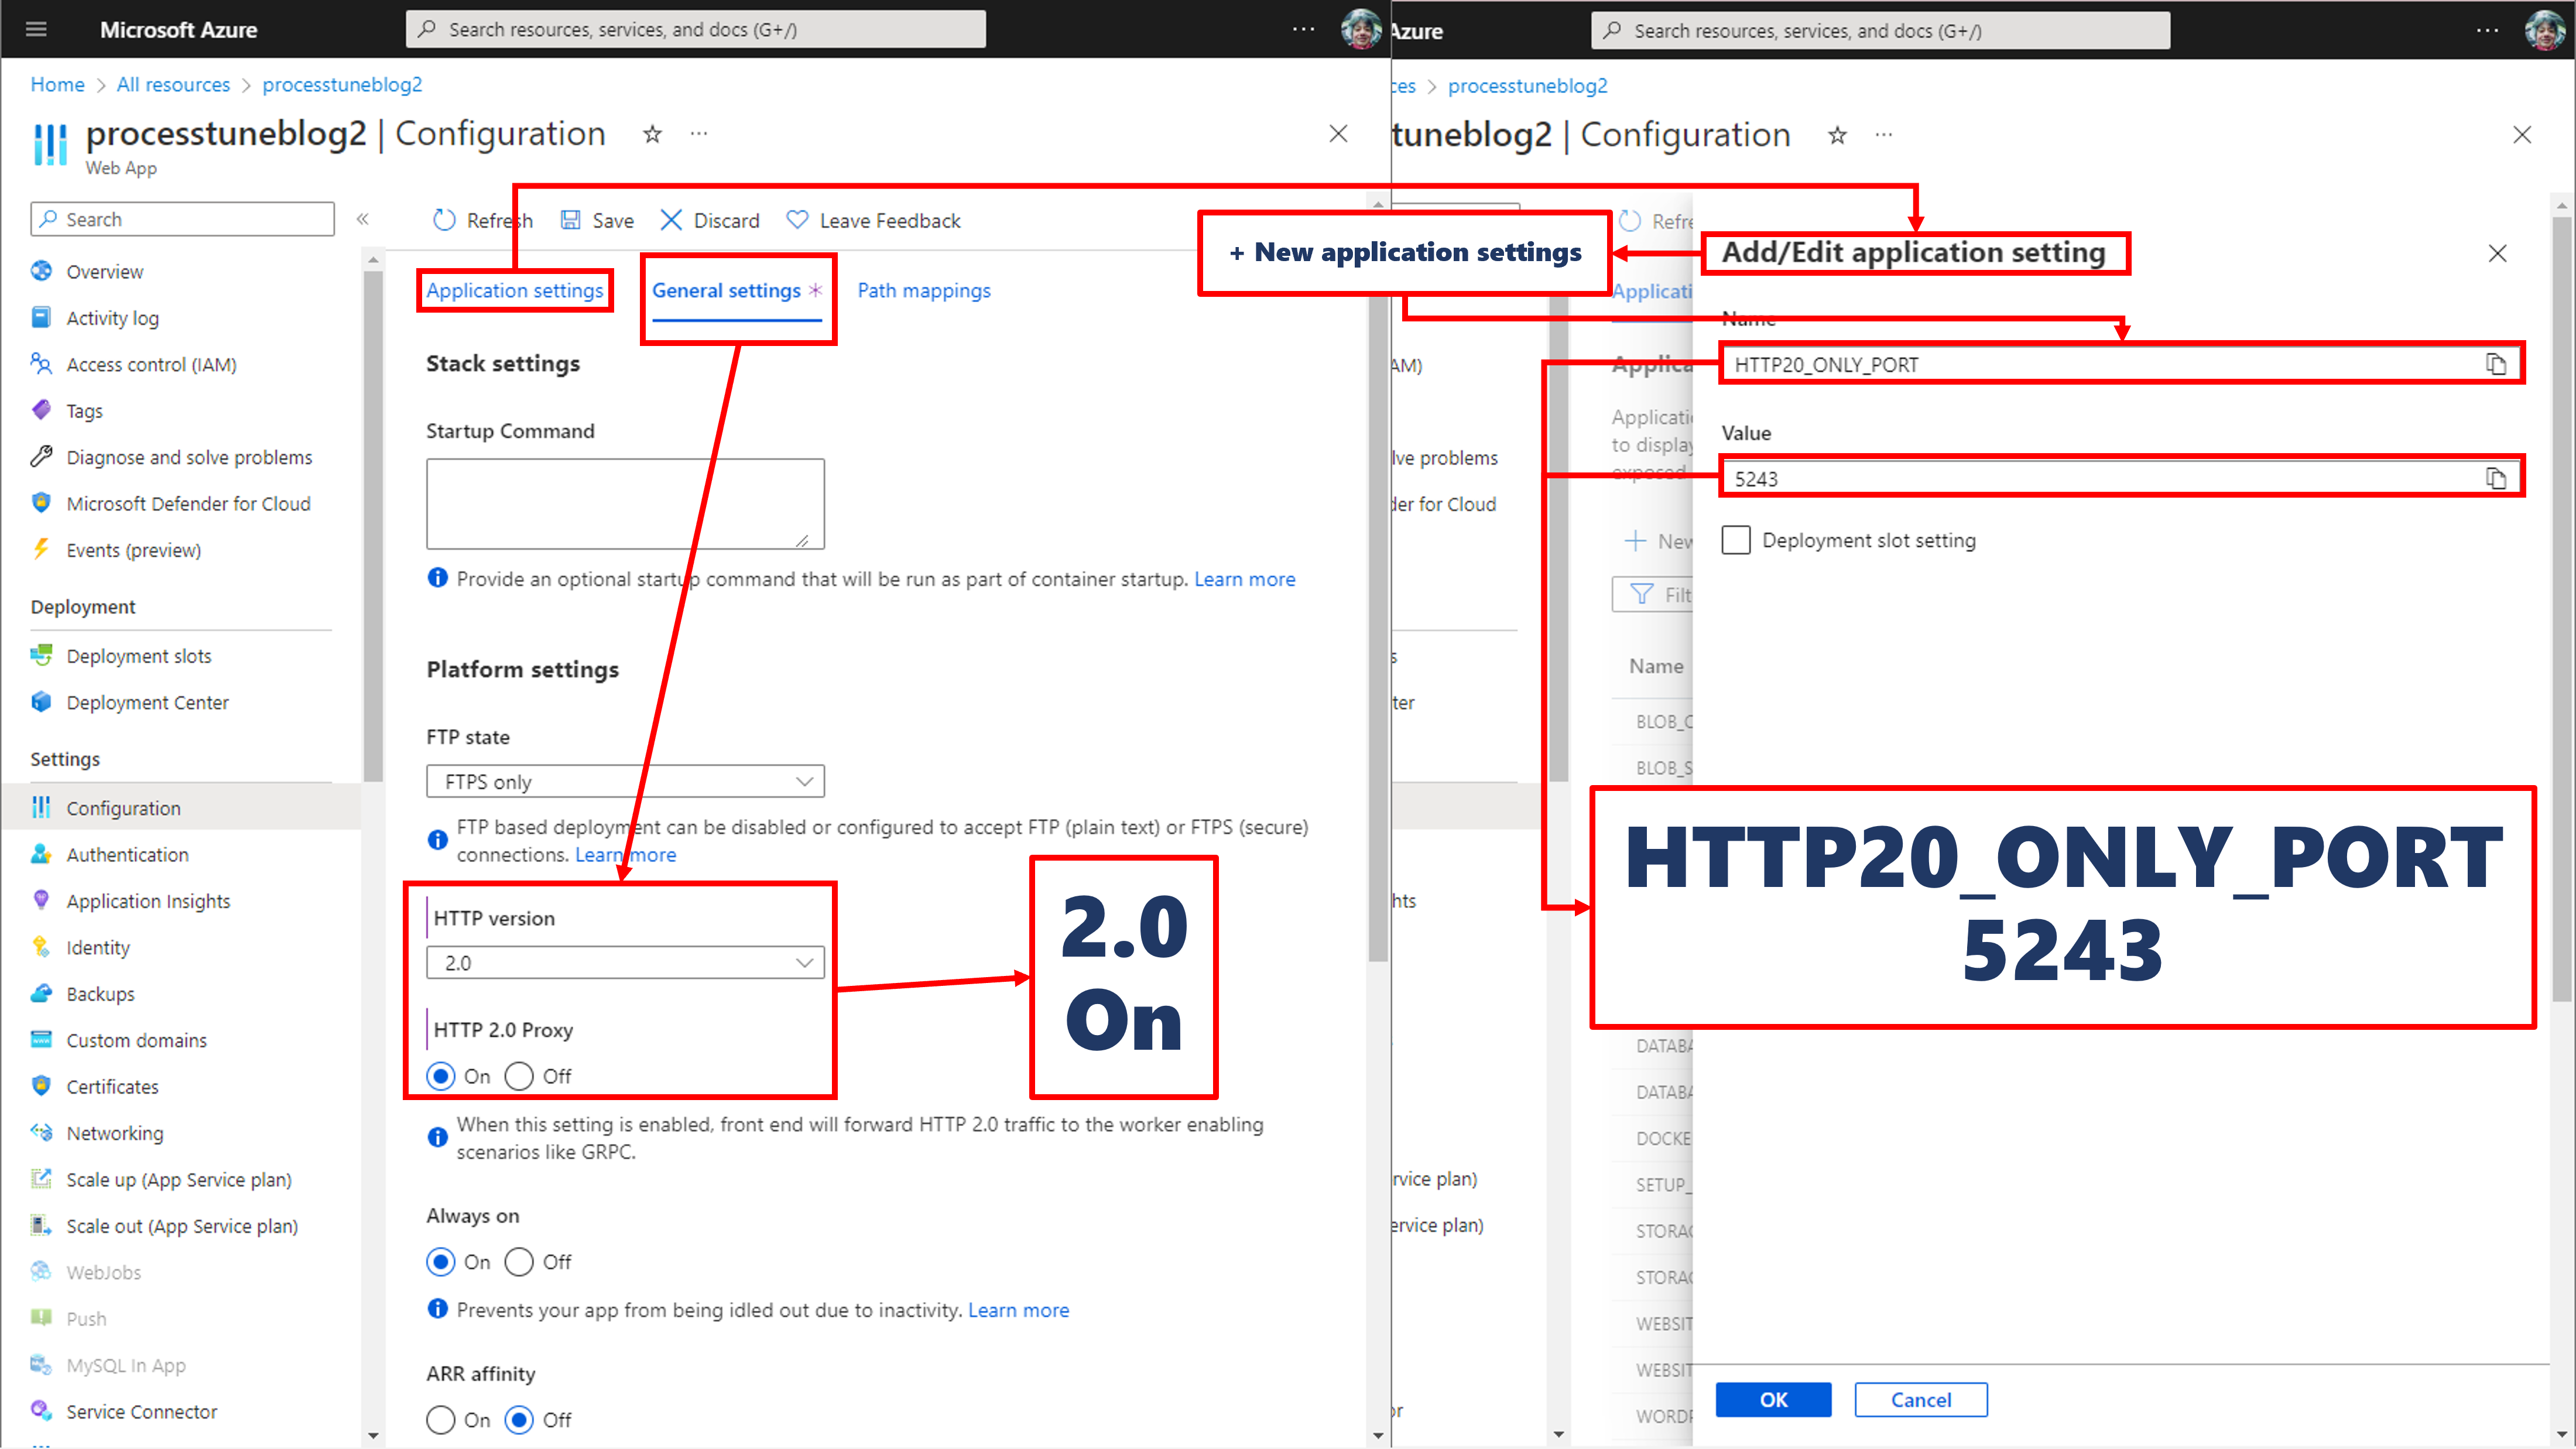
Though there are application settings and general settings in the [Configuration], set value “2.0” to the [HTTP version] property and set value “On” to the [HTTP 2.0 Proxy] property in the [General settings] tab.
Select the [+ New application settings] link after the [Application settings] link, then the [Add/Edit application setting] blade displayed, set value “HTTP20_ONLY_PORT” to the [Name] property and set value “5243” to the [Value] property.
• Execute the gRPC service with HTTPS
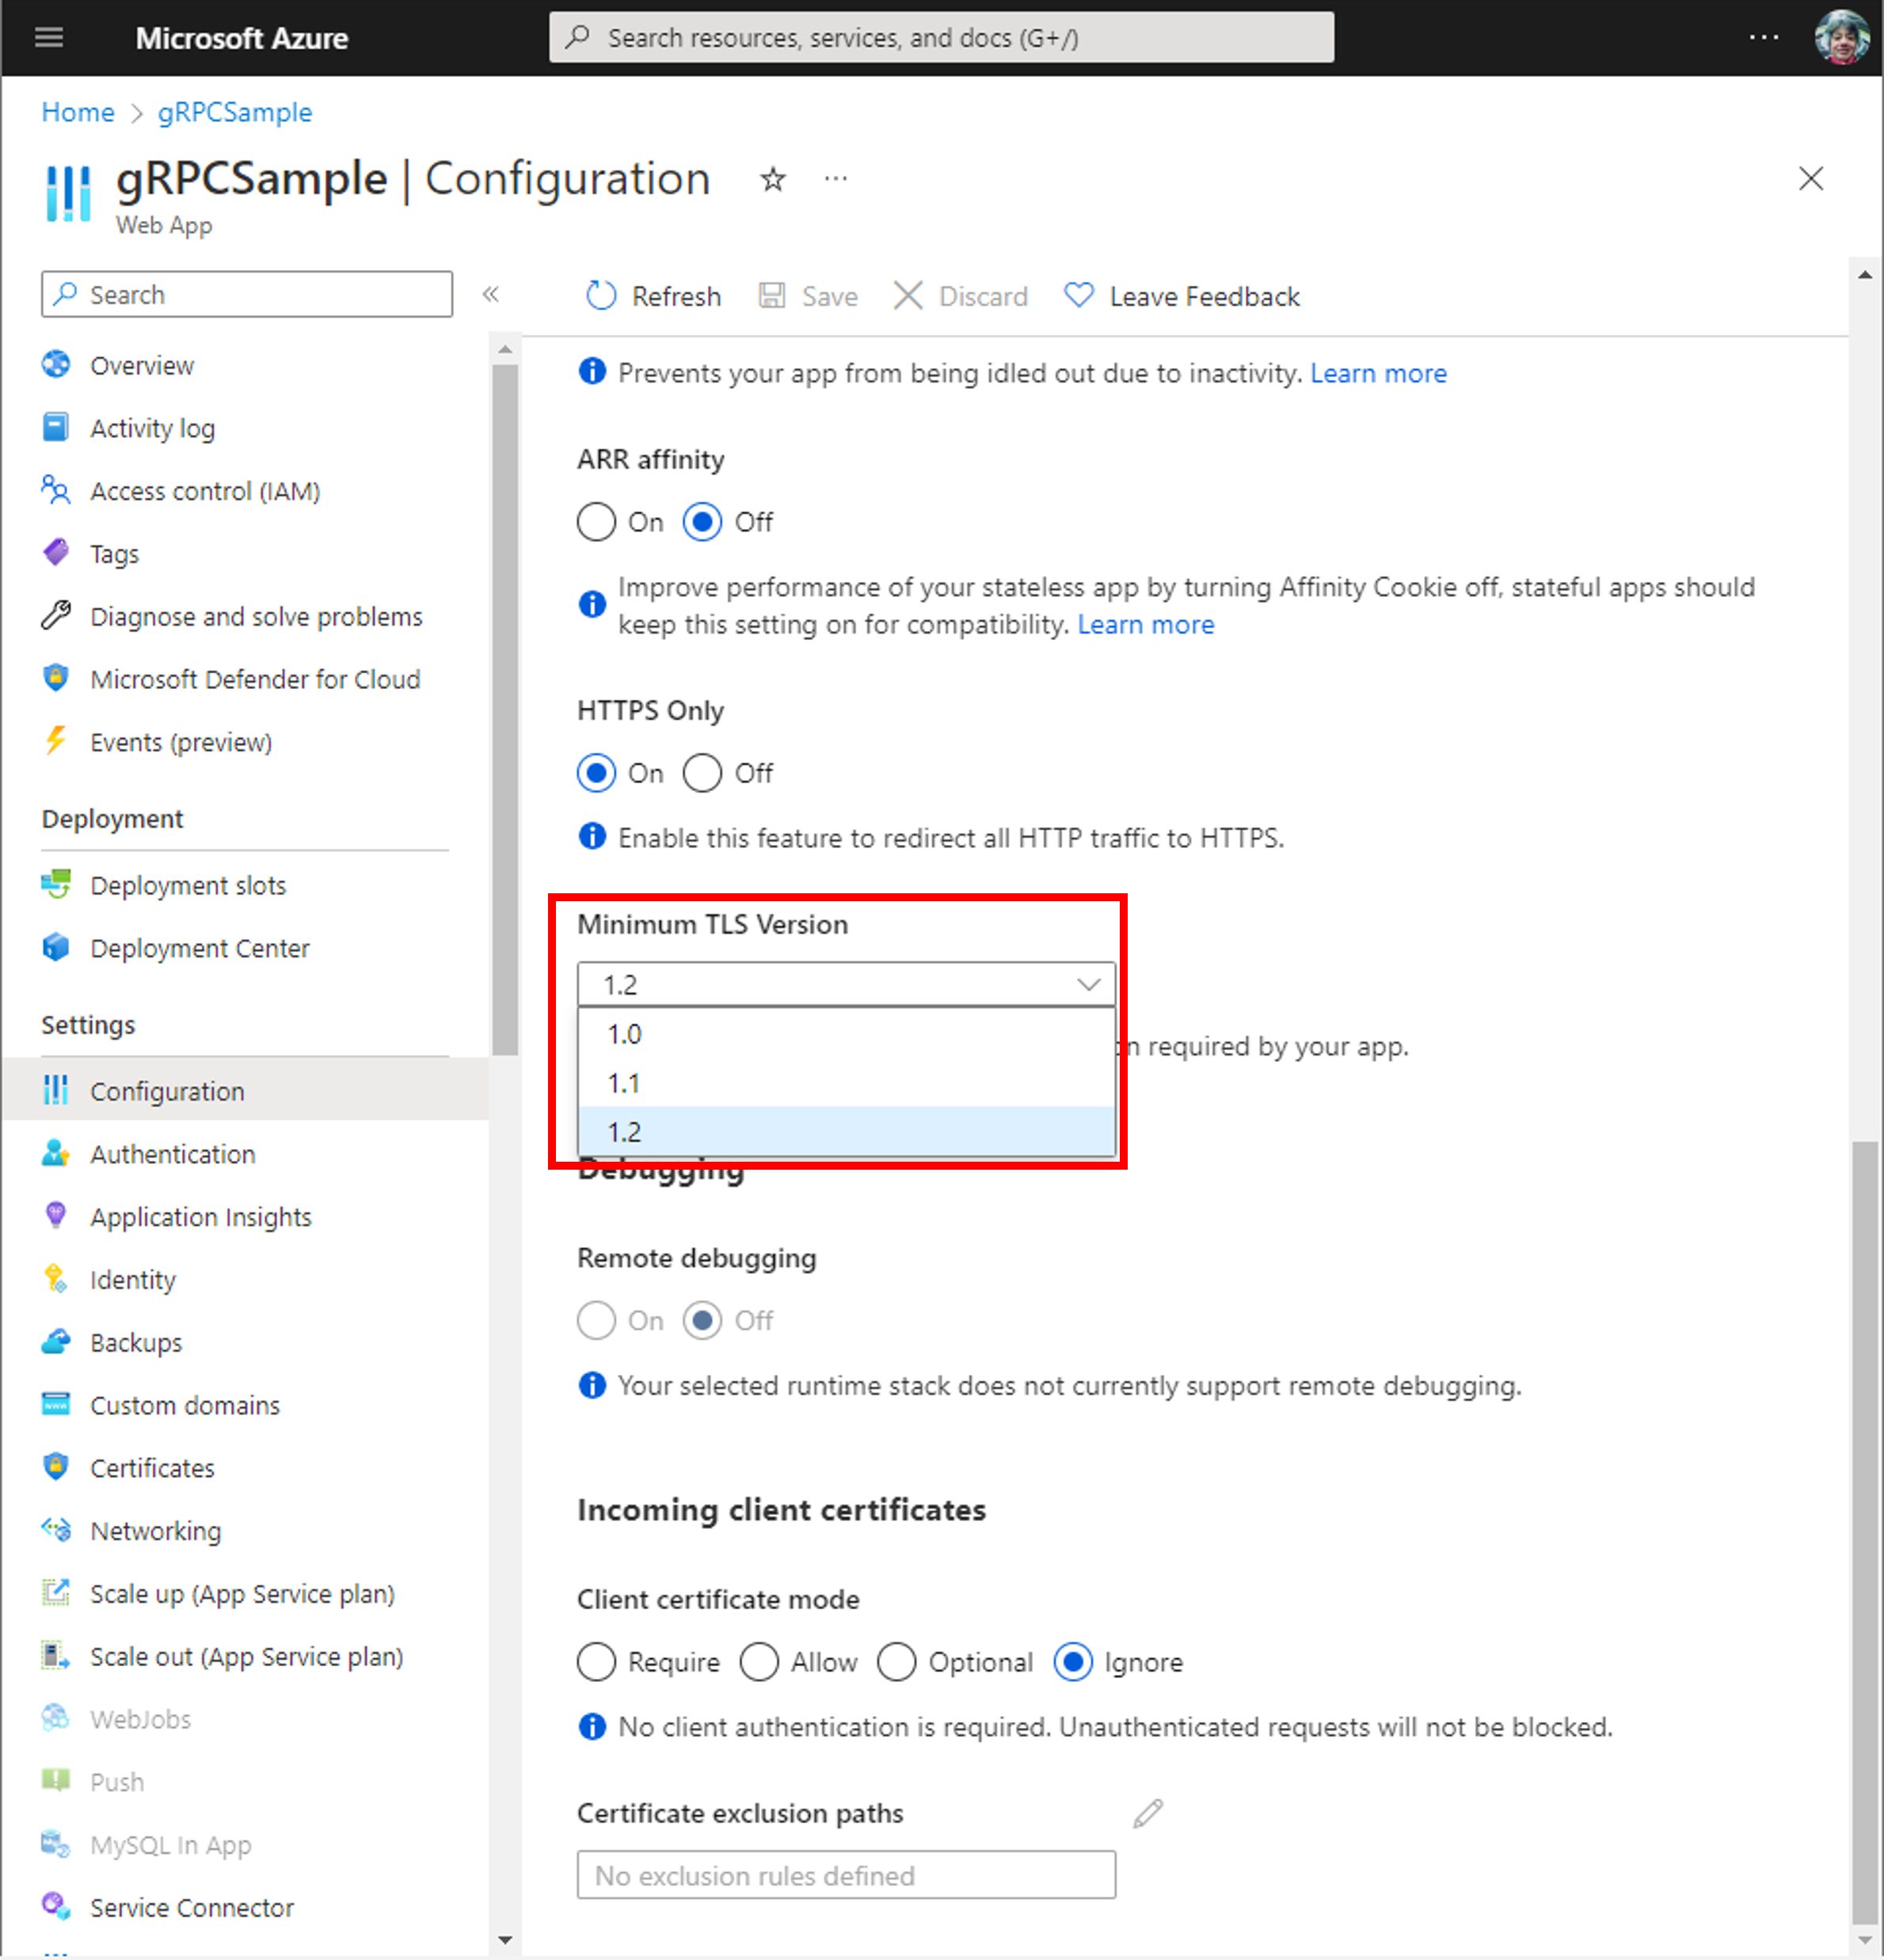
Created gRPC service uses TSL 1.2 (figure below left), therefore several modifying.
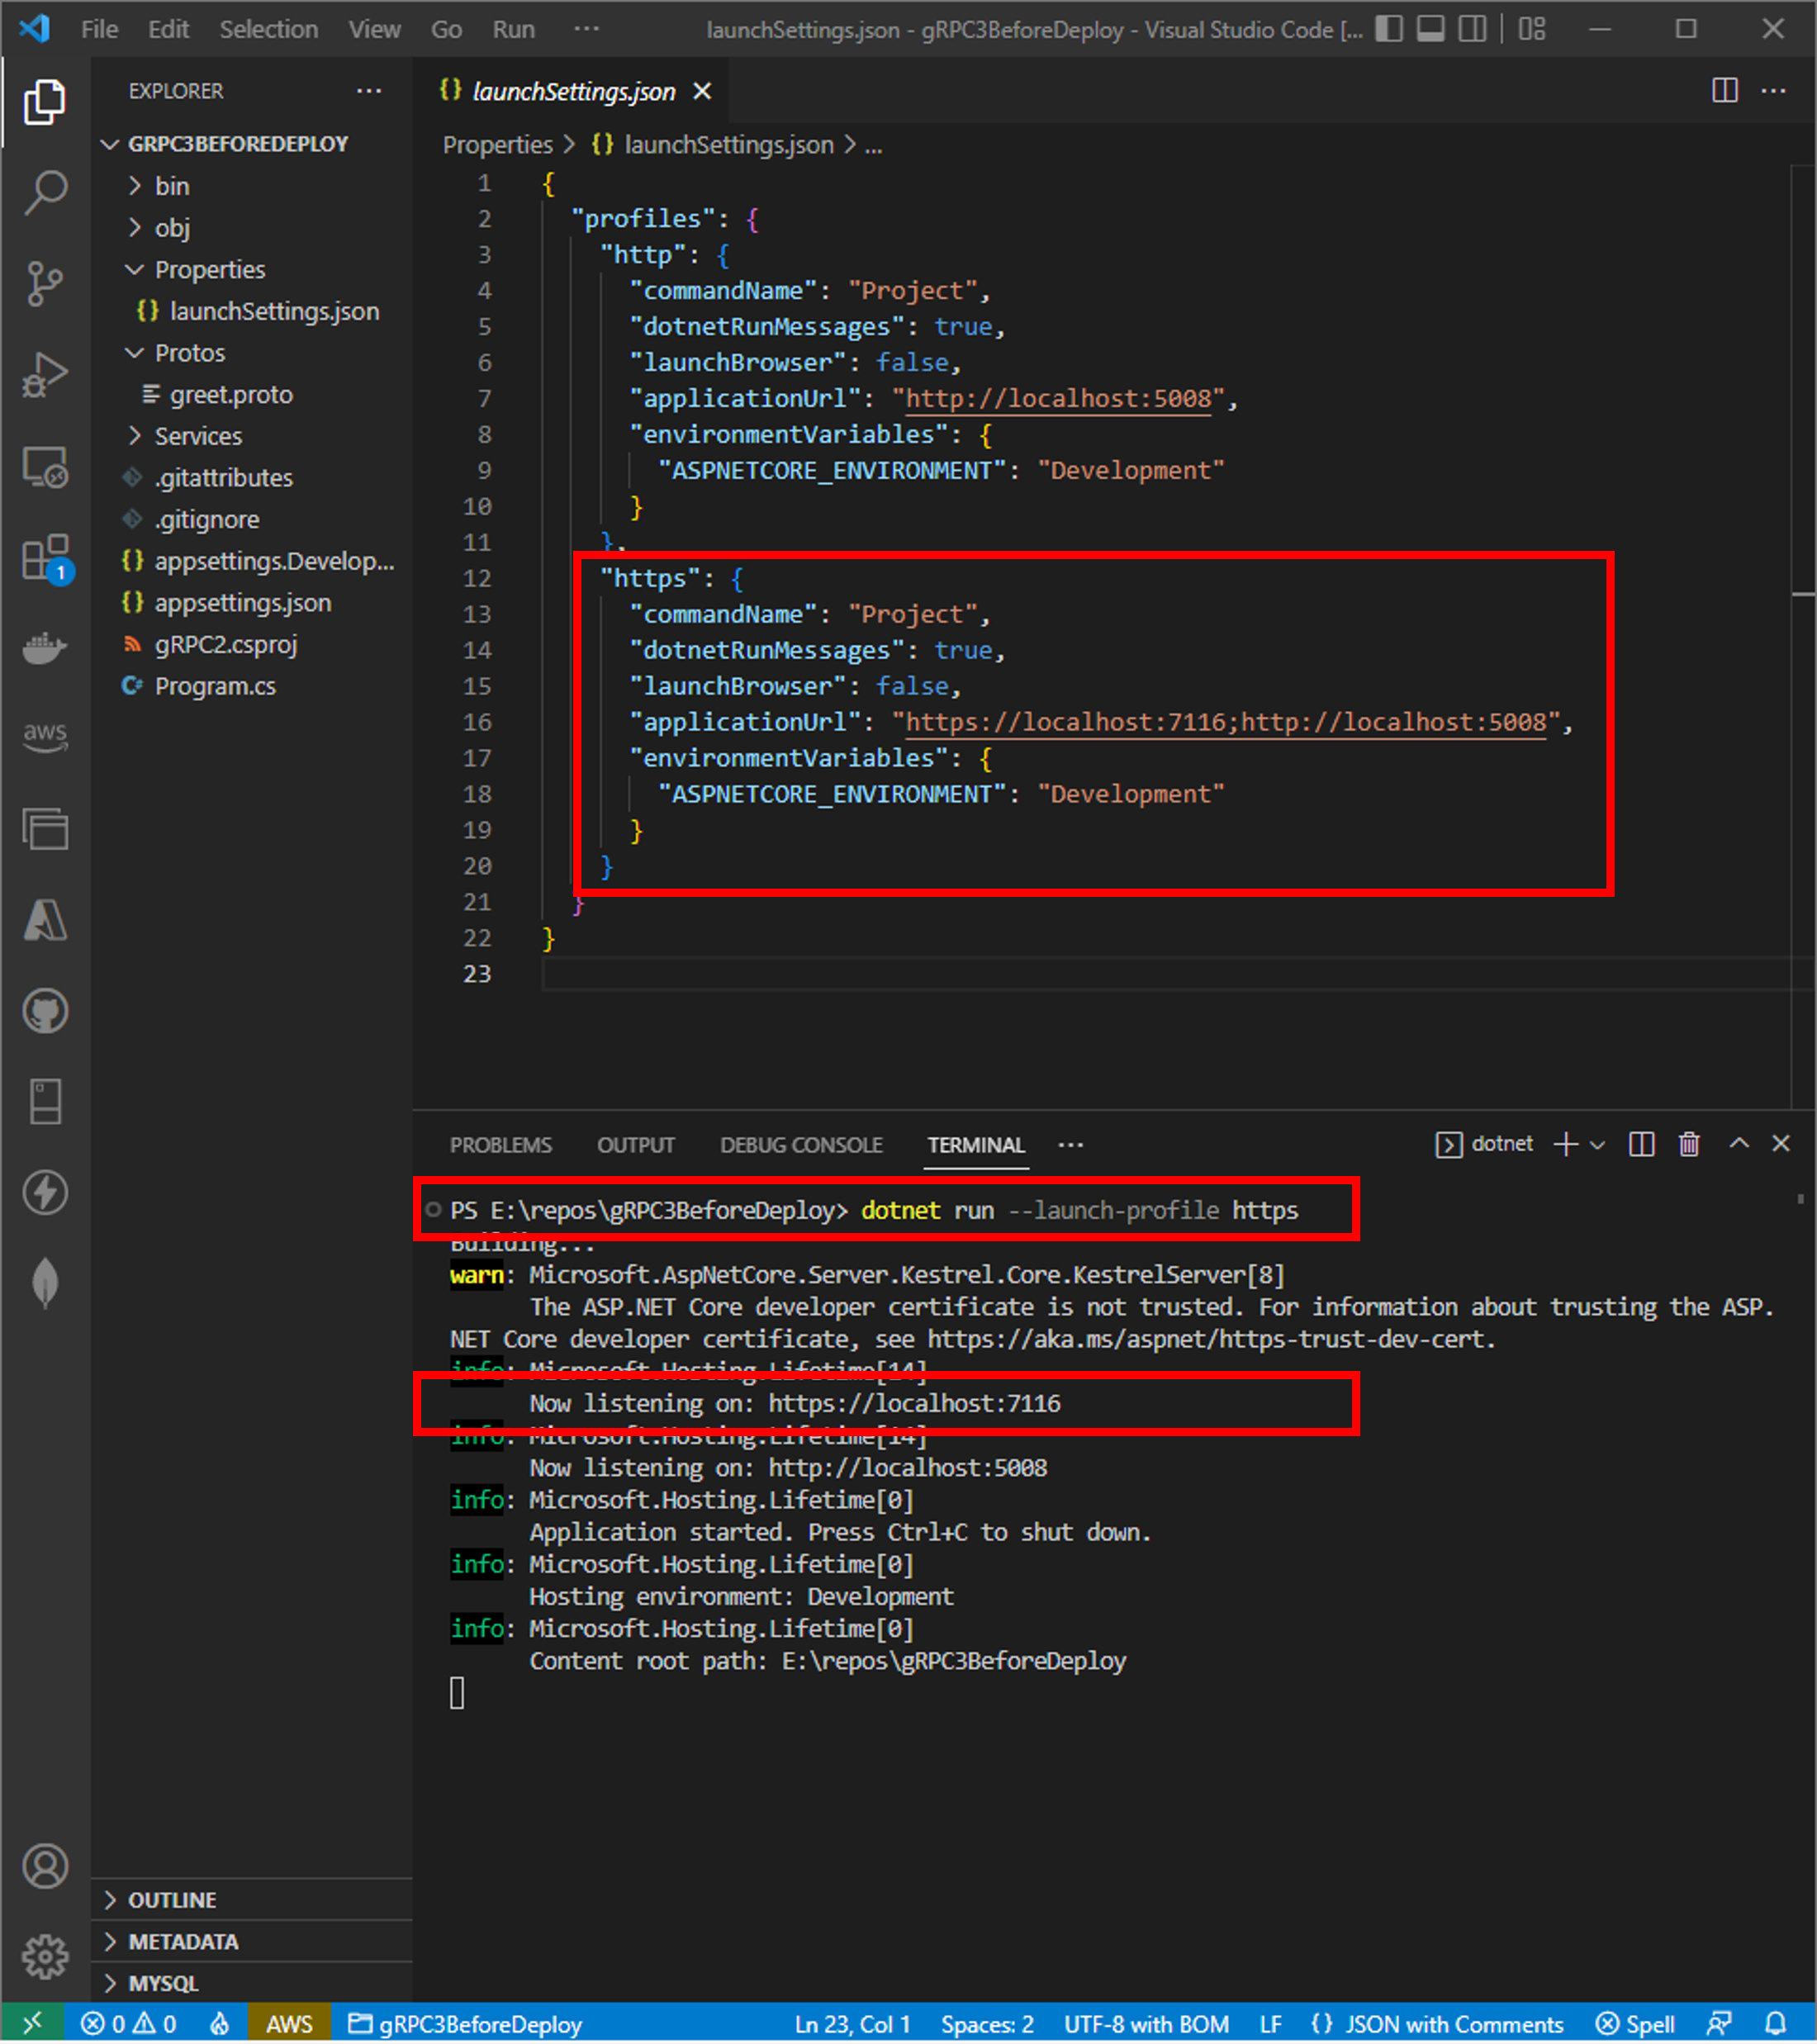
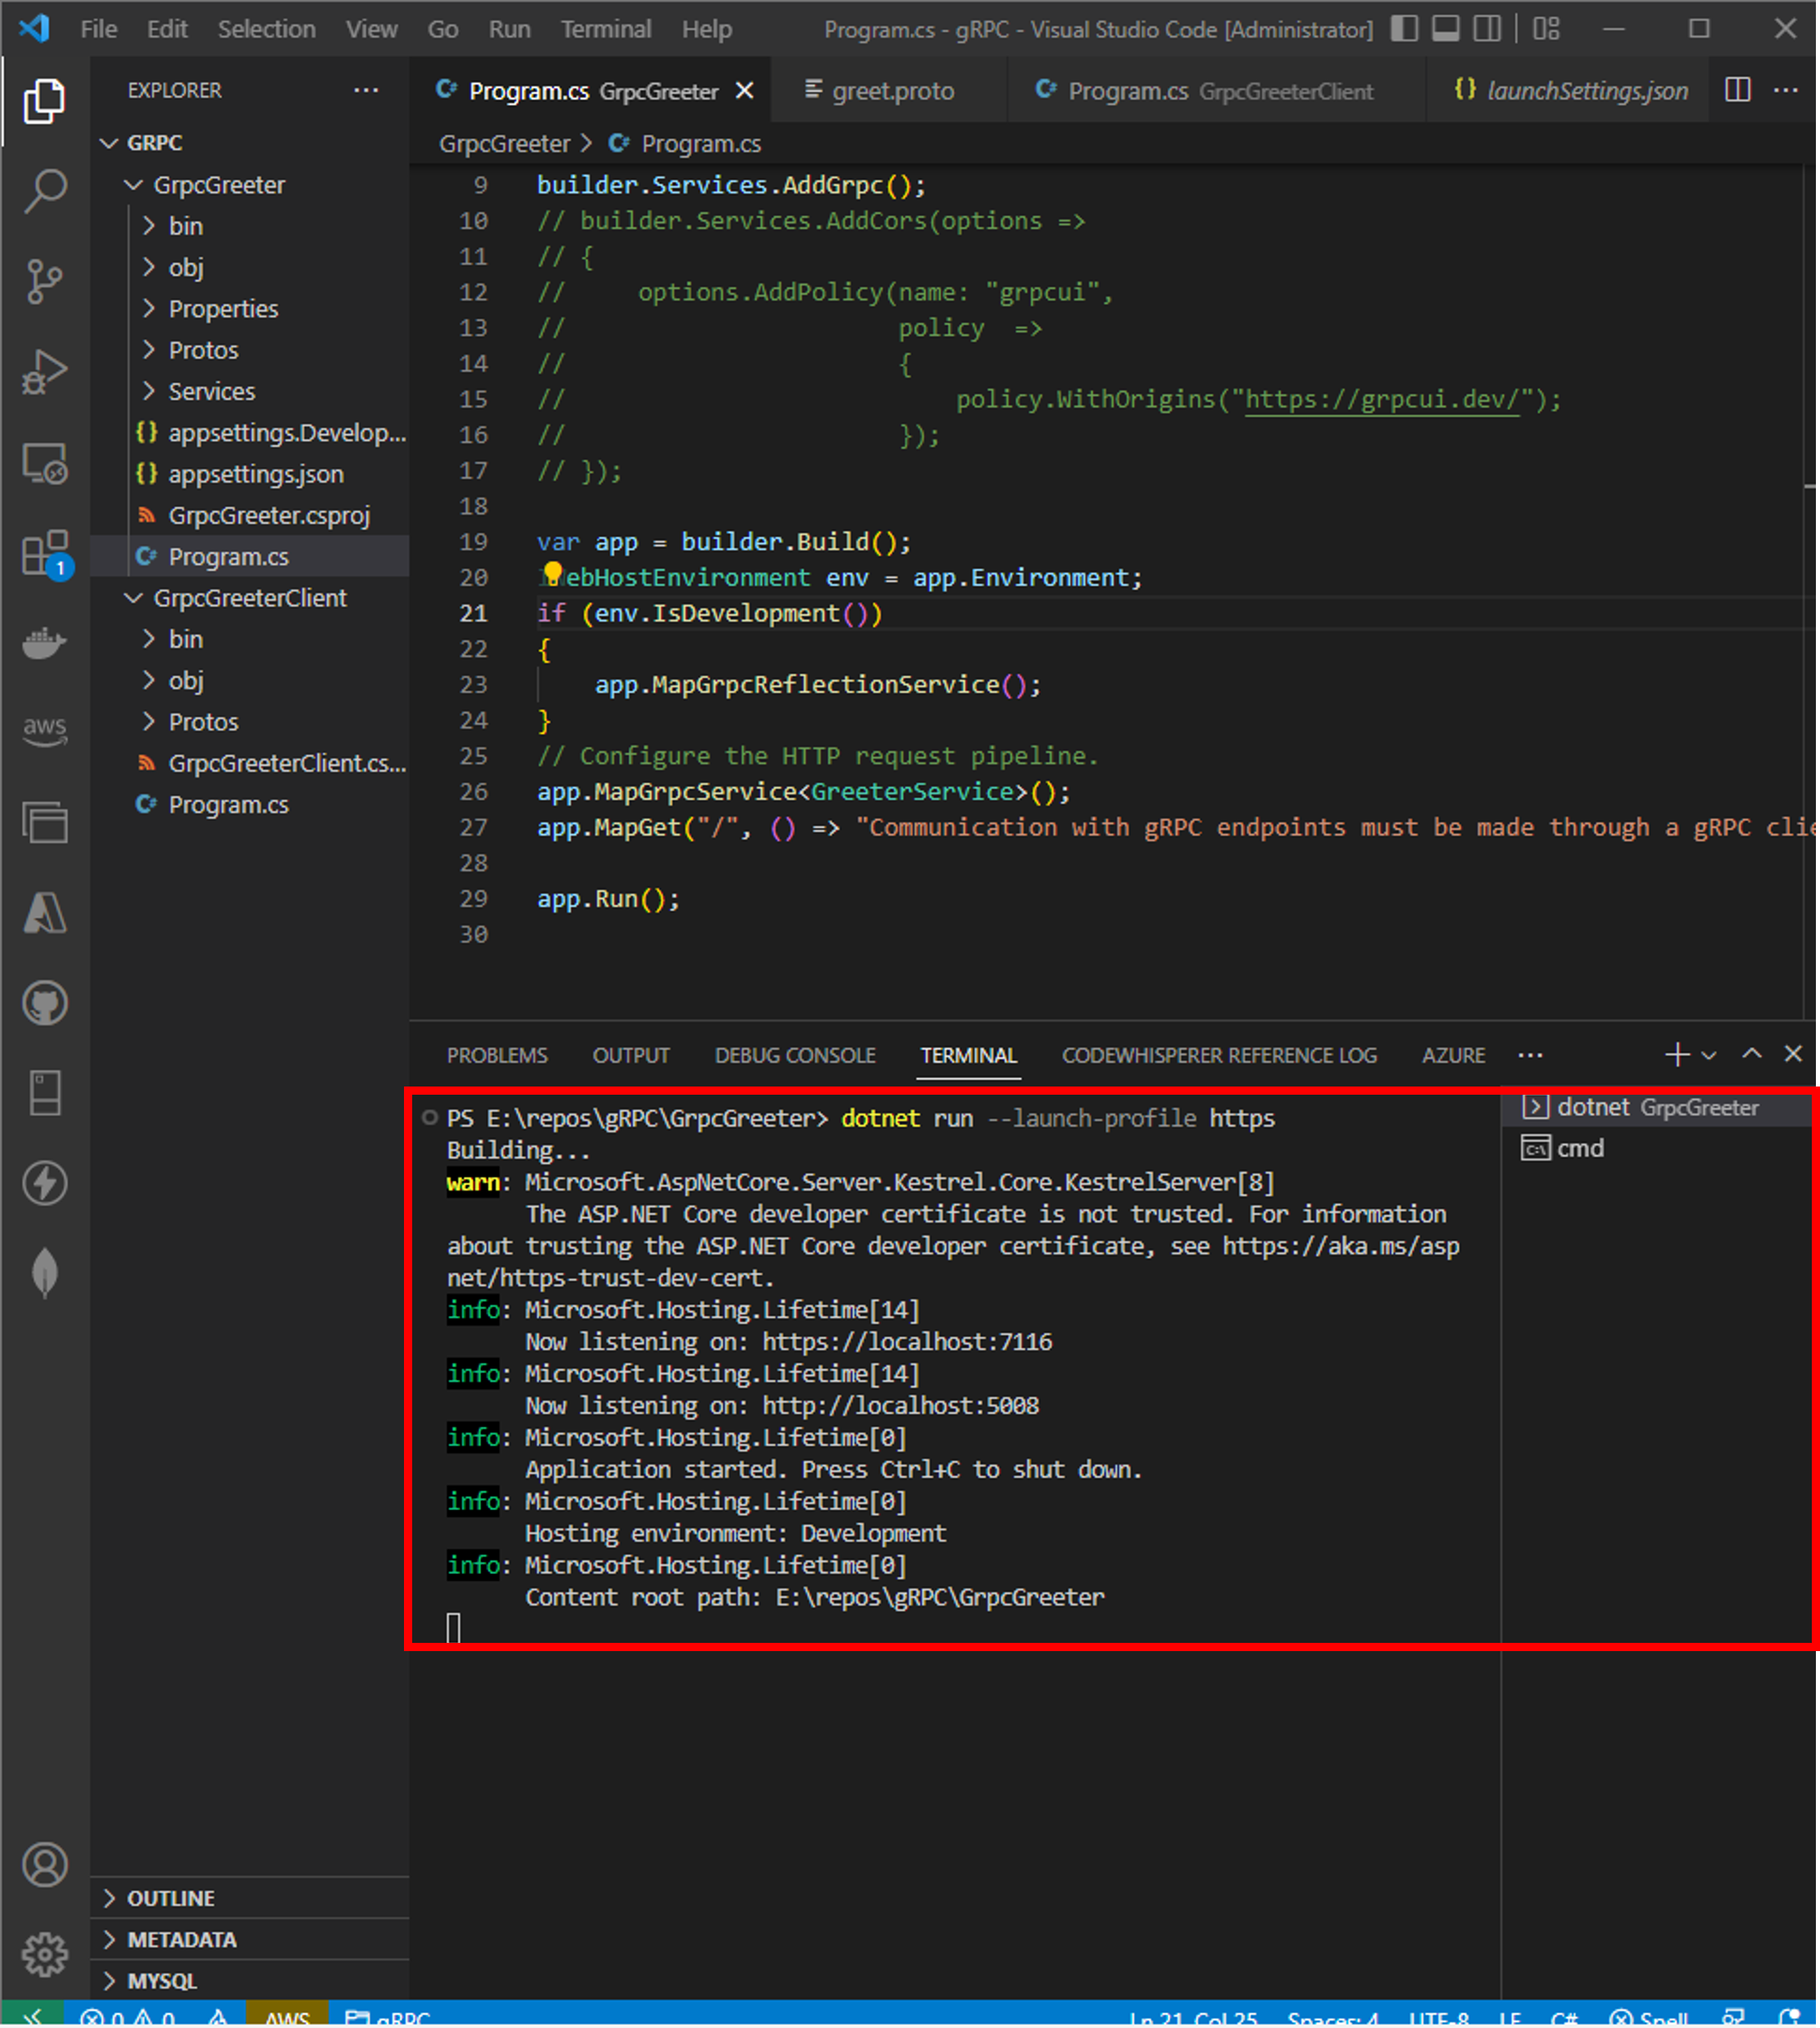
There are two settings in the [launchsettings.json] file of the [Properties] folder of the sample project that was described in the article ‘ASP.NET Core gRPC & gRPC communication tools’. Execute the project using the setting [https]. Please download the sample project from GitHub, or create the gRPC service with referring of the article.
The figure below right is type the [dotnet run –launch-profile https] command in the [Ternimal] of Visual Studio Code.
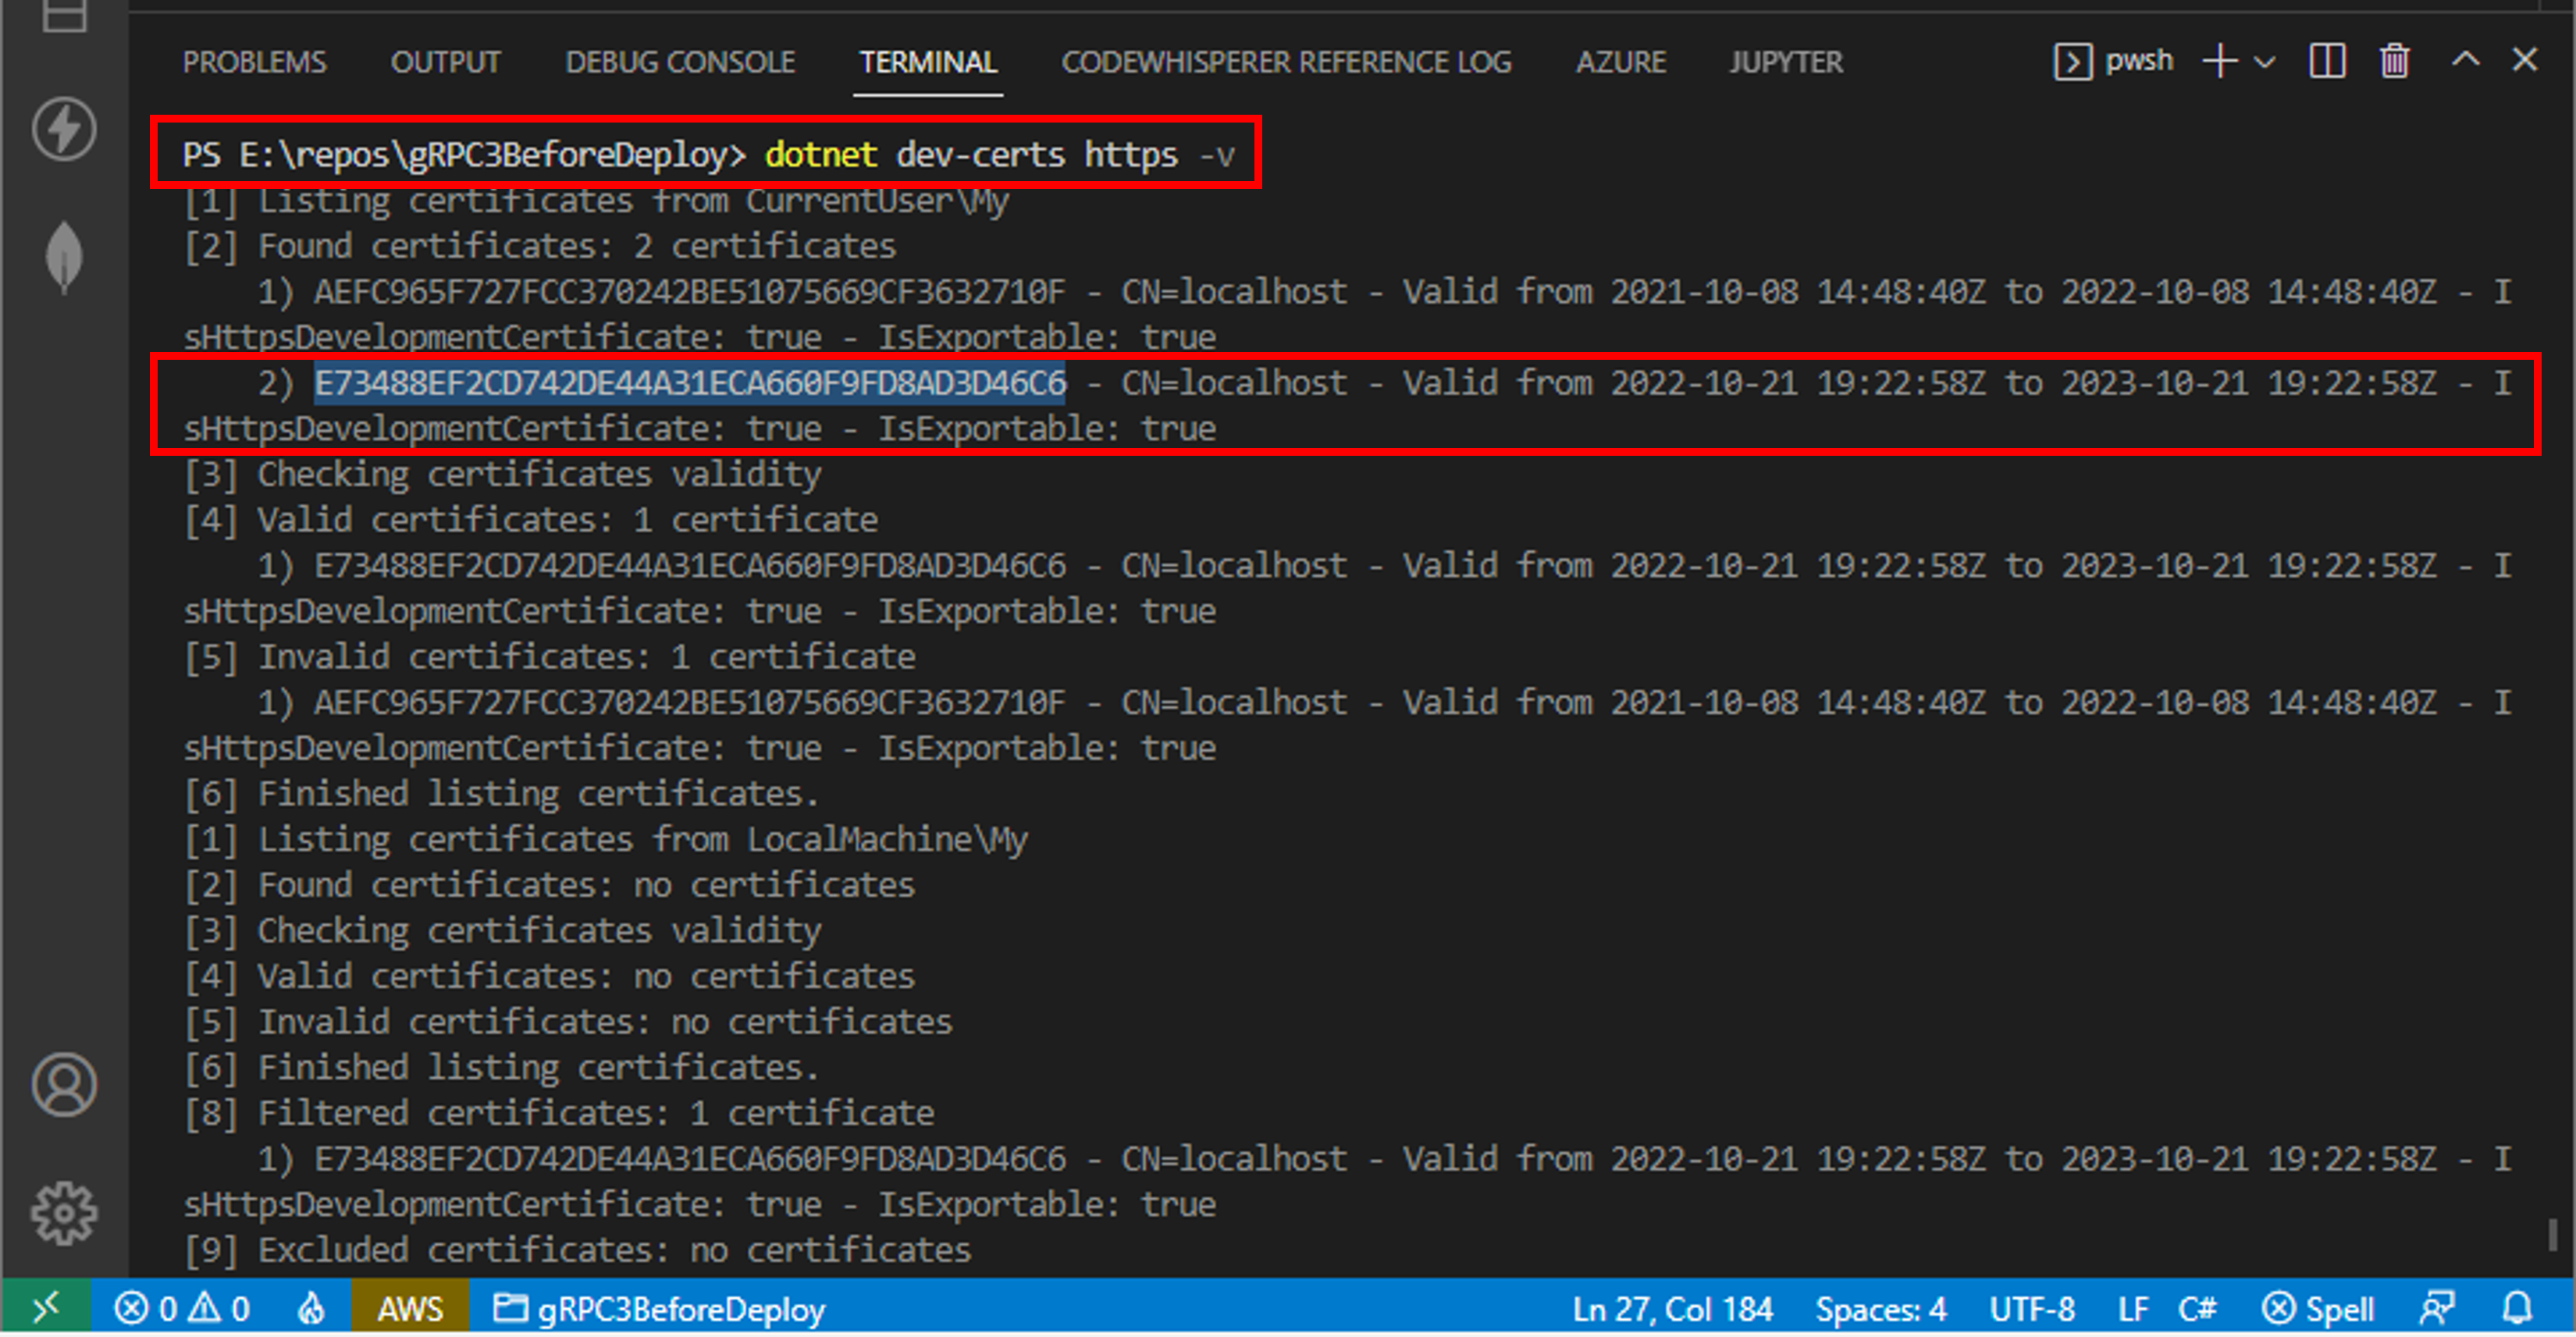
The gRPC communication provided Azure Web App Service needs TSL communication. It needs certificate to communicate while TSL handshake. Therefor create certificate, in many cases, there is the certificate for development already in the PC. For confirming local certificates in development environment use the command [dotnet dev-certs https -v] in the [Terminal] pane of Visual Studio Code. Find the certificate that is in vailed term and copy the certificate id. The certificate is also able to create as self signed with Go language that install in previous article [ASP.NET Core gRPC & gRPC communication tools]. Put the command below in the [Terminal] pane of Visual Studio Code (at current directory that moved project root folder).
//In the case of self signed
$Go installed path$\bin\go run $Go installed path$\src\crypto\tls\generate_cert.go --rsa-bits=2048 --host=localhost
In the case of certificate for development, check the [ASP.NET Core HTTPS development certificate] is trusted using the [certmgr.msc] command input to Windows [Run] menu item. If not, put the [dotnet dev-certs https –check –trust] in the [Terminal] pane of Visual Studio Code.
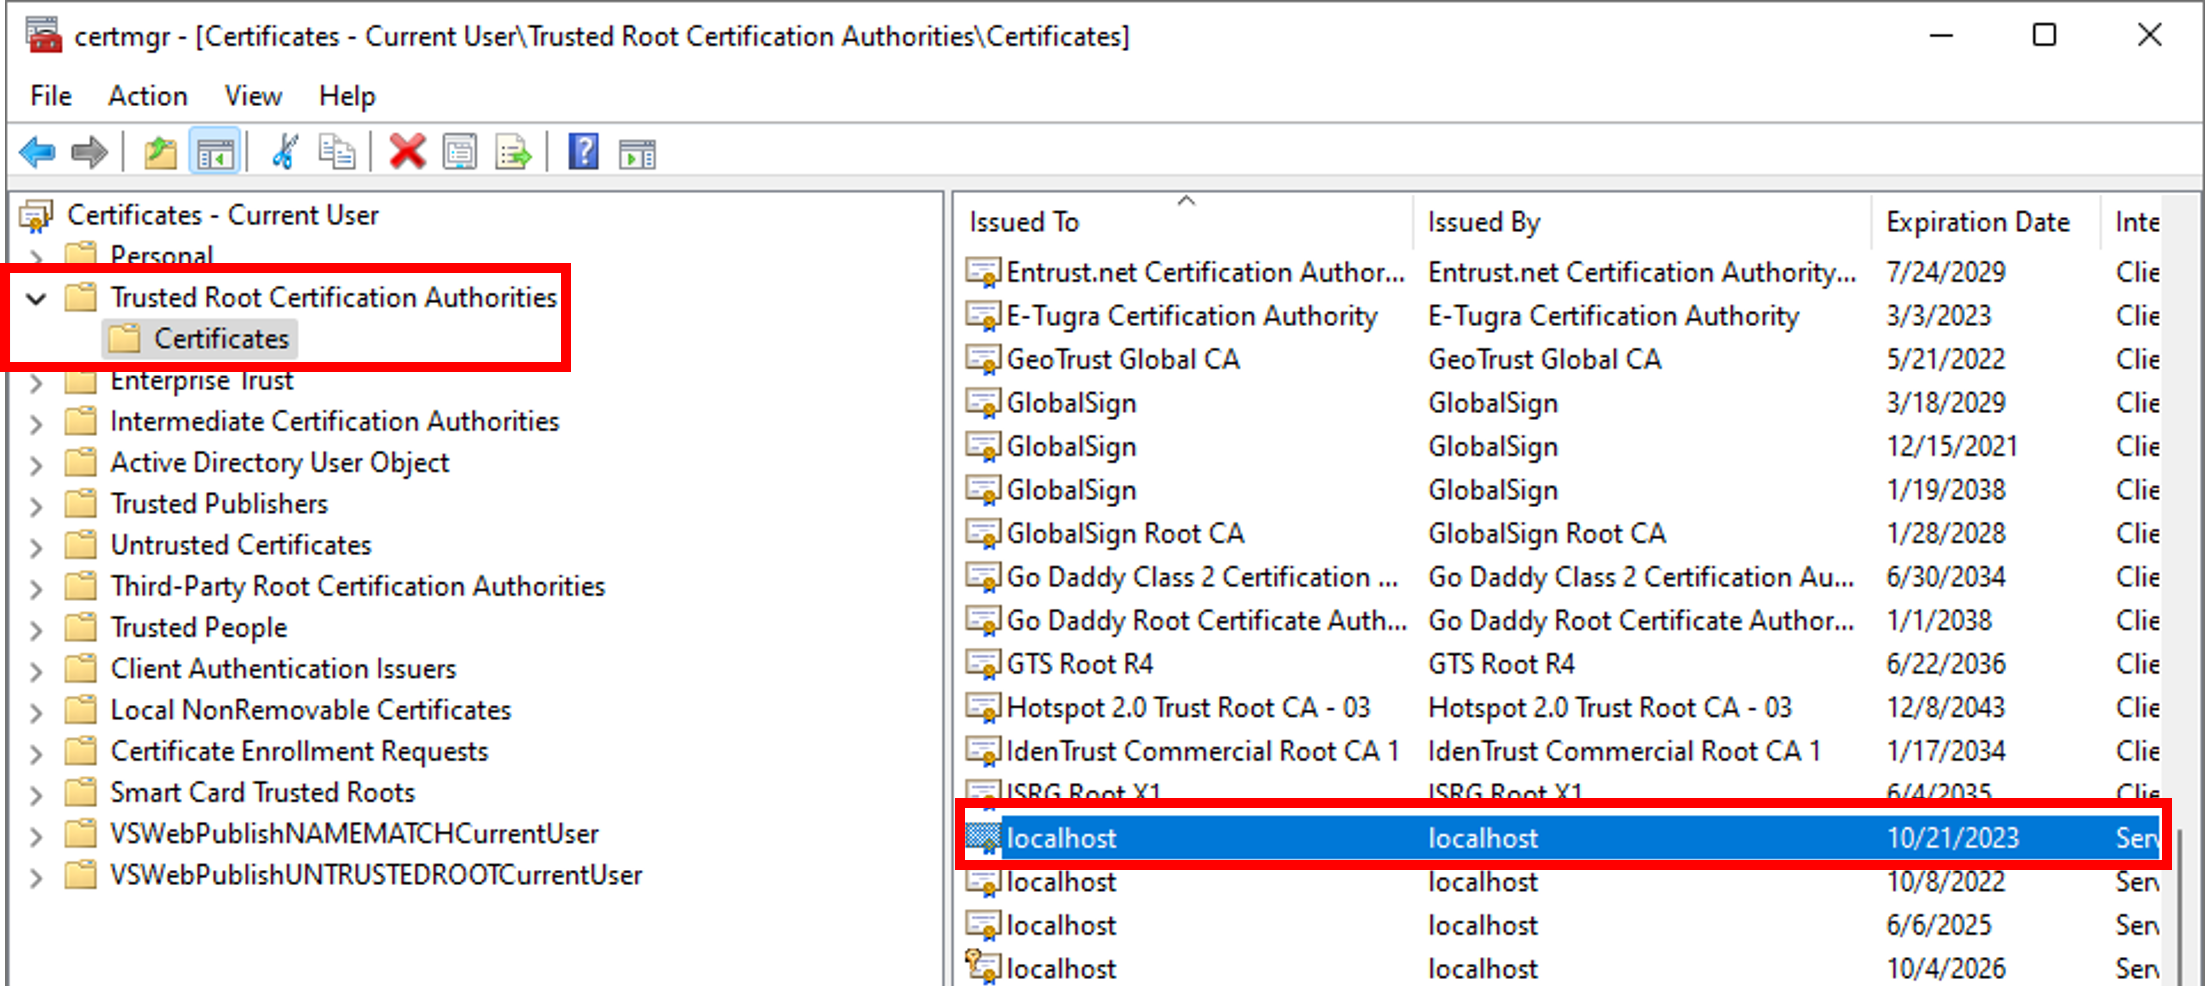
There is also able to check using the command [dotnet dev-certs https -v] in the [Terminal] pane of Visual Studio Code. And copy collect one certificate to use at C# code (refer to figure below). Select certificate that includes value [localhost] as the [CN] property and also has value of the [IsHttpsDevelopmentCertificate] property is [true] and valid period. If not, use the command [dotnet dev-certs https] to create the development certificate (detail is refer to the official document).
The code copied is used for the gRPC client app that is able to download from GitHub.
using System.Security.Cryptography.X509Certificates;
...
X509Store store = new X509Store(StoreName.My, StoreLocation.CurrentUser);
store.Open(OpenFlags.ReadOnly | OpenFlags.OpenExistingOnly);
var cert = store.Certificates.Where(c => c.GetCertHashString() =="E73488EF2CD742DE44A31ECA660F9FD8AD3D46C6").FirstOrDefault();
...
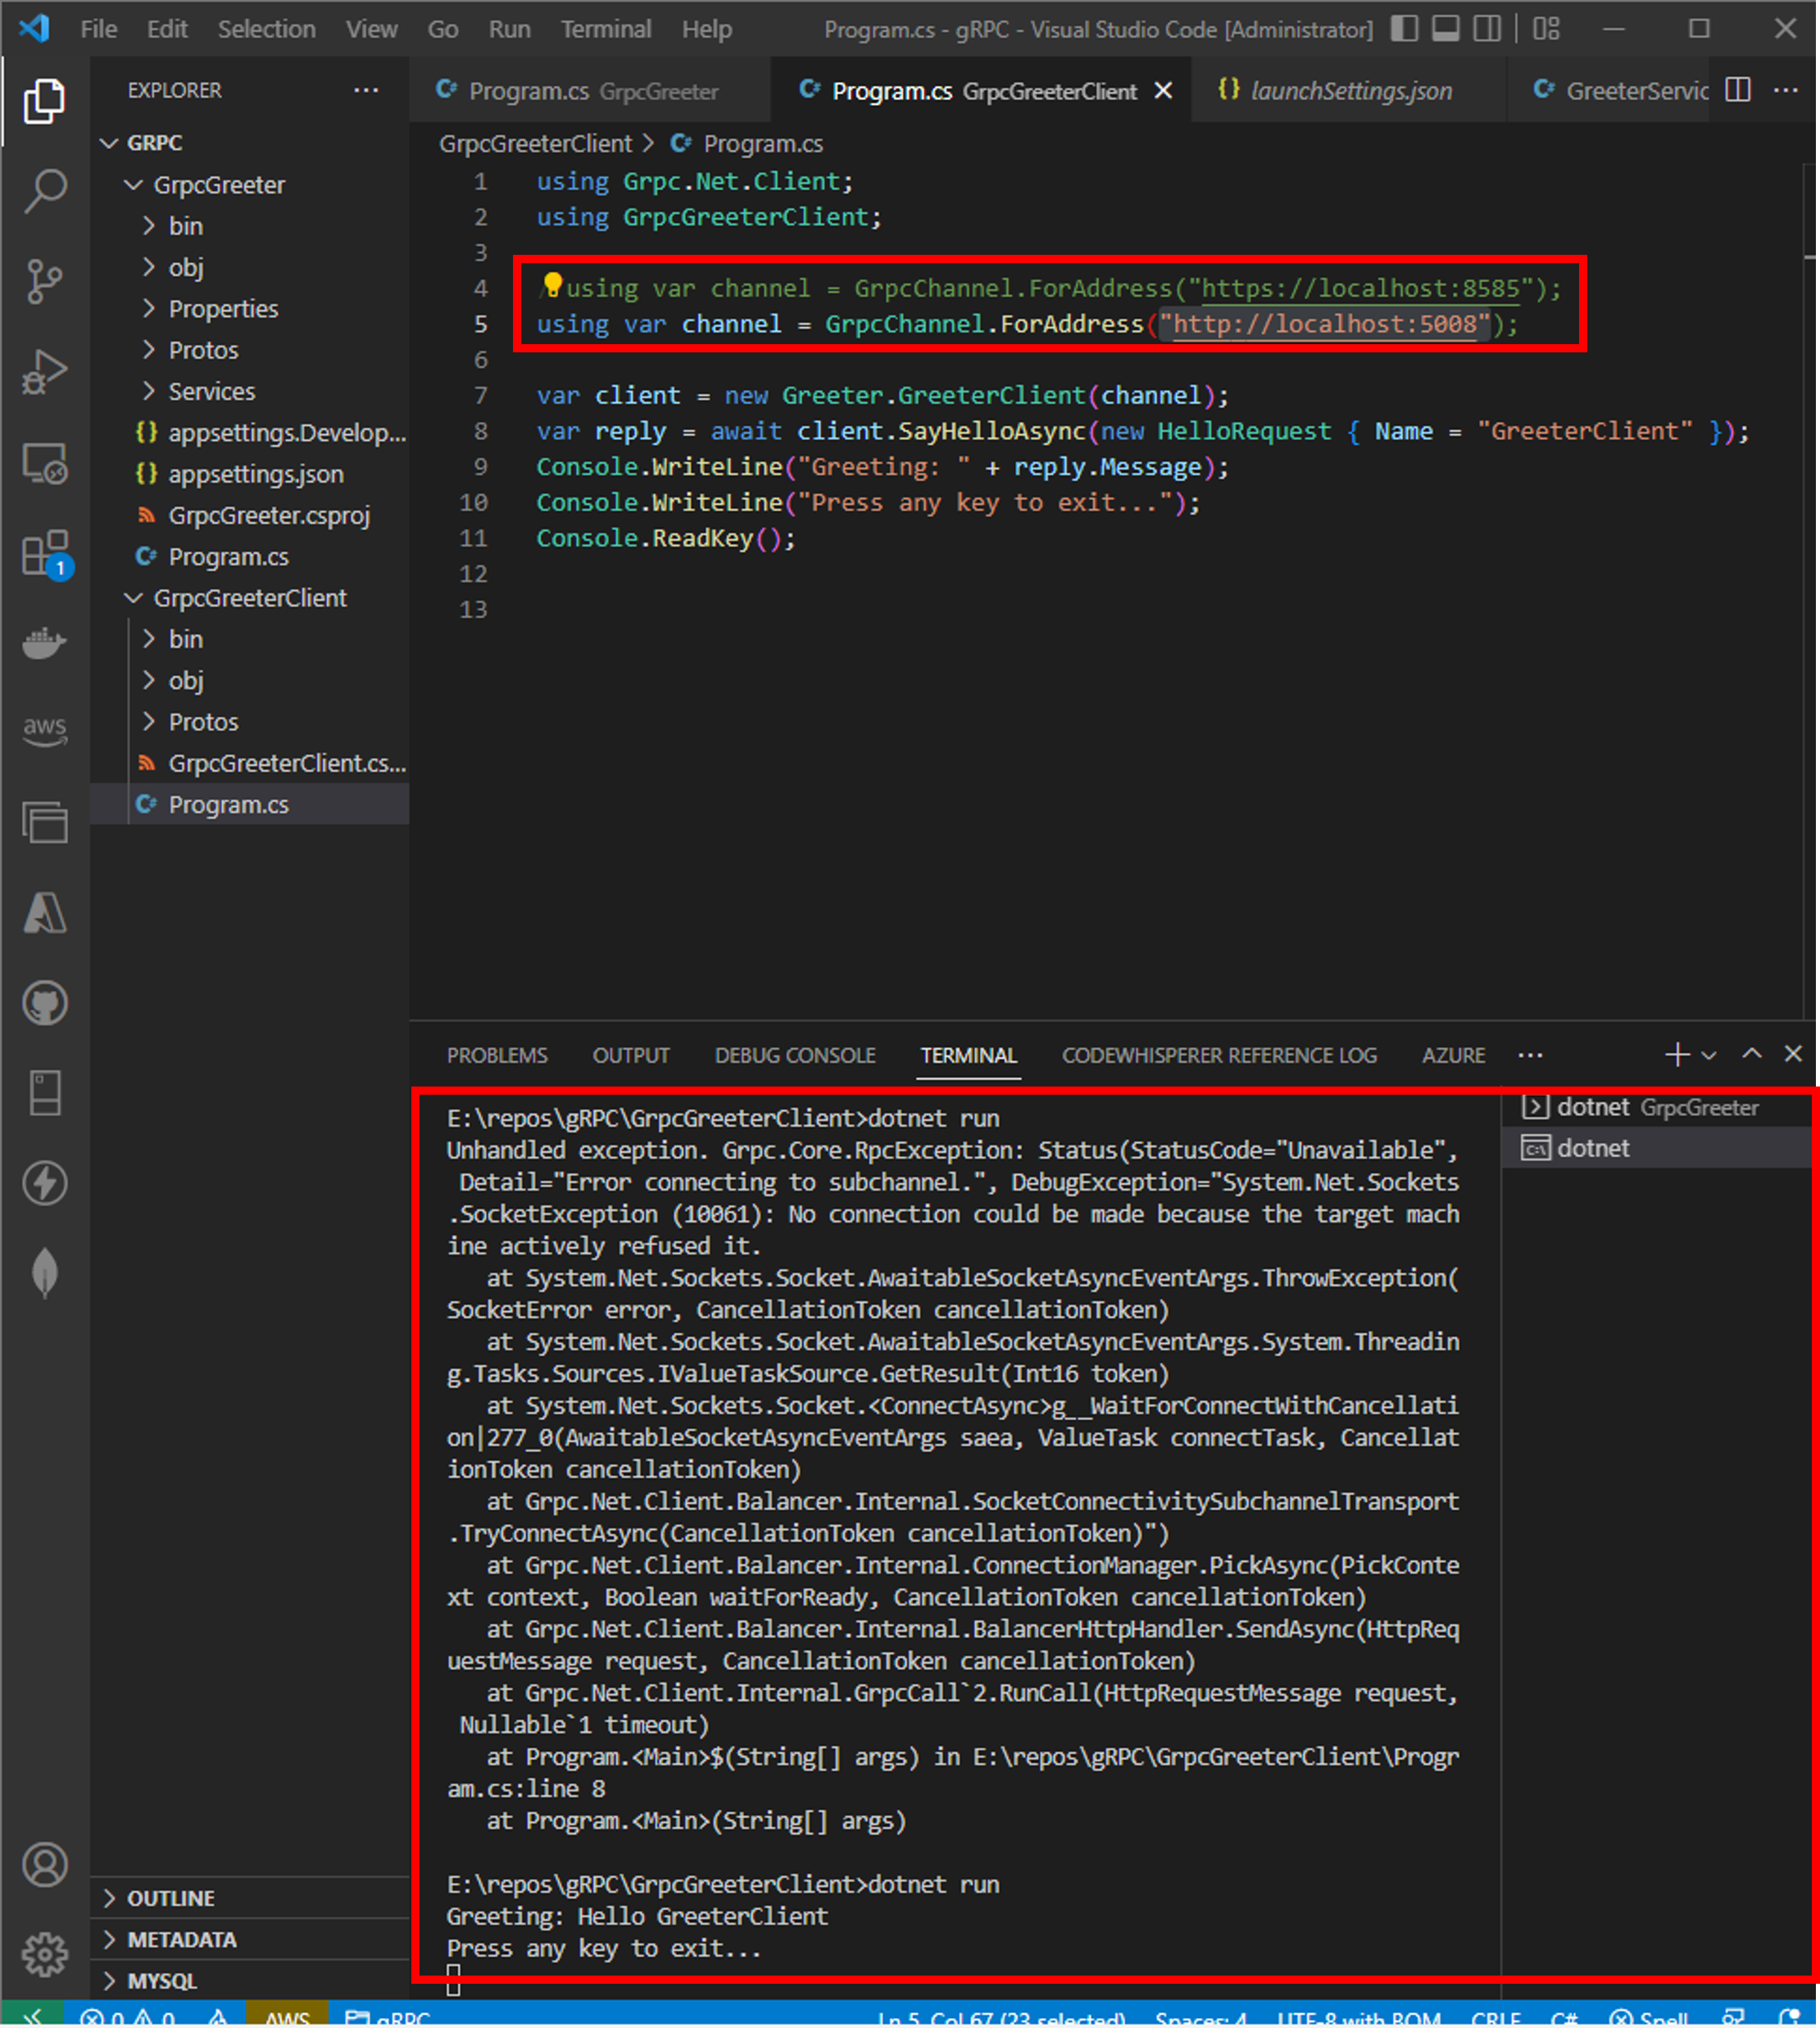
There is displayed error when execute the gRPC service use HTTPS and execute client-side app as simple [dotnet run] command with leave downloaded client-side app sample code. Thus, open the [Program.cs] file of the client-side app project and modify an argument of the [ForAddress] method to [“http://localhost:5008”].
Confirm certificate for development of localhost using the code above.
using Grpc.Net.Client;
// using GrpcGreeterClient;
using System.Security.Cryptography.X509Certificates;

//using var channel = GrpcChannel.ForAddress("https://localhost:8585");
using var channel = GrpcChannel.ForAddress("http://localhost:5008");

X509Store store = new X509Store(StoreName.My, StoreLocation.CurrentUser);
store.Open(OpenFlags.ReadOnly | OpenFlags.OpenExistingOnly);
var cert = store.Certificates.Where(c => c.GetCertHashString() =="E73488EF2CD742DE44A31ECA660F9FD8AD3D46C6").FirstOrDefault();

// var client = new Greeter.GreeterClient(channel);
// var reply = await client.SayHelloAsync(new HelloRequest { Name = "GreeterClient" });
// Console.WriteLine("Greeting: " + reply.Message);
Console.WriteLine(string.Format("{0}, Press any key to exit...",cert!.FriendlyName));
Console.ReadKey();
• Deploy the gRPC service to Azure Web App Service
It is able to use Visual Studio Code to deploy the gRPC service to Azure Web App service. Download the sample project that was described in the article ‘ASP.NET Core gRPC & gRPC communication tools‘ from GitHub, or create the gRPC service refer to the article.
The gRPC service has to be able to listen on only port 5243 that set at Azure Web App Service with HTTP 2.0, so modify configuration of the Program.cs file as below. This code needs the nuget package.
using Microsoft.AspNetCore.Server.Kestrel.Https;
using Microsoft.AspNetCore.Authentication.Certificate;
...
var builder = WebApplication.CreateBuilder();
builder.Services.AddAuthentication(
        CertificateAuthenticationDefaults.AuthenticationScheme) // use Microsoft.AspNetCore.Authentication.Certificate
    .AddCertificate(options =>
    {
        options.AllowedCertificateTypes = CertificateTypes.All; // use Microsoft.AspNetCore.Authentication.Certificate
    });
builder.Services.AddAuthorization();
builder.WebHost.ConfigureKestrel(options =>
{
    options.ListenAnyIP(5008);
    options.ListenAnyIP(7116, listenOptions =>
    {
        listenOptions.Protocols = Microsoft.AspNetCore.Server.Kestrel.Core.HttpProtocols.Http2;
        listenOptions.UseHttps(options =>
            {
                options.ClientCertificateMode = ClientCertificateMode.RequireCertificate; // use Microsoft.AspNetCore.Server.Kestrel.Https
                options.ClientCertificateValidation = (certificate, chain, errors) => {
                    options.ServerCertificate = certificate;
                    return true;
                };
            }
        );
    });
});
This code adds the Authentication feature and the Authorization feature, also needs the Routing feature, the Authentication feature and the Authorization feature for Web application, thus add code below before the [app.MapGrpcService
app.UseRouting();
app.UseAuthentication();
app.UseAuthorization();
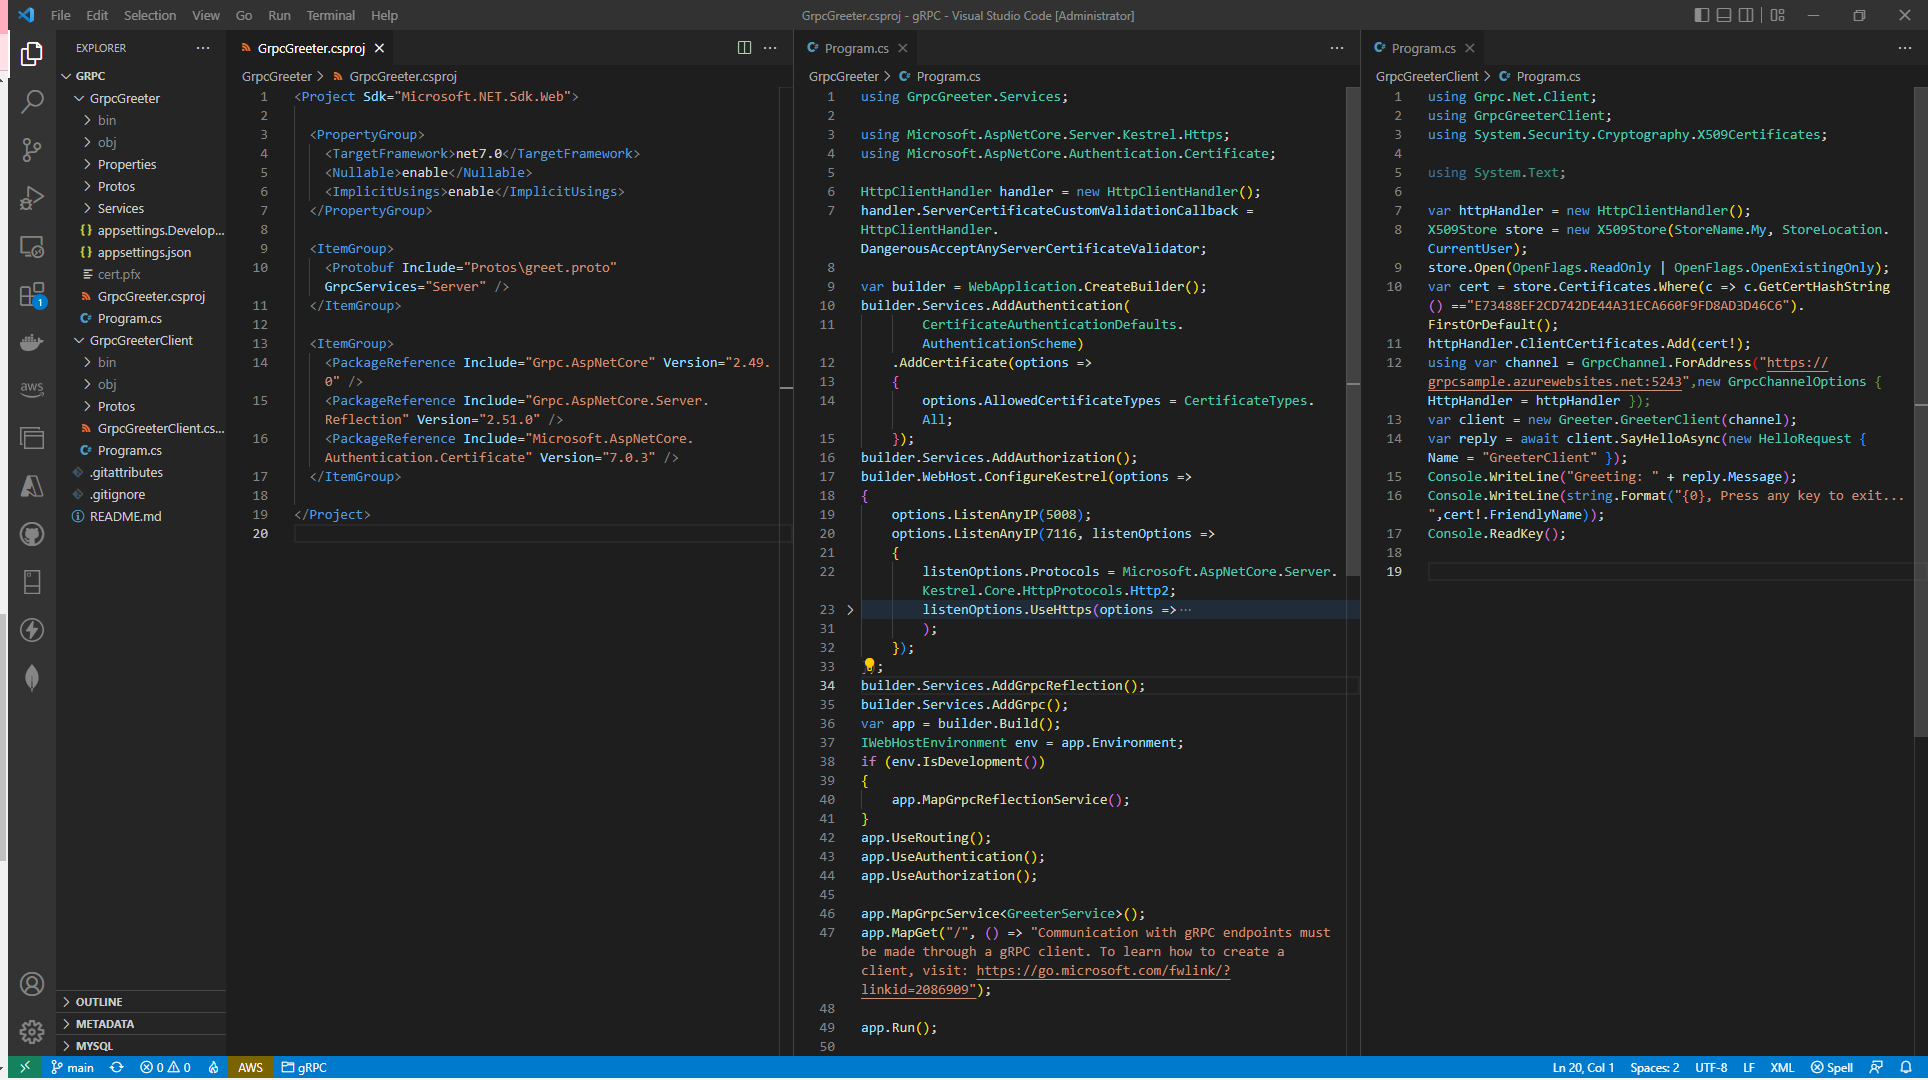
Figure below is all code of service and client, therefore can deploy the service part to Azure.
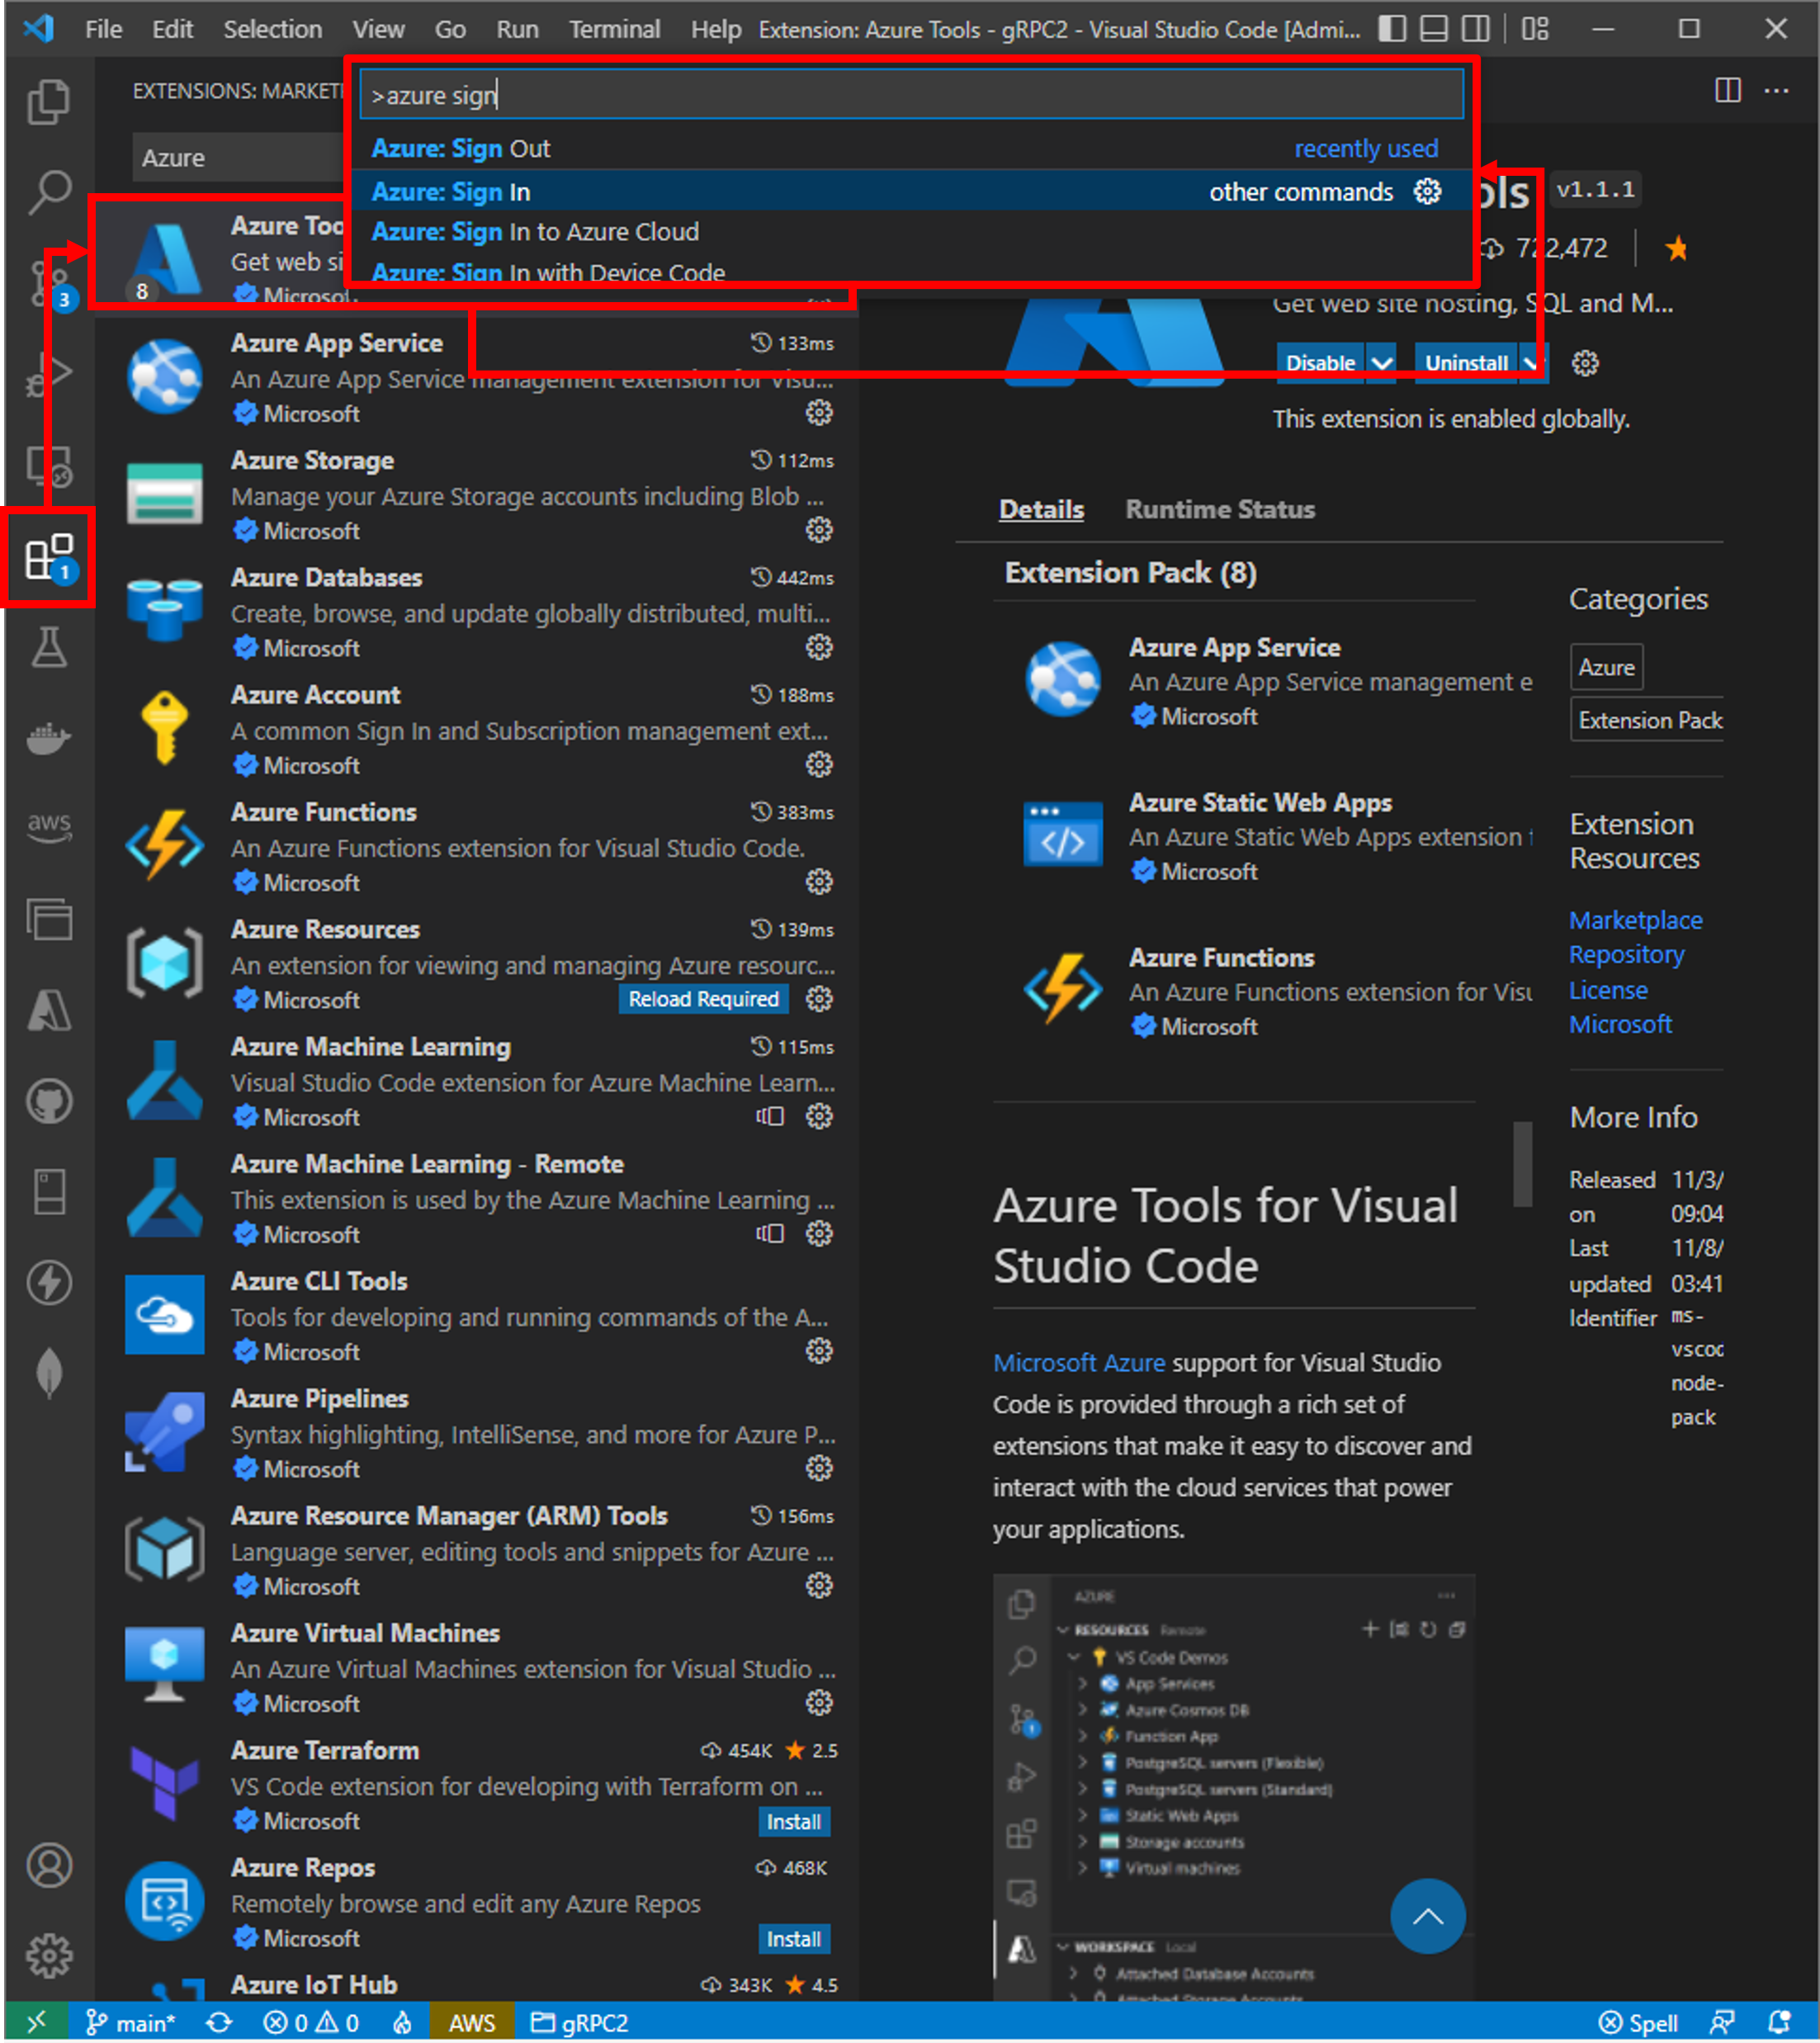
Sign in Azure from Visual Studio Code before proceeding to the next step. Press the key [Ctrl] + [Shift] + [P] to open the [Command palette], and input ‘azure sign’ and select the menu item [Azure Sign In] from the list of the palette. This operation needs the [Azure Tools] Visual Studio Code extension, thus install it if the extension is not installed (Figure left).
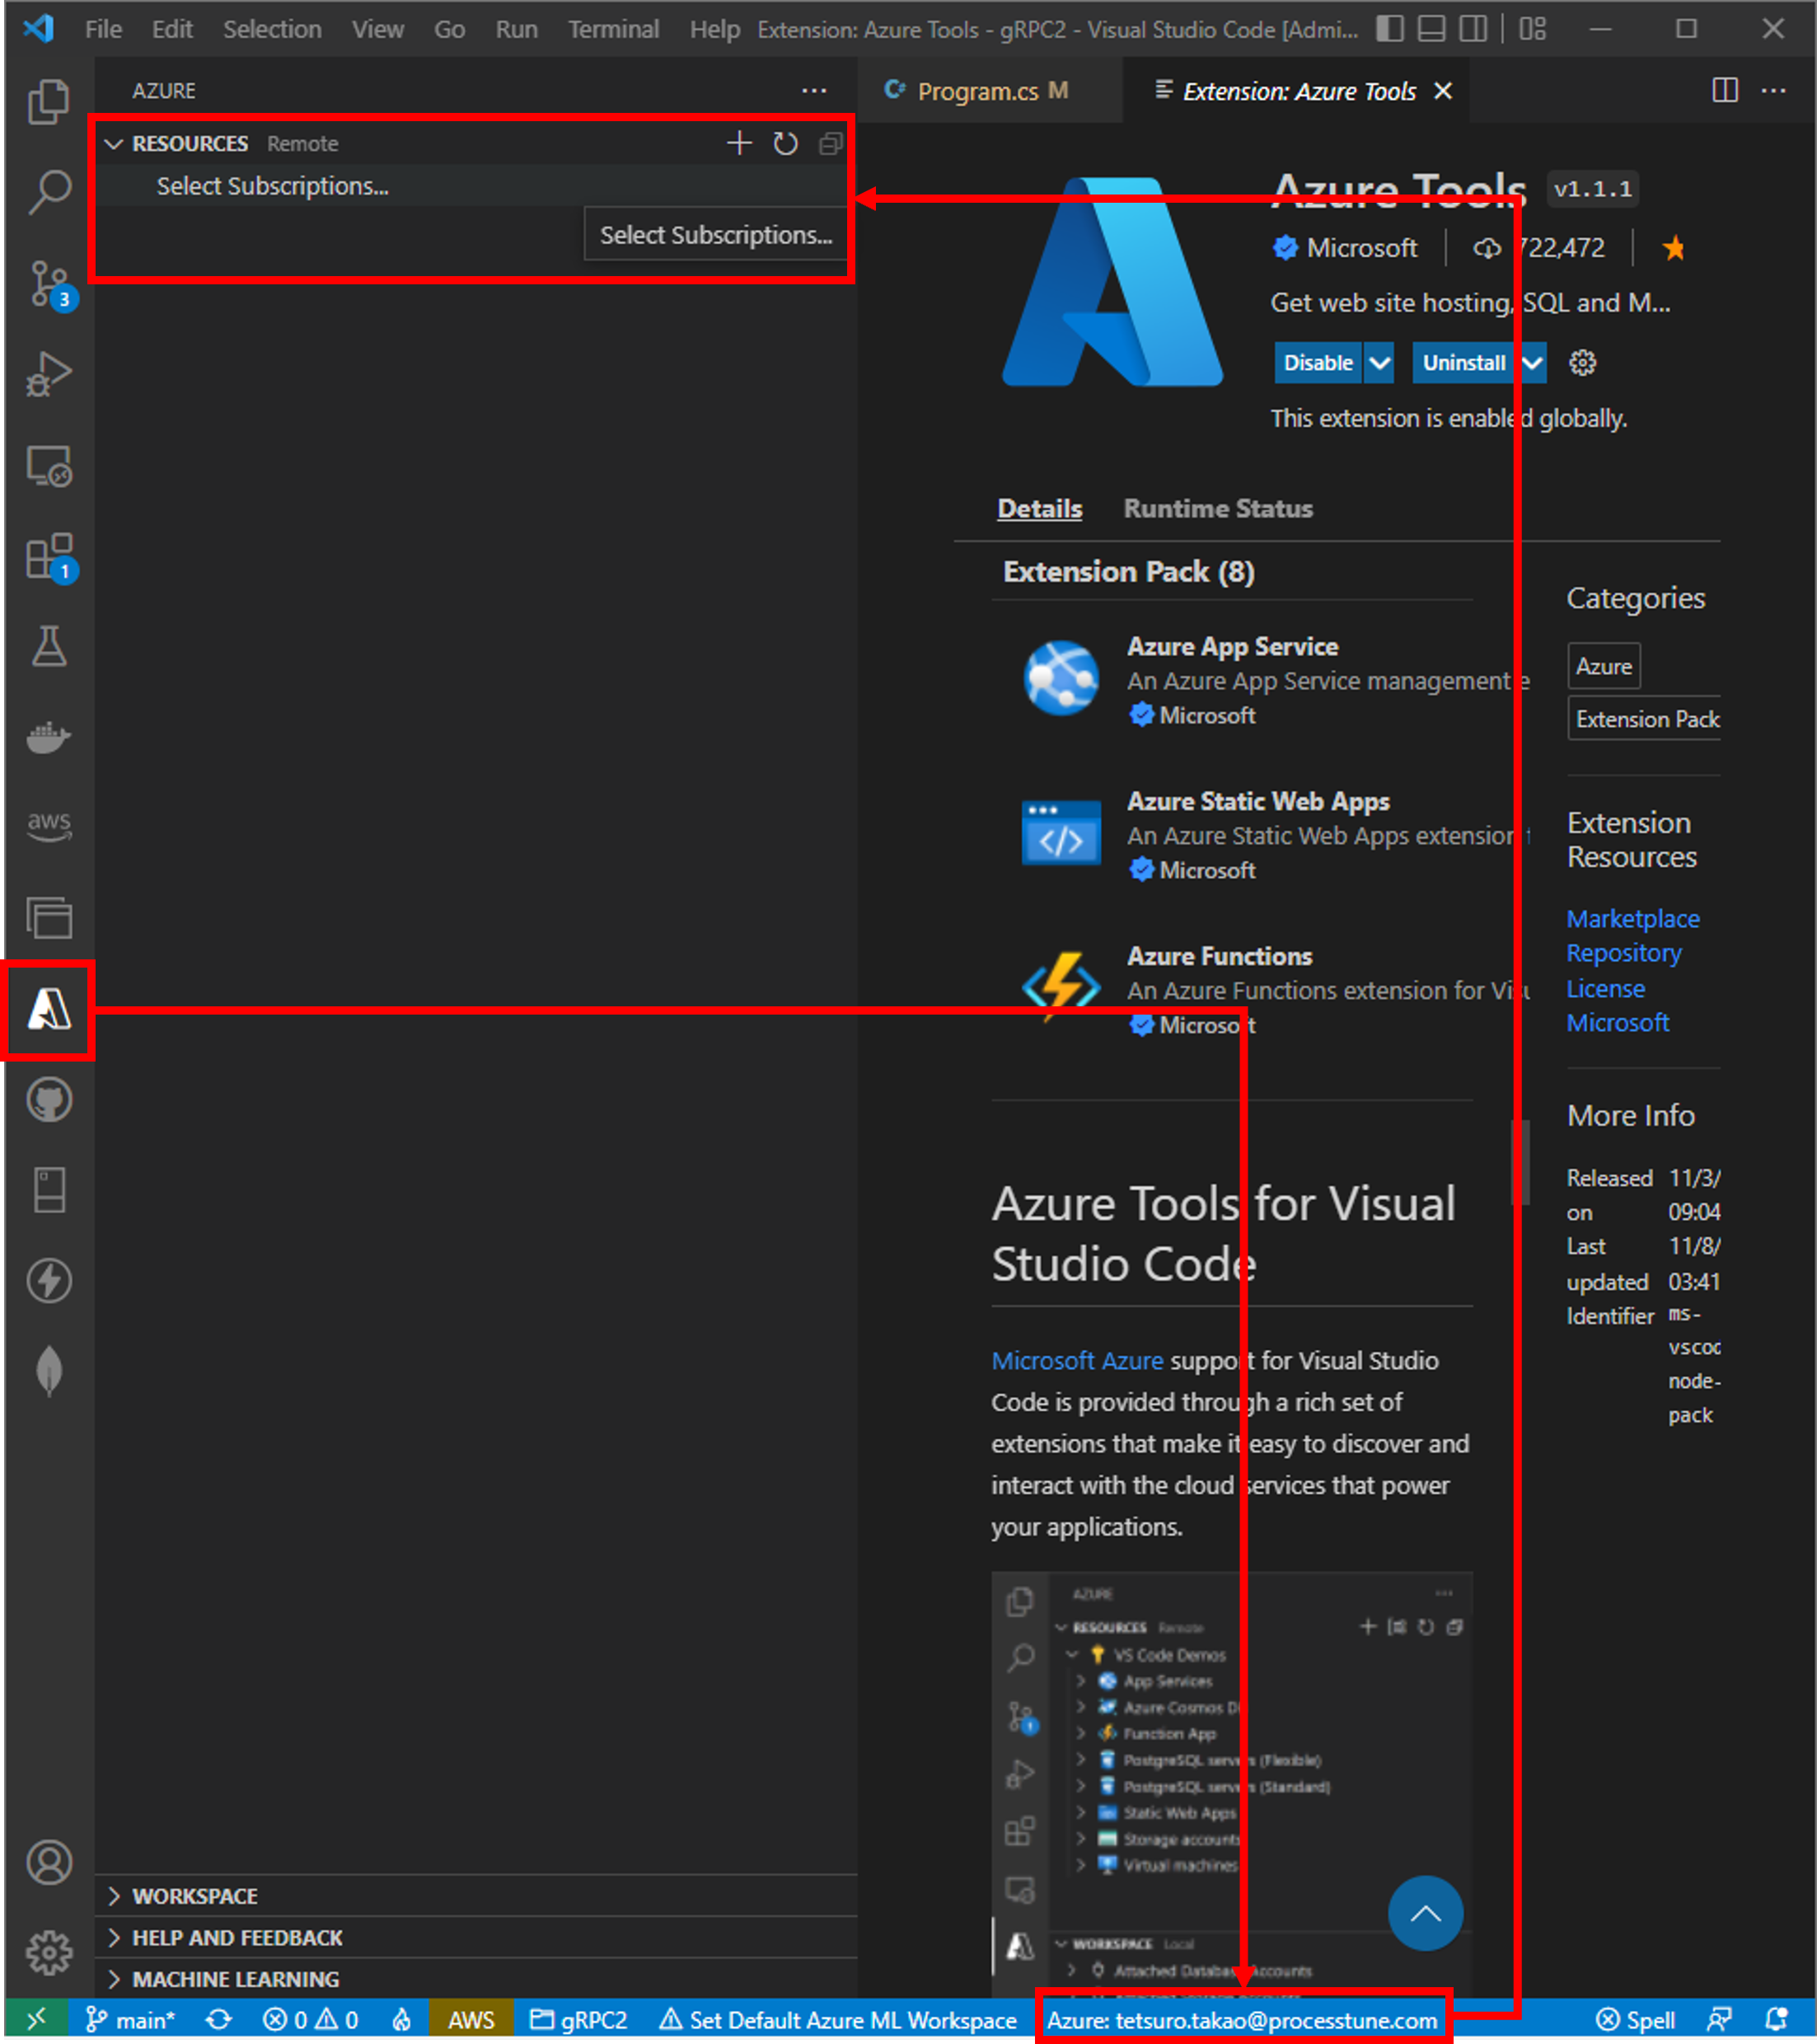
Confirm sign in information at the [Azure Account Status] of the [Status bar] and select the [Azure Tools] extension at the [Activity Bar]. Then can select subscription of Azure when select the [RESOURCES] section of the [Azure Tools] extension (Figure right).
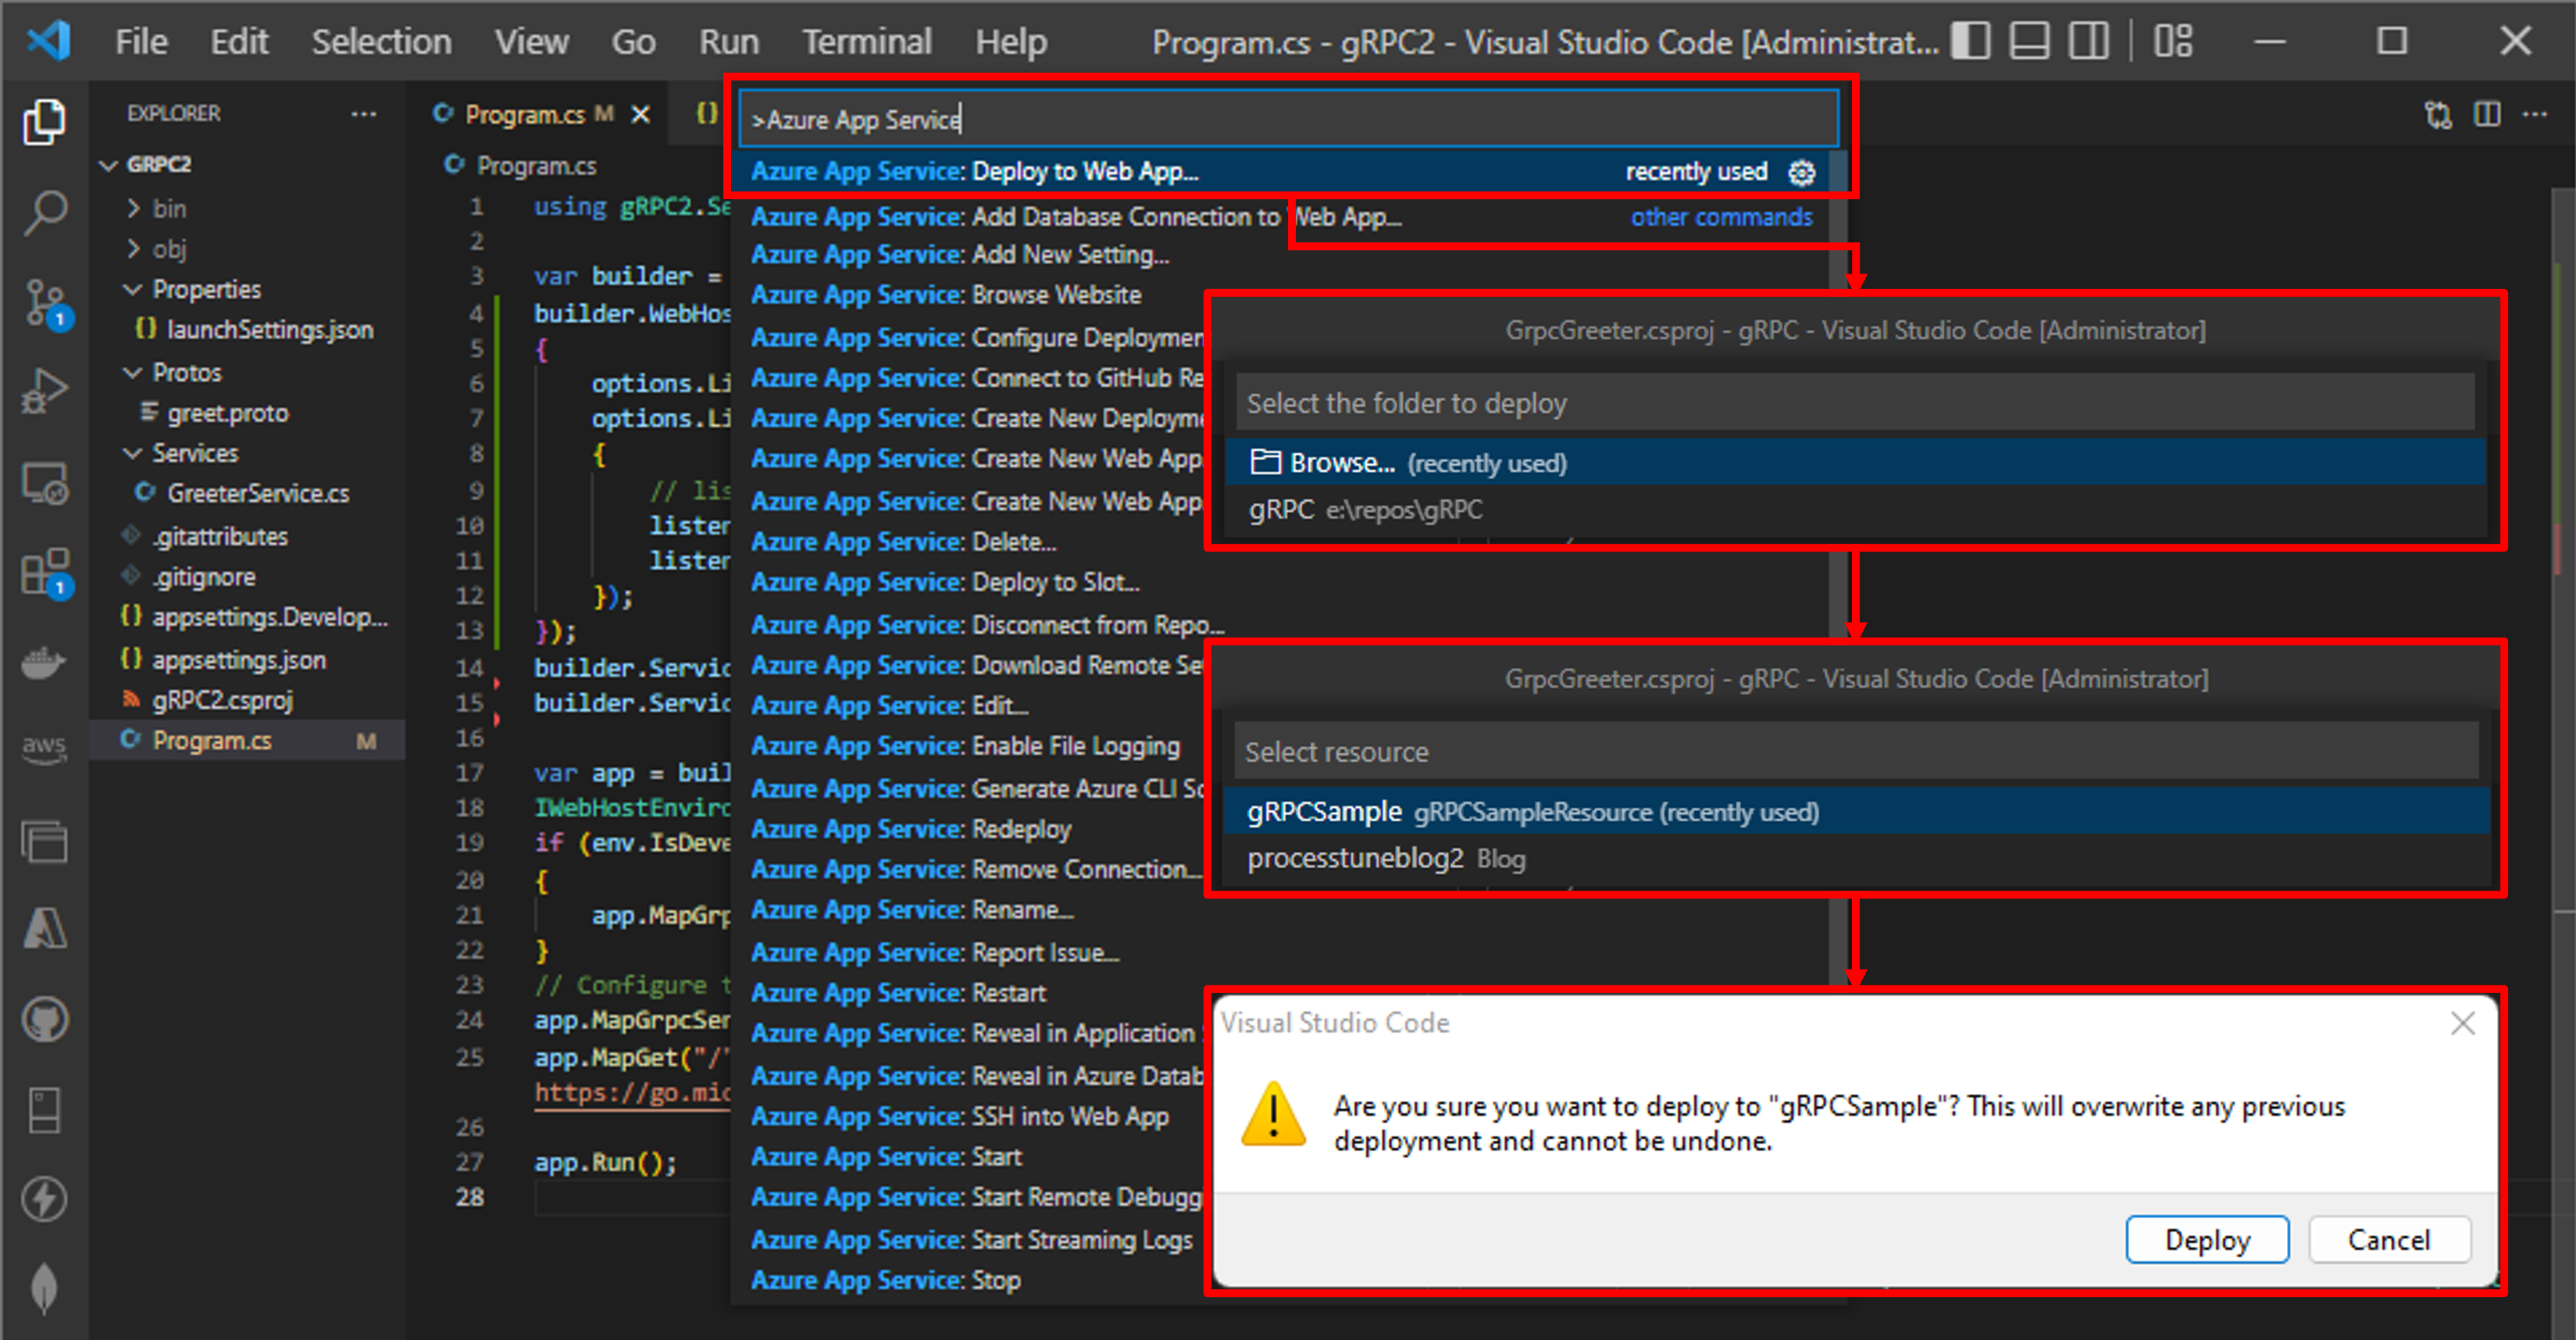
Press the key [Ctrl] + [Shift] + [P] in Visual Studio Code to open the [Command palate], And input ‘Azure App Service’ to the palate. Select the Subscription at the [Command palette] and select the Resource (Azure Web App Service) that created in the section above (‘Create the Web App Service using Azure portal’) too. Select the [OK] button after shown the confirm dialog.
No responses yet