
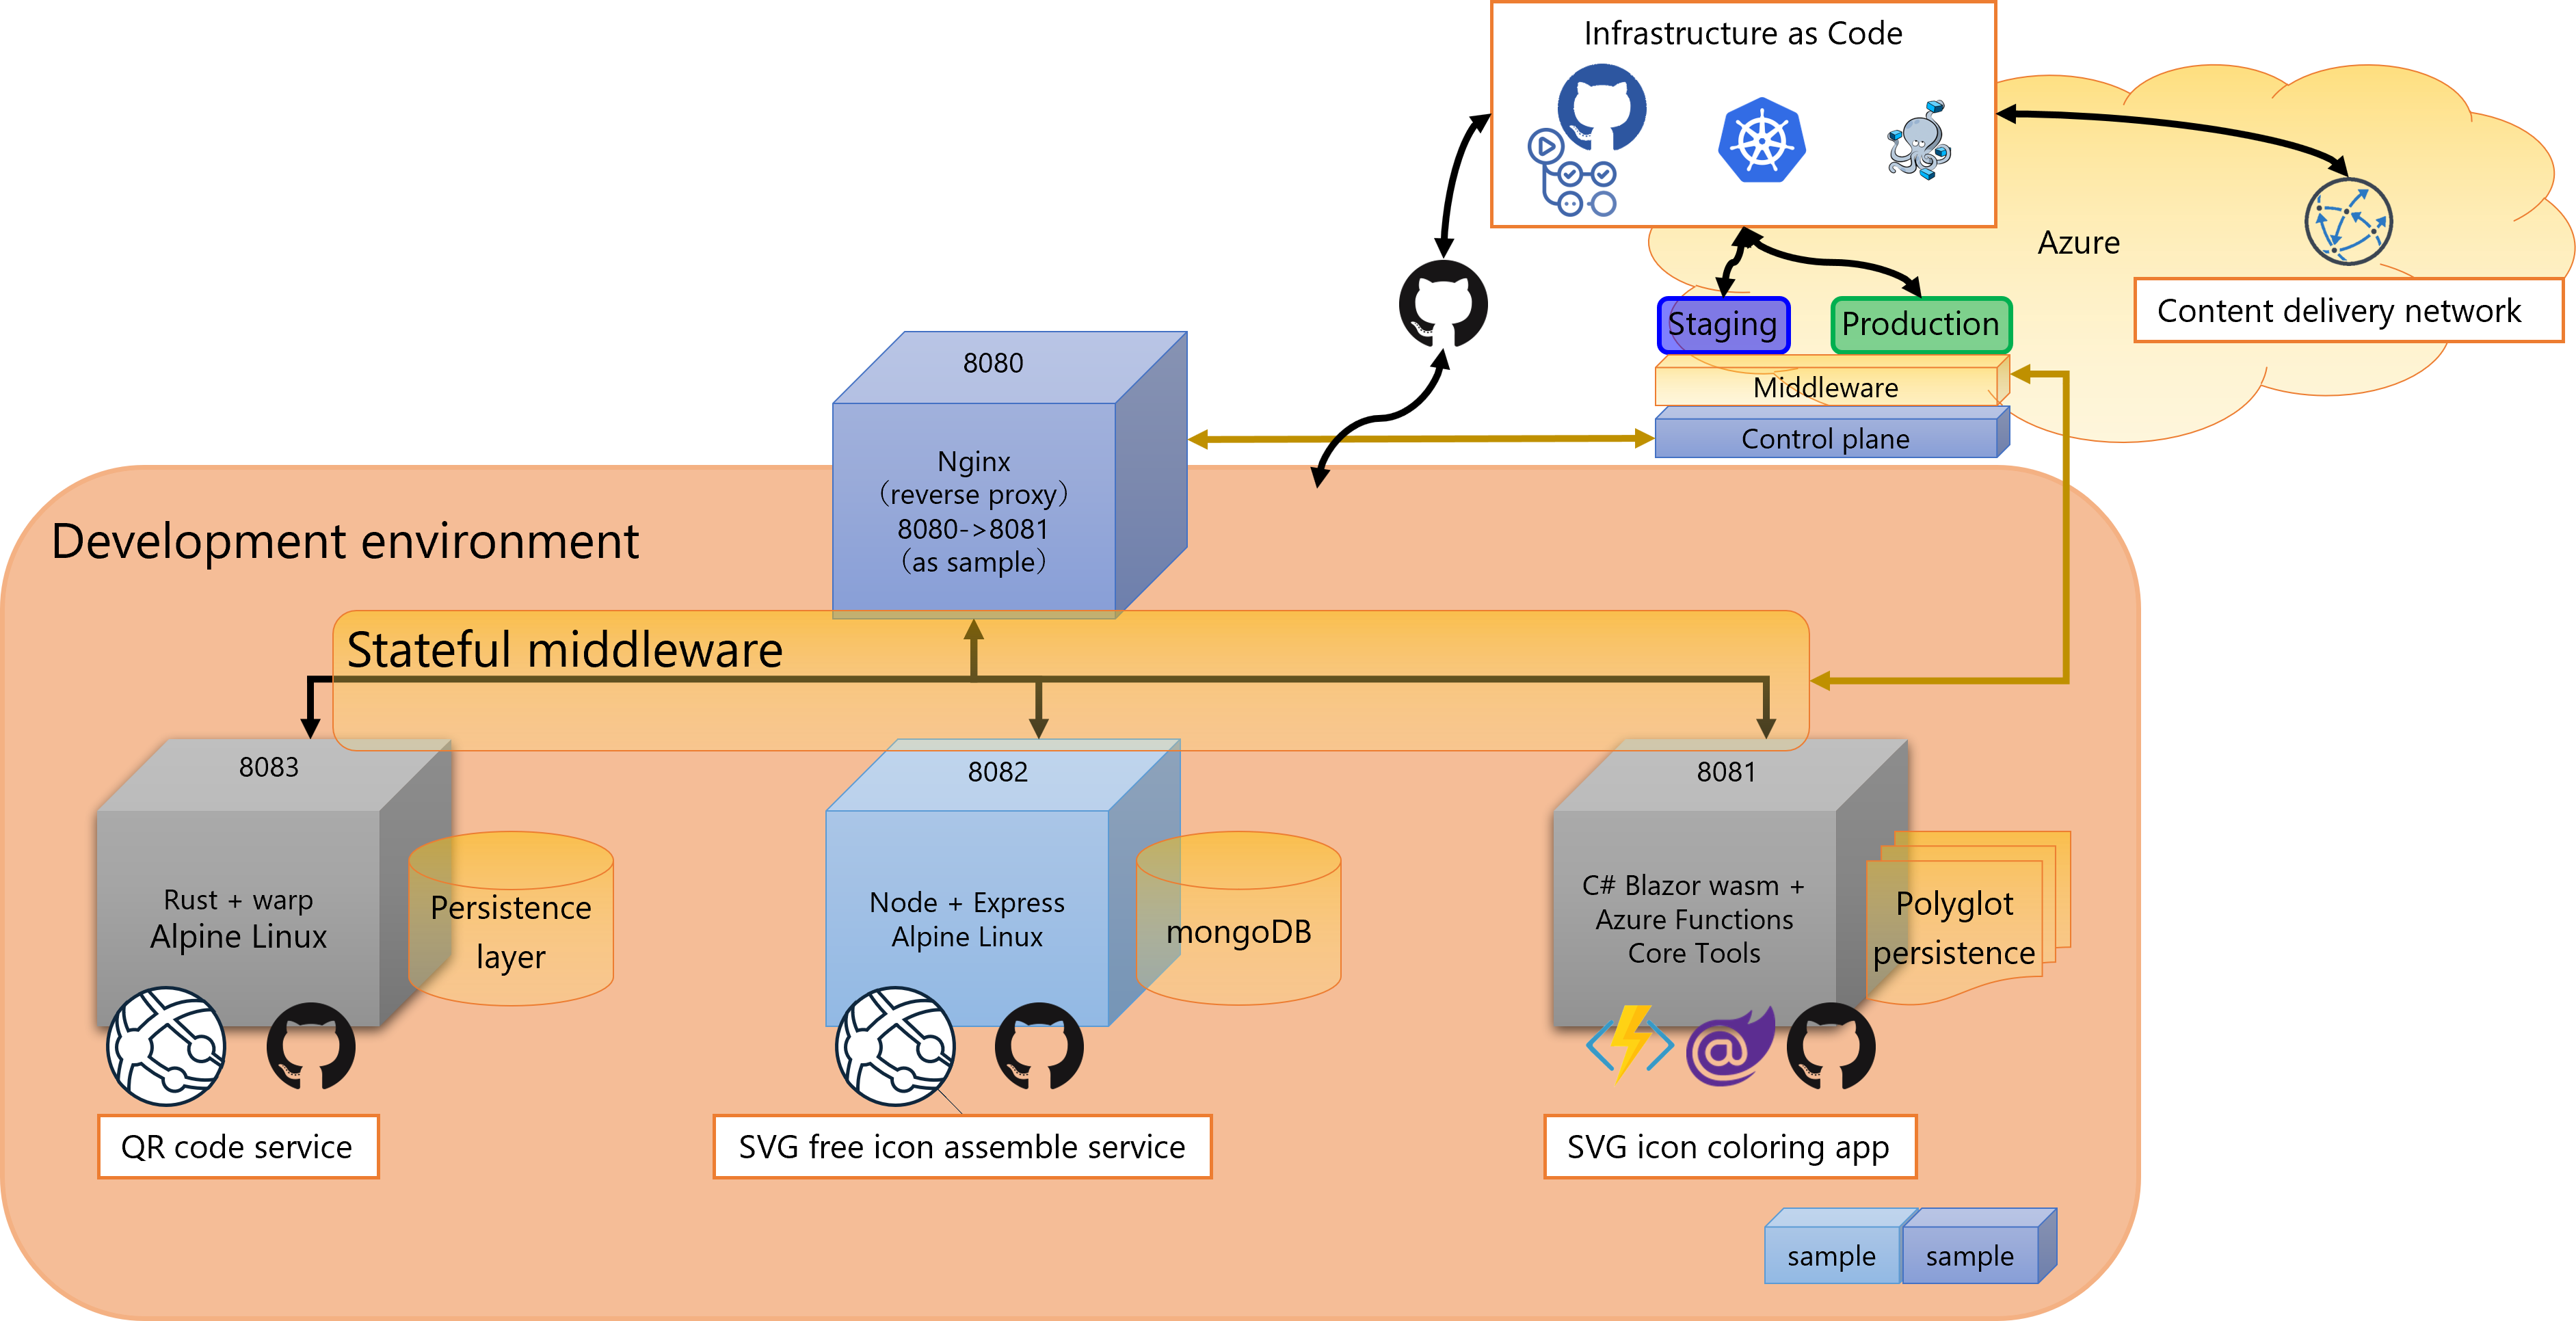
The article [Nginx run on Windows Subsystem for Linux 2] described mechanism of reverse proxy for development environment. This sample server has not features of logging, service discovery, load balancing, encryption, observability, traceability, authentication & authorization, and the circuit breaker pattern, if create service mesh endpoint that can provide these features, individual service delegates these feature to the endpoint. This article describes mecanism of such service that only provides business logic.
Also the service this article discribes has persistence layer, its data storage type is deferent against other services provides. So this article helps you to get outline of polyglot persistence.
The sample container of this article uses Node for application runtime, Express web app framework, and MongoDB as persistence layer.
>>Sample project of this article that created with Node and Express
・MongoDB Docker official image
First step of the sample project creation is same as the sample project of the article [Nginx run on Windows Subsystem for Linux 2], download Docker official image then modify Alpine Linux, with some apps or liblary, framework and so on install to it.
In this article, this sample container use MongoDB as persistence layer, so using MongoDB Docker official image. It is different procedure that using Nginx Docker official image as creation of HTTP listener and web contents response service. It are made from the Express libraly this time.
It is easy way using the Docker Desktop than following steps that using the Windows Subsystem for Linux 2 to create a container, although reccomend using WSL 2 to create some container for understanding mechanism of inside of a container.
If following prepare are not complete yet, refer the article [Nginx run on Windows Subsystem for Linux 2] to prepare doing follow code such as making WSL 2 usable, set Ubuntu on WSL 2 or how to install Docker.
The command follows means that the port number [3000] is default port number of the Express framework, and the port number [27017] is default port number of the MongoDB. The directory path [/home/node] is application root (in the case of this example). The command [apt update && apt upgrade -y] is make an installed package or app, library and so on to be latest. Description of the Express framework is continues after figure.
-- WSL 2
$ docker pull mongo
$ docker run -d -p 8082:3000 -p 27017:27017 --init --name svgfreeicondb mongo:latest
$ docker exec -it svgfreeicondb /bin/bash
--Into the container and install the curl, the Node, the Node Package Manager (npm)
# apt install -y curl
# curl -fsSL https://deb.nodesource.com/setup_17.x | bash
# apt install -y nodejs
# npm install -g npm
# apt update && upgrade -y
# mkdir /home/node
# chmod 777 /home/node
# cd /home/node
--Install the Express
# apt update && apt upgrade -y
# npm init
-- Type the [package name] or the [description] and so on after the [npm init] command here.
# npm install –g express-generator
# express
# npm i --package-lock-only
# npm audit fix --force
# DEBUG=node:* npm start
For maintainance of node application, execute initialization of Node Package Manager using the command [npm init], so input [package name] or [description] and so on if it needs. And if use the [-g] option while install the Express framework, usable any directory path as application install target path. The command [express] is creation default web application to the current directory path. It is able to define web application type as arguments, it is described later. The command [npm i –package-lock-only] and [npm audit fix –force] is described at the article [].
To confirm running at web browser, use the command [DEBUG=node:* npm start] to run application.
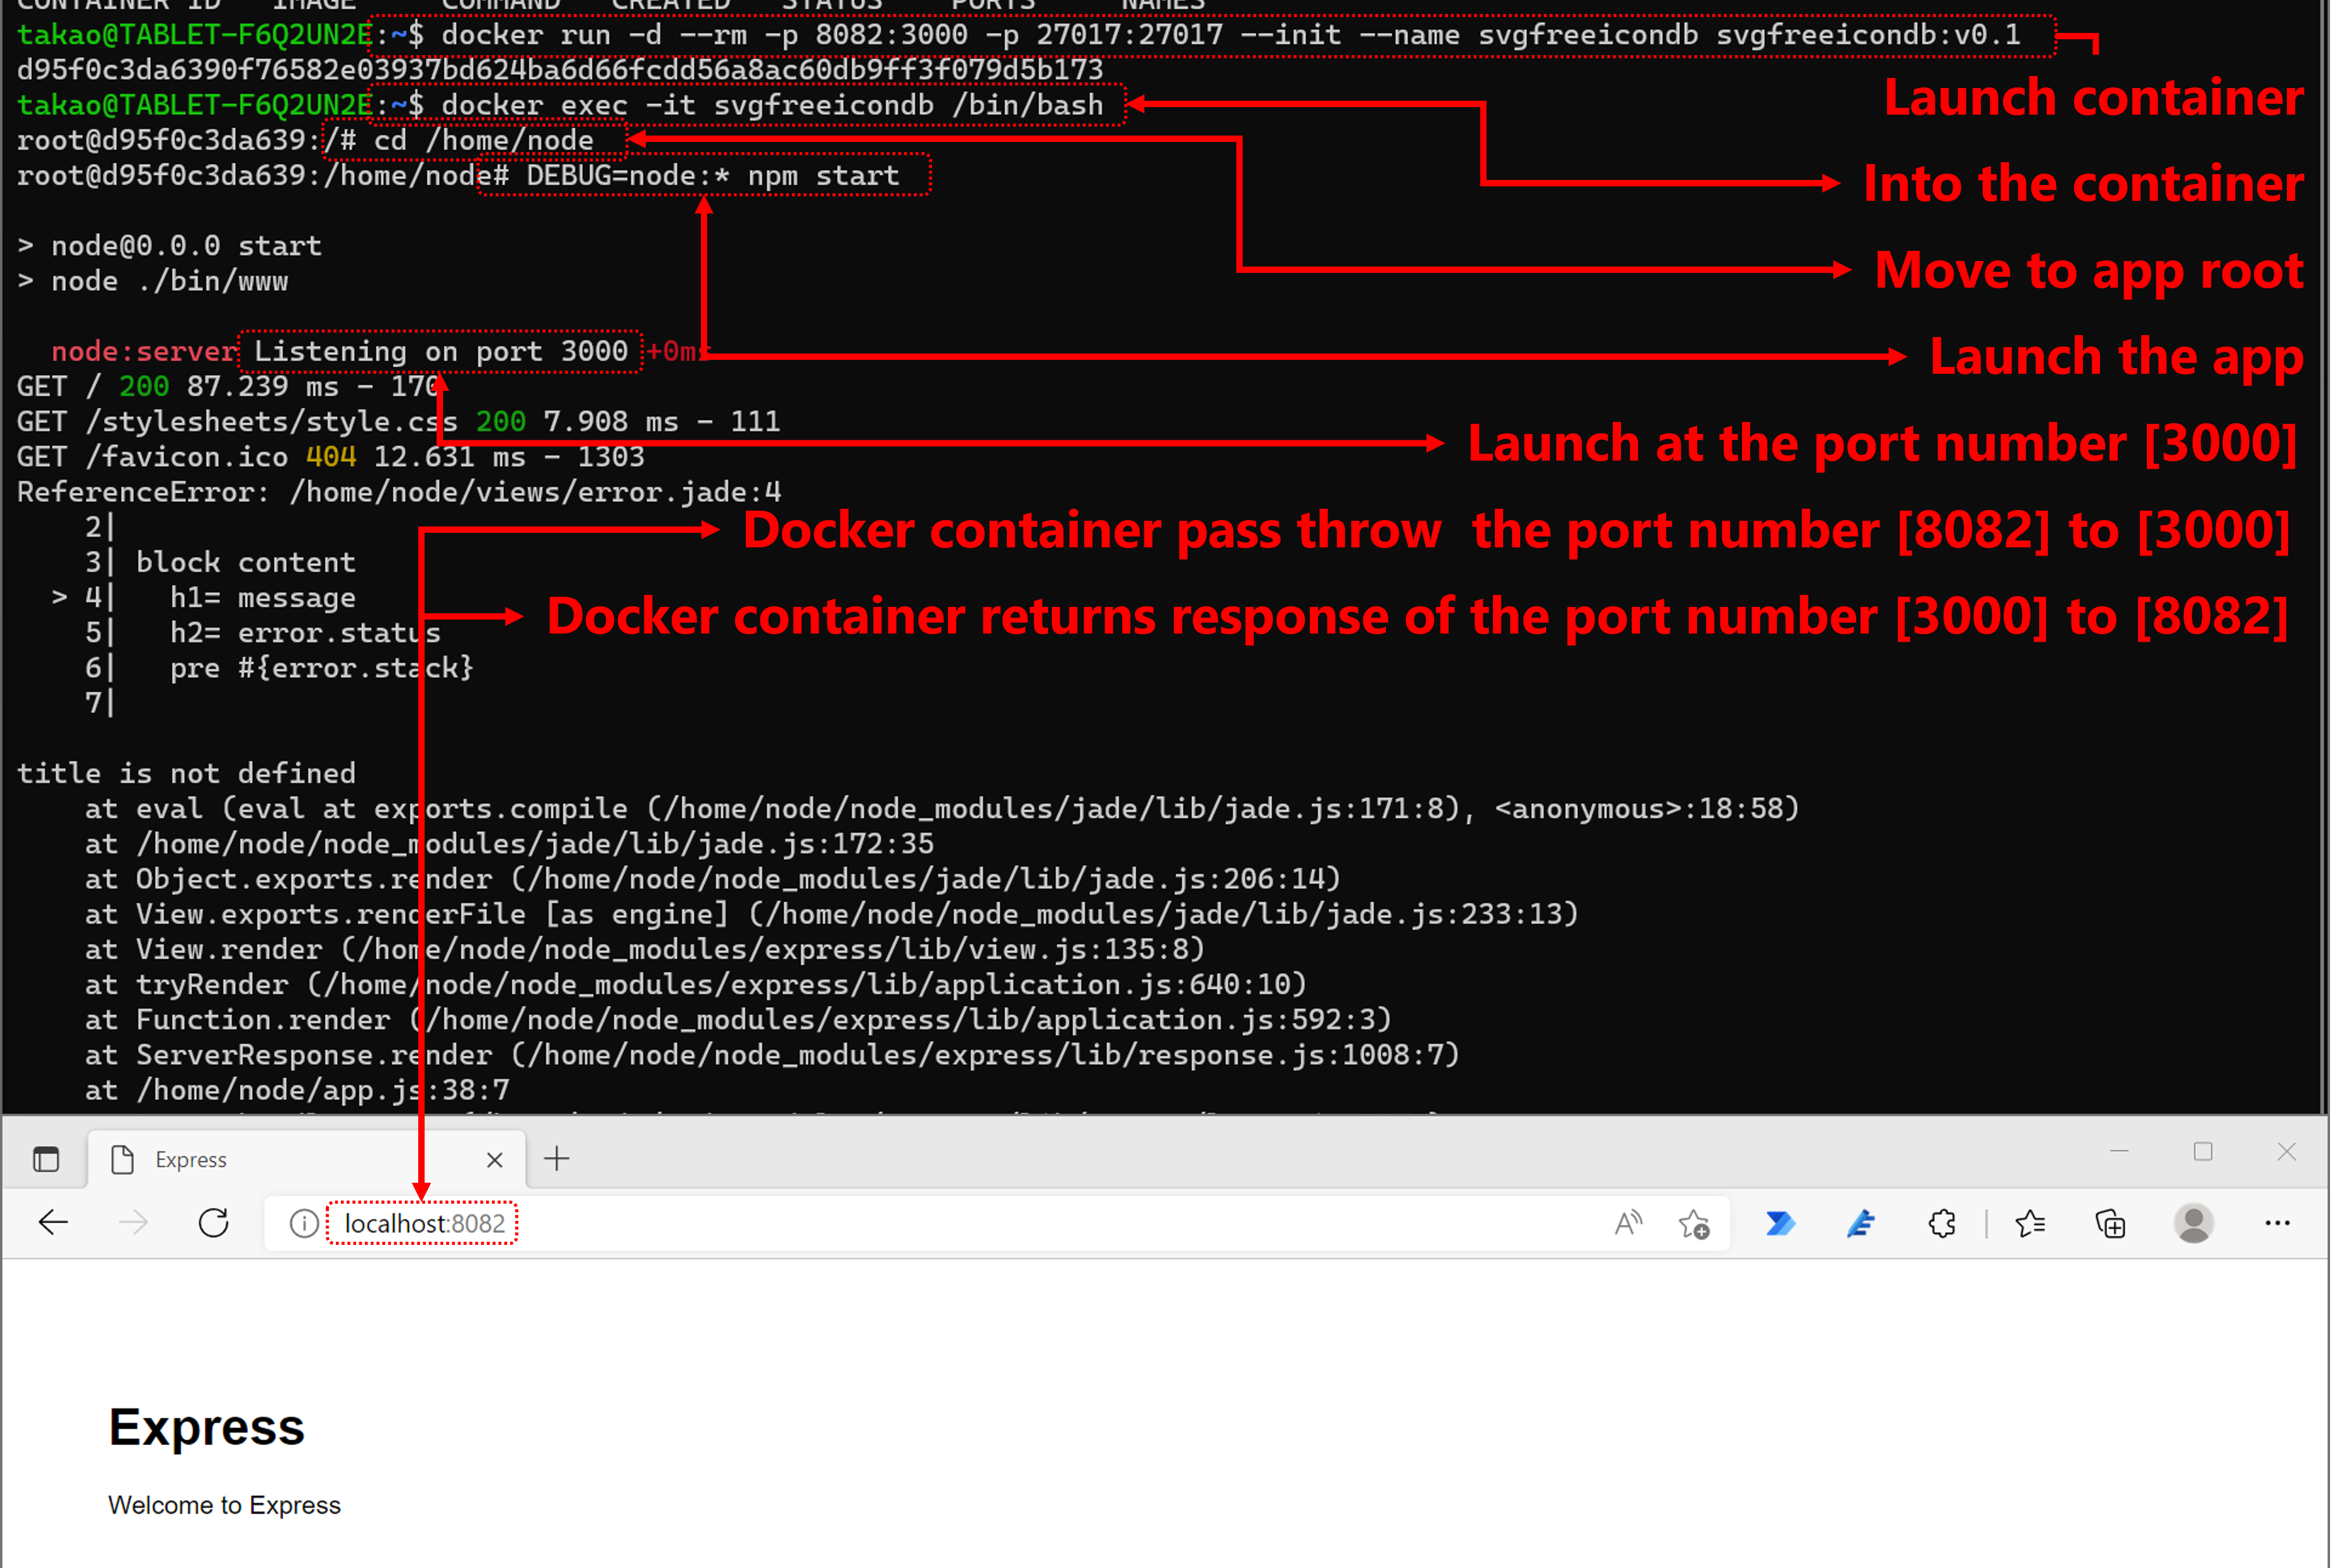
 * The image name [svgfreeicondb:v0.1] of the figure above means the image name [mongo:latest] of the command [docker run -d -p 8082:3000 -p 27017:27017
   –init –name svgfreeicondb mongo:latest].
Here is able to confirm the port number [8082] is transfer to the port number [3000] at web browser. In next step, confirm the port number [27017] exposes MongoDB default port. This port number is not exposed to outside of the service. The service of api communicates to the port number [27017] to aquire the state of this service self from persistence layer of specific this srevice.
・Access to the document of MongoDB
It is easy to development application that uses MongoDB with Visual Studio Code MongoDB Extention.
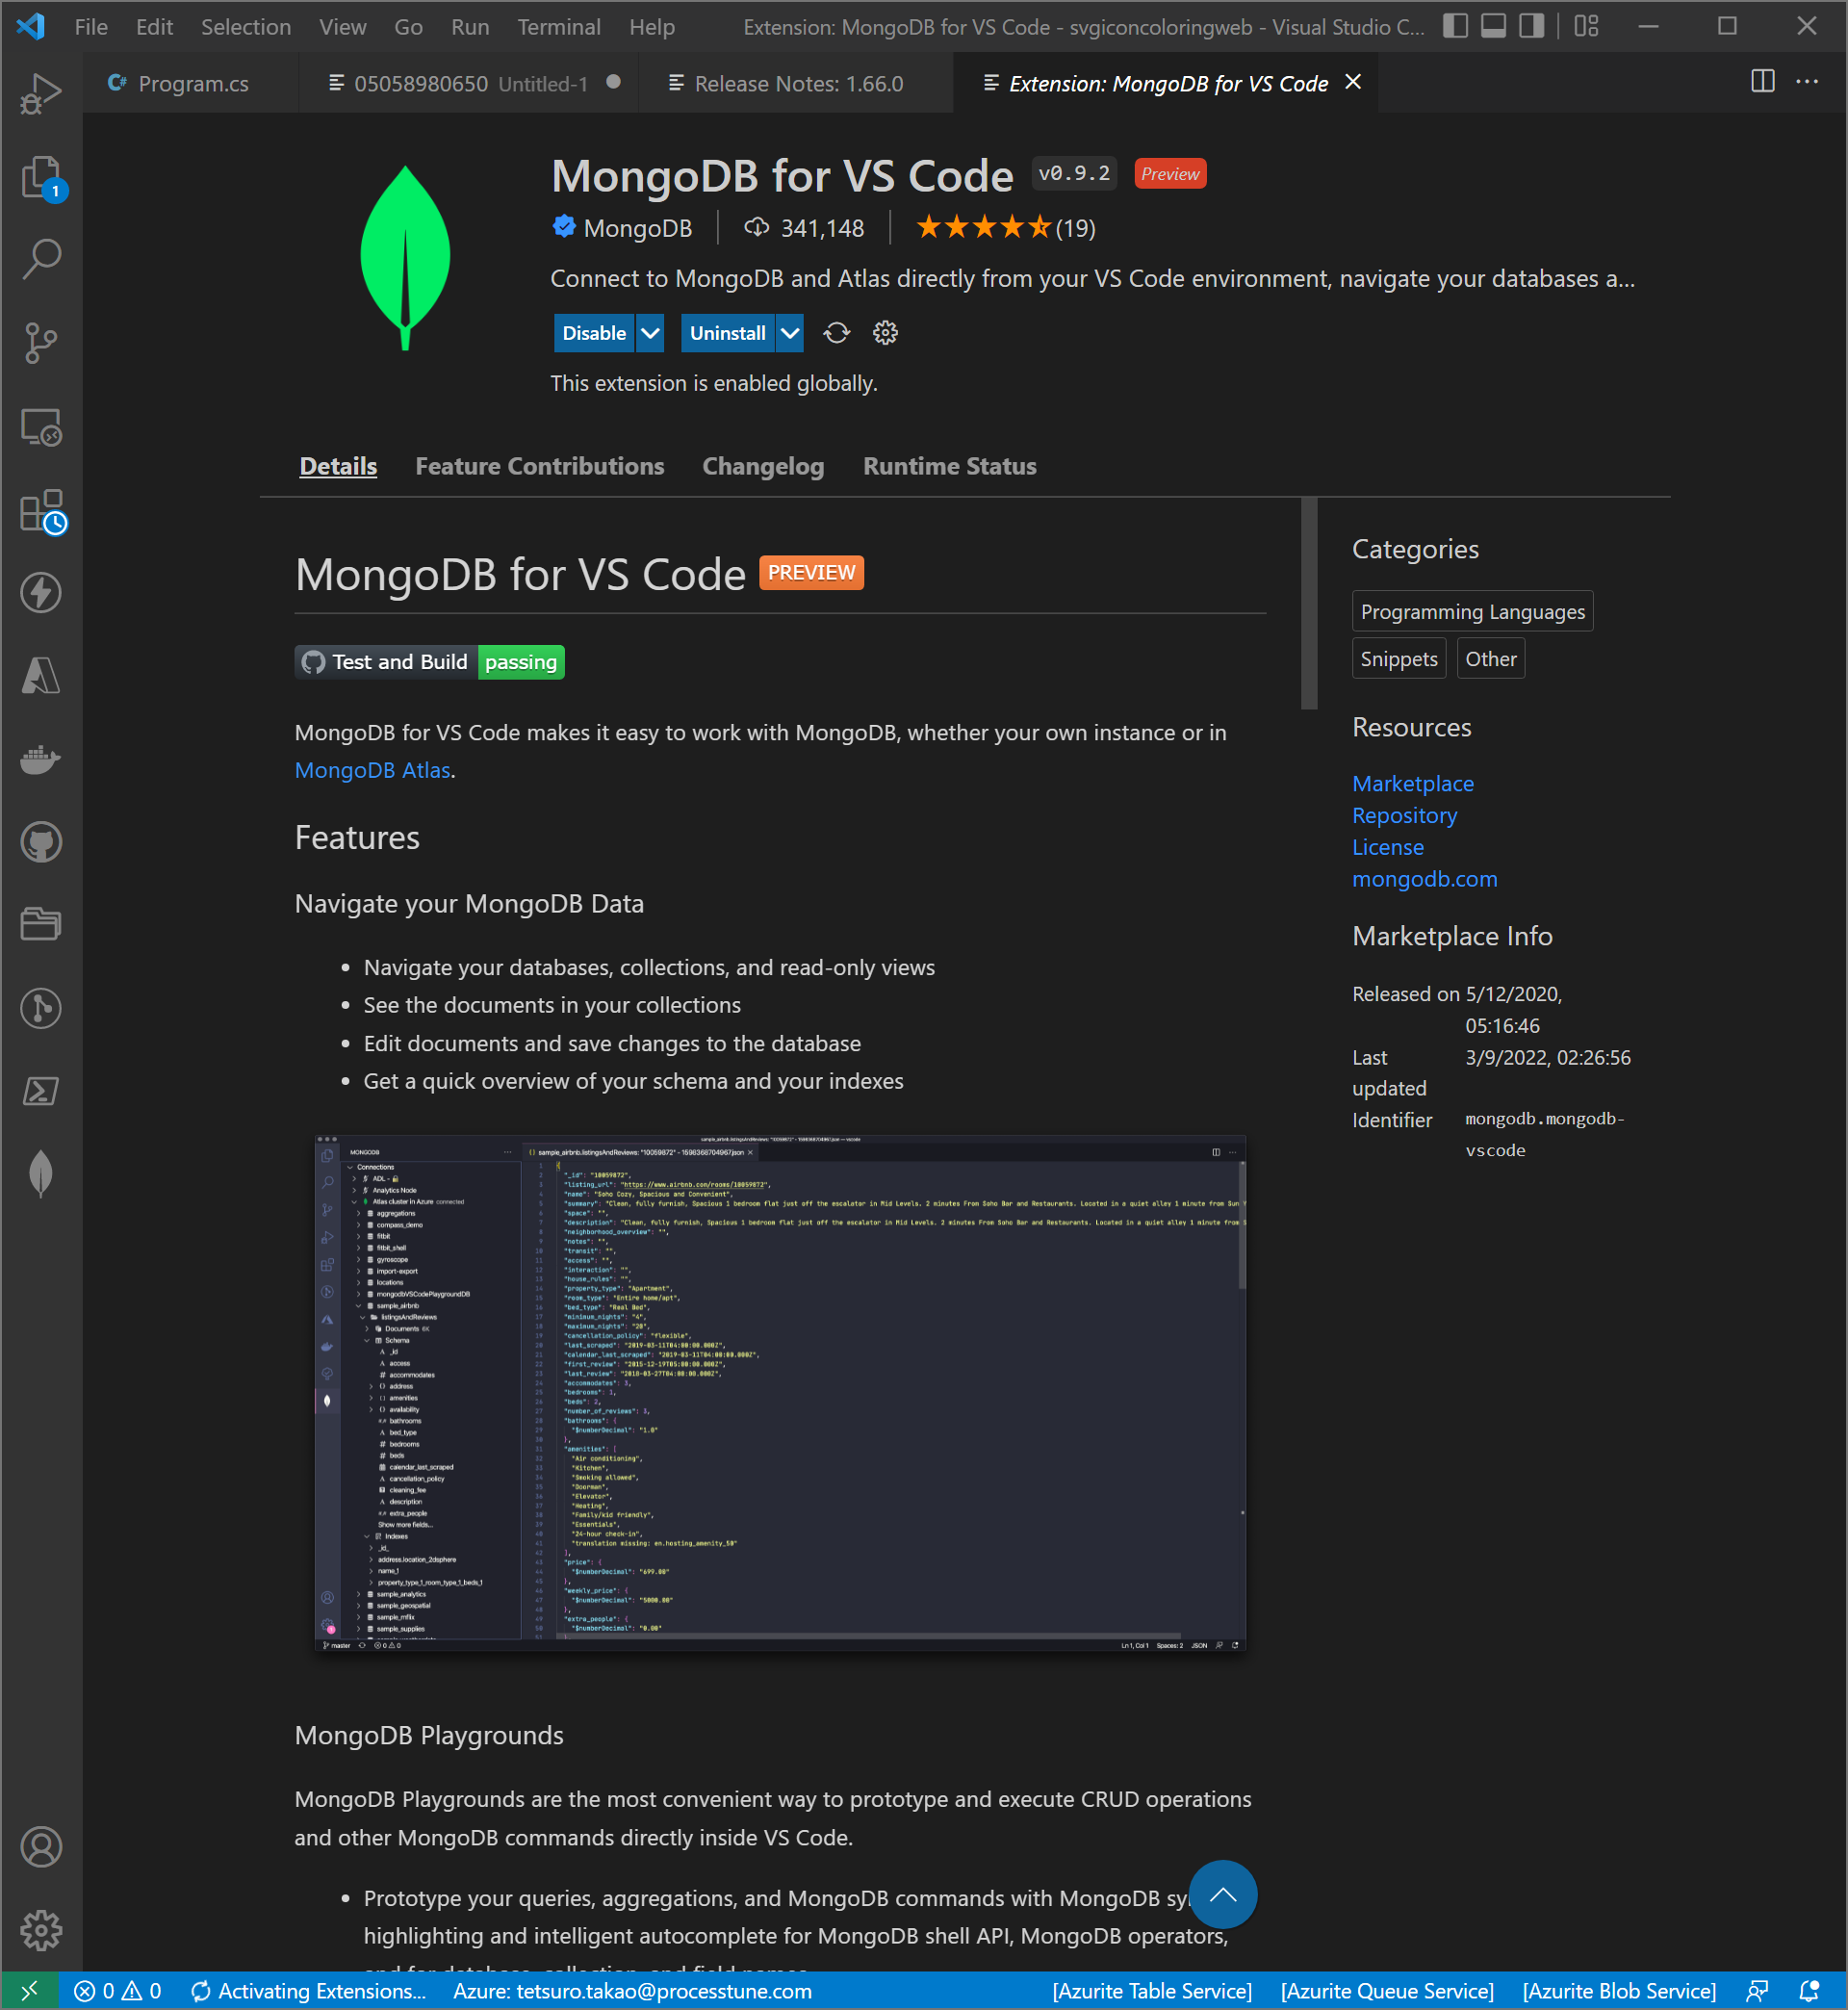
While browsing of contents provided from the port number [8082] is confirmed, Visual Studio Code MongoDB extention can connect to the MongoDB from the port number [27017].
There is showing MongoDB extention icon after install Visual Studio Code MongoDB extention form the Extentions. Select the MongoDB extention icon of the [Activity Bar] to launch Visual Studio Code MongoDB extention.
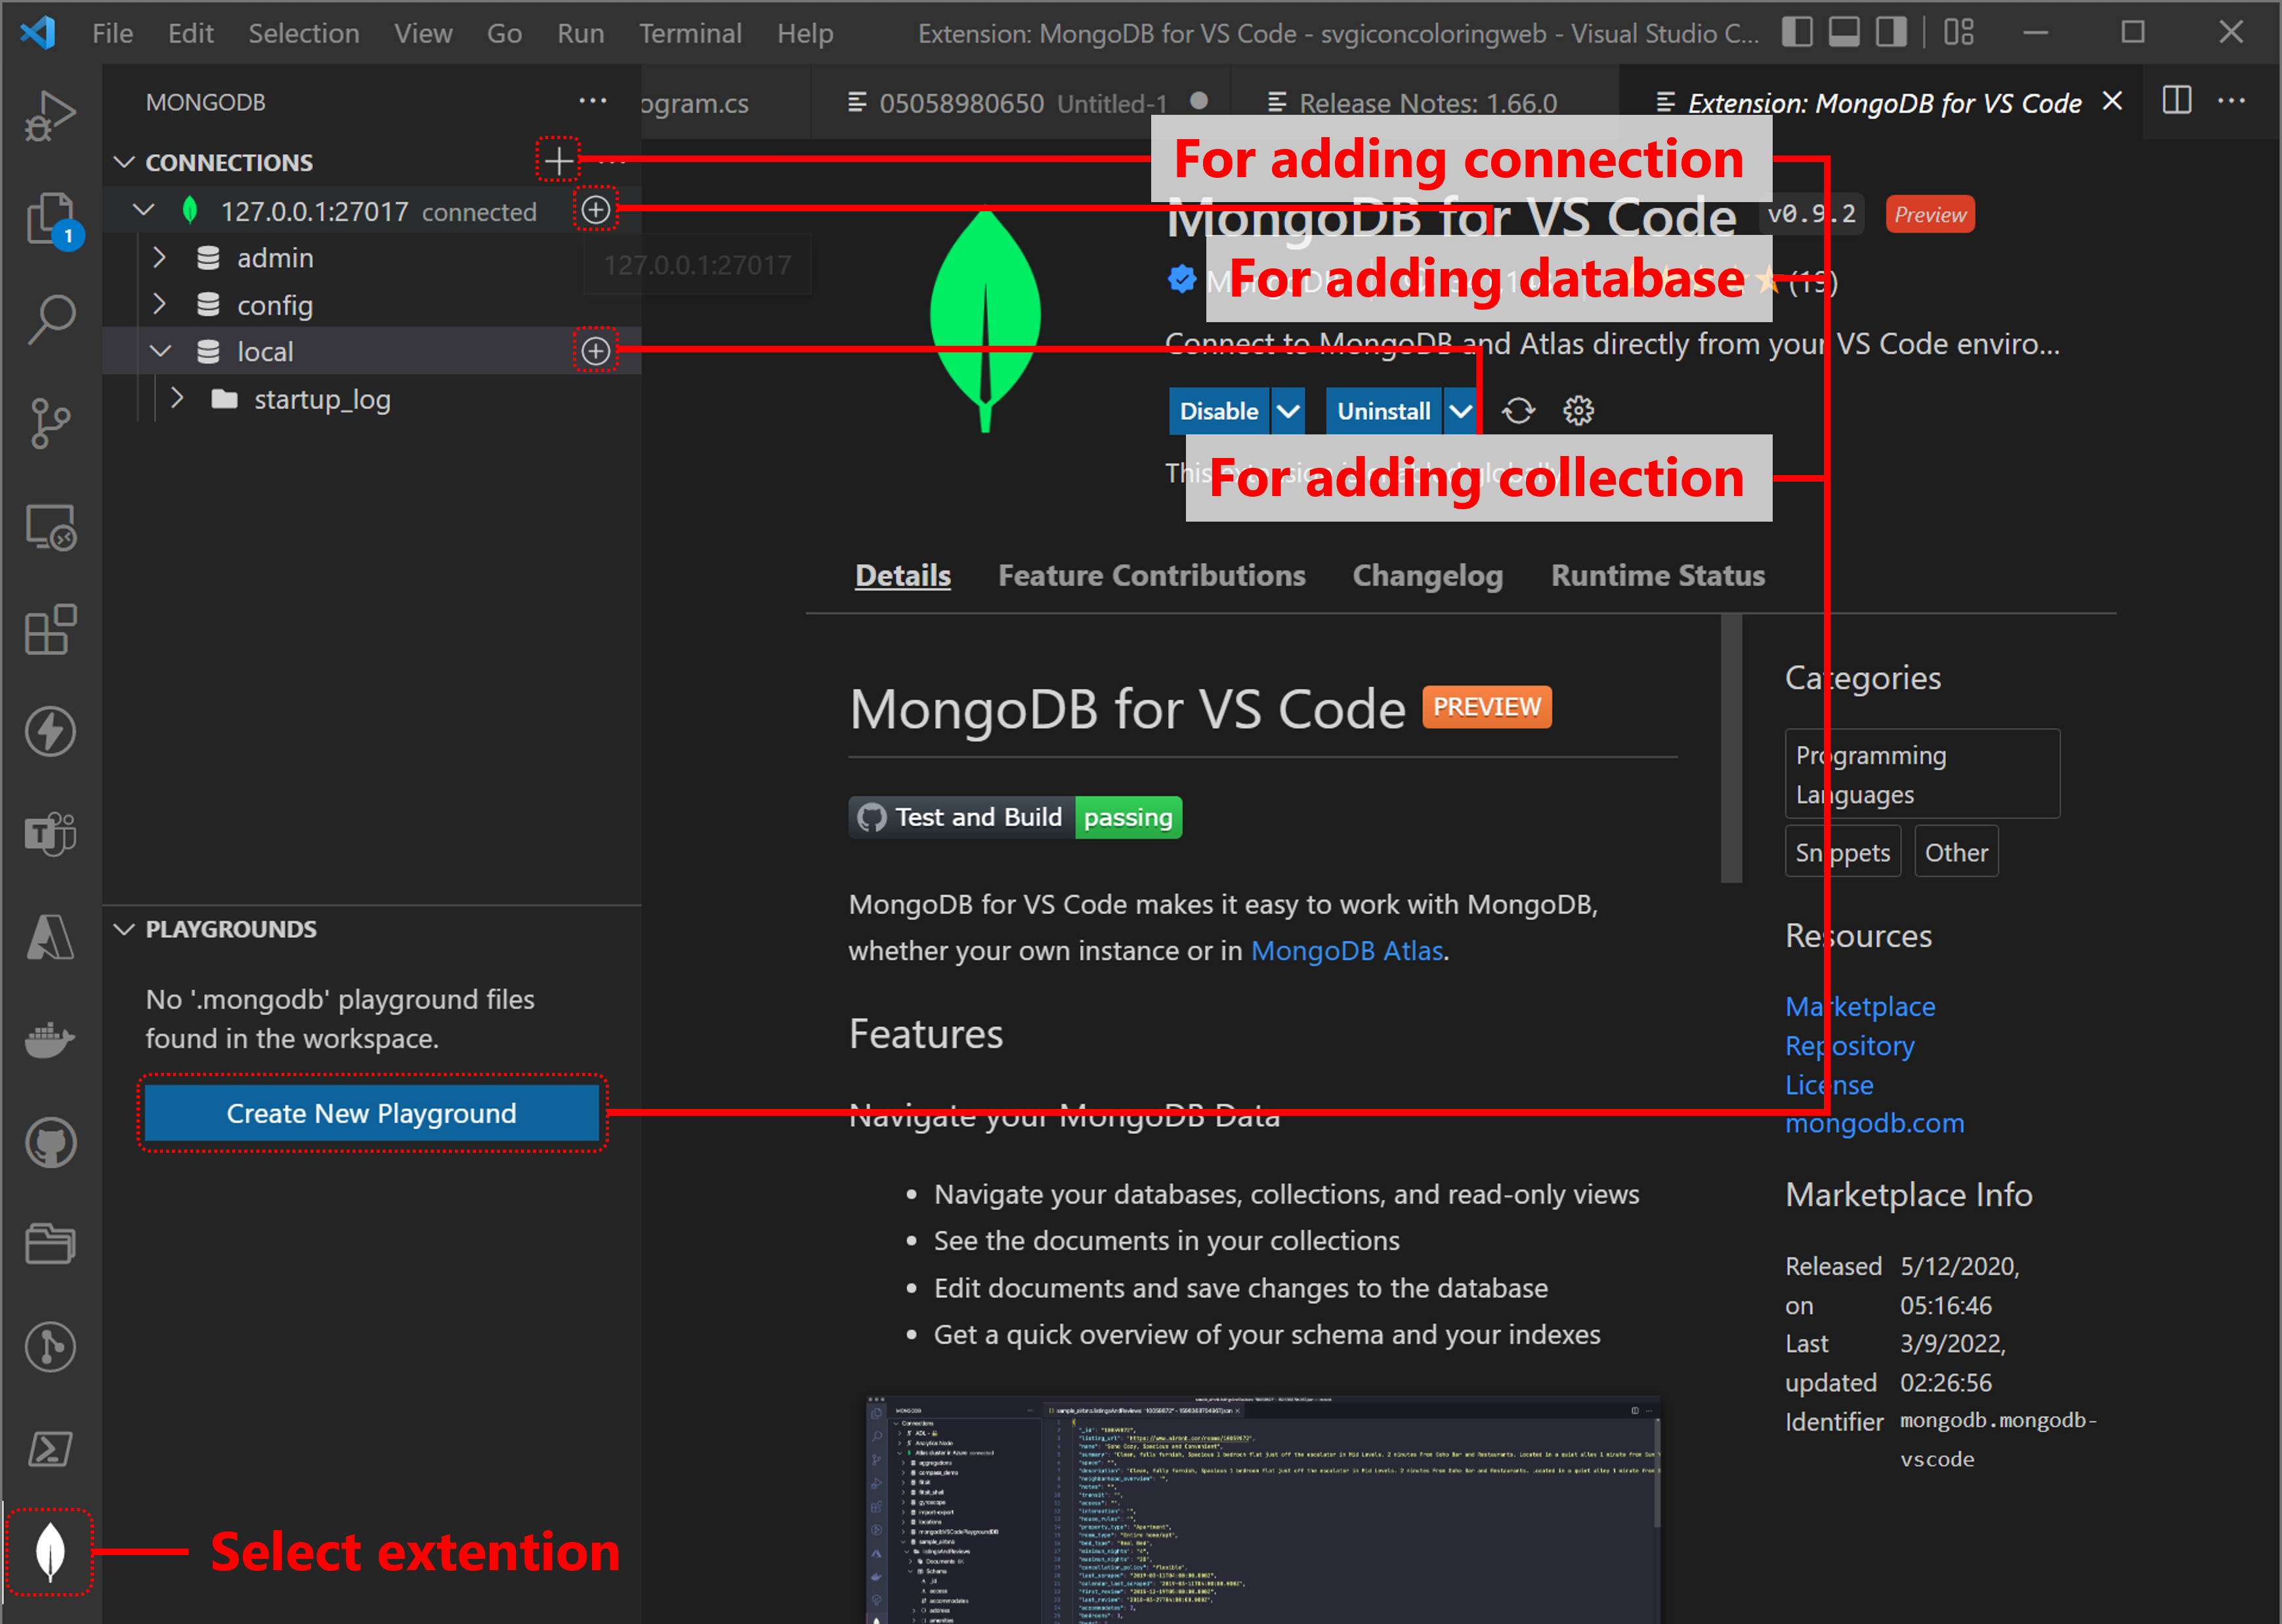
Type the address URL and port number after select Add MongoDB Connection, then MongoDB extention shows default databases of MongoDB Docker official image. The [Add Database…] icon is showed when mouse over the connected connection tree, same as it, the [Add Collection…] icon is showed when mouse over the database tree.
The MongoDB Playground is showed when select the [Add Collection…] icon to add new collection.
・Create persistence layer of the service using MongoDB Playground
This service are assuming to provide several icons that are aquired from free icons web site, there are two patterns use case that the case an identity calling this service already has specific icon because this service called before, and an identity does not have an icon. Return specific icon from data store (MongoDB) if it has icon, and return 10 icons acquire from free icons web site if it has not icon.
So this service have to store only specific icon that is related an identity and the identity as key. The icon type is SVG image has properties, [Original URL], [SVG XML], [Releted Identity] and so on.
The icon for adding collection to the [local] of figure above is used to create the collection of the [local] database, the [Create New Playground] button of figure above is used to create the collection, the database or the connection settings, the MongoDB Playground is able to control all settings of MongoDB.
A database schema may be saved as models of project for continuous integration. So about how to modify the Node-Express application of above on Windows, if use Visual Studio Code Docker extension, save mongodb file using Visual Studio Code on Windows. If not, the Node-Express application in the Docker container that was created from MongoDB Docker official image is able to download from GitHub as sample project. After it, save mongodb file to the project root.
As additional way, this sample project was uploaded using GitHub CLI from inside of the container. The article [Nginx run on Windows Subsystem for Linux 2] describes how to use GitHub CLI. Uploading the Node-Express application of above using GitHub CLI from inside of the container and sharing to GitHub for modifying on Windows side.
Using any ways, prepare of that the Node-Express application project is able to modify with Visual Studio Code on Windows. Create schema then save it at project root of the sample project.
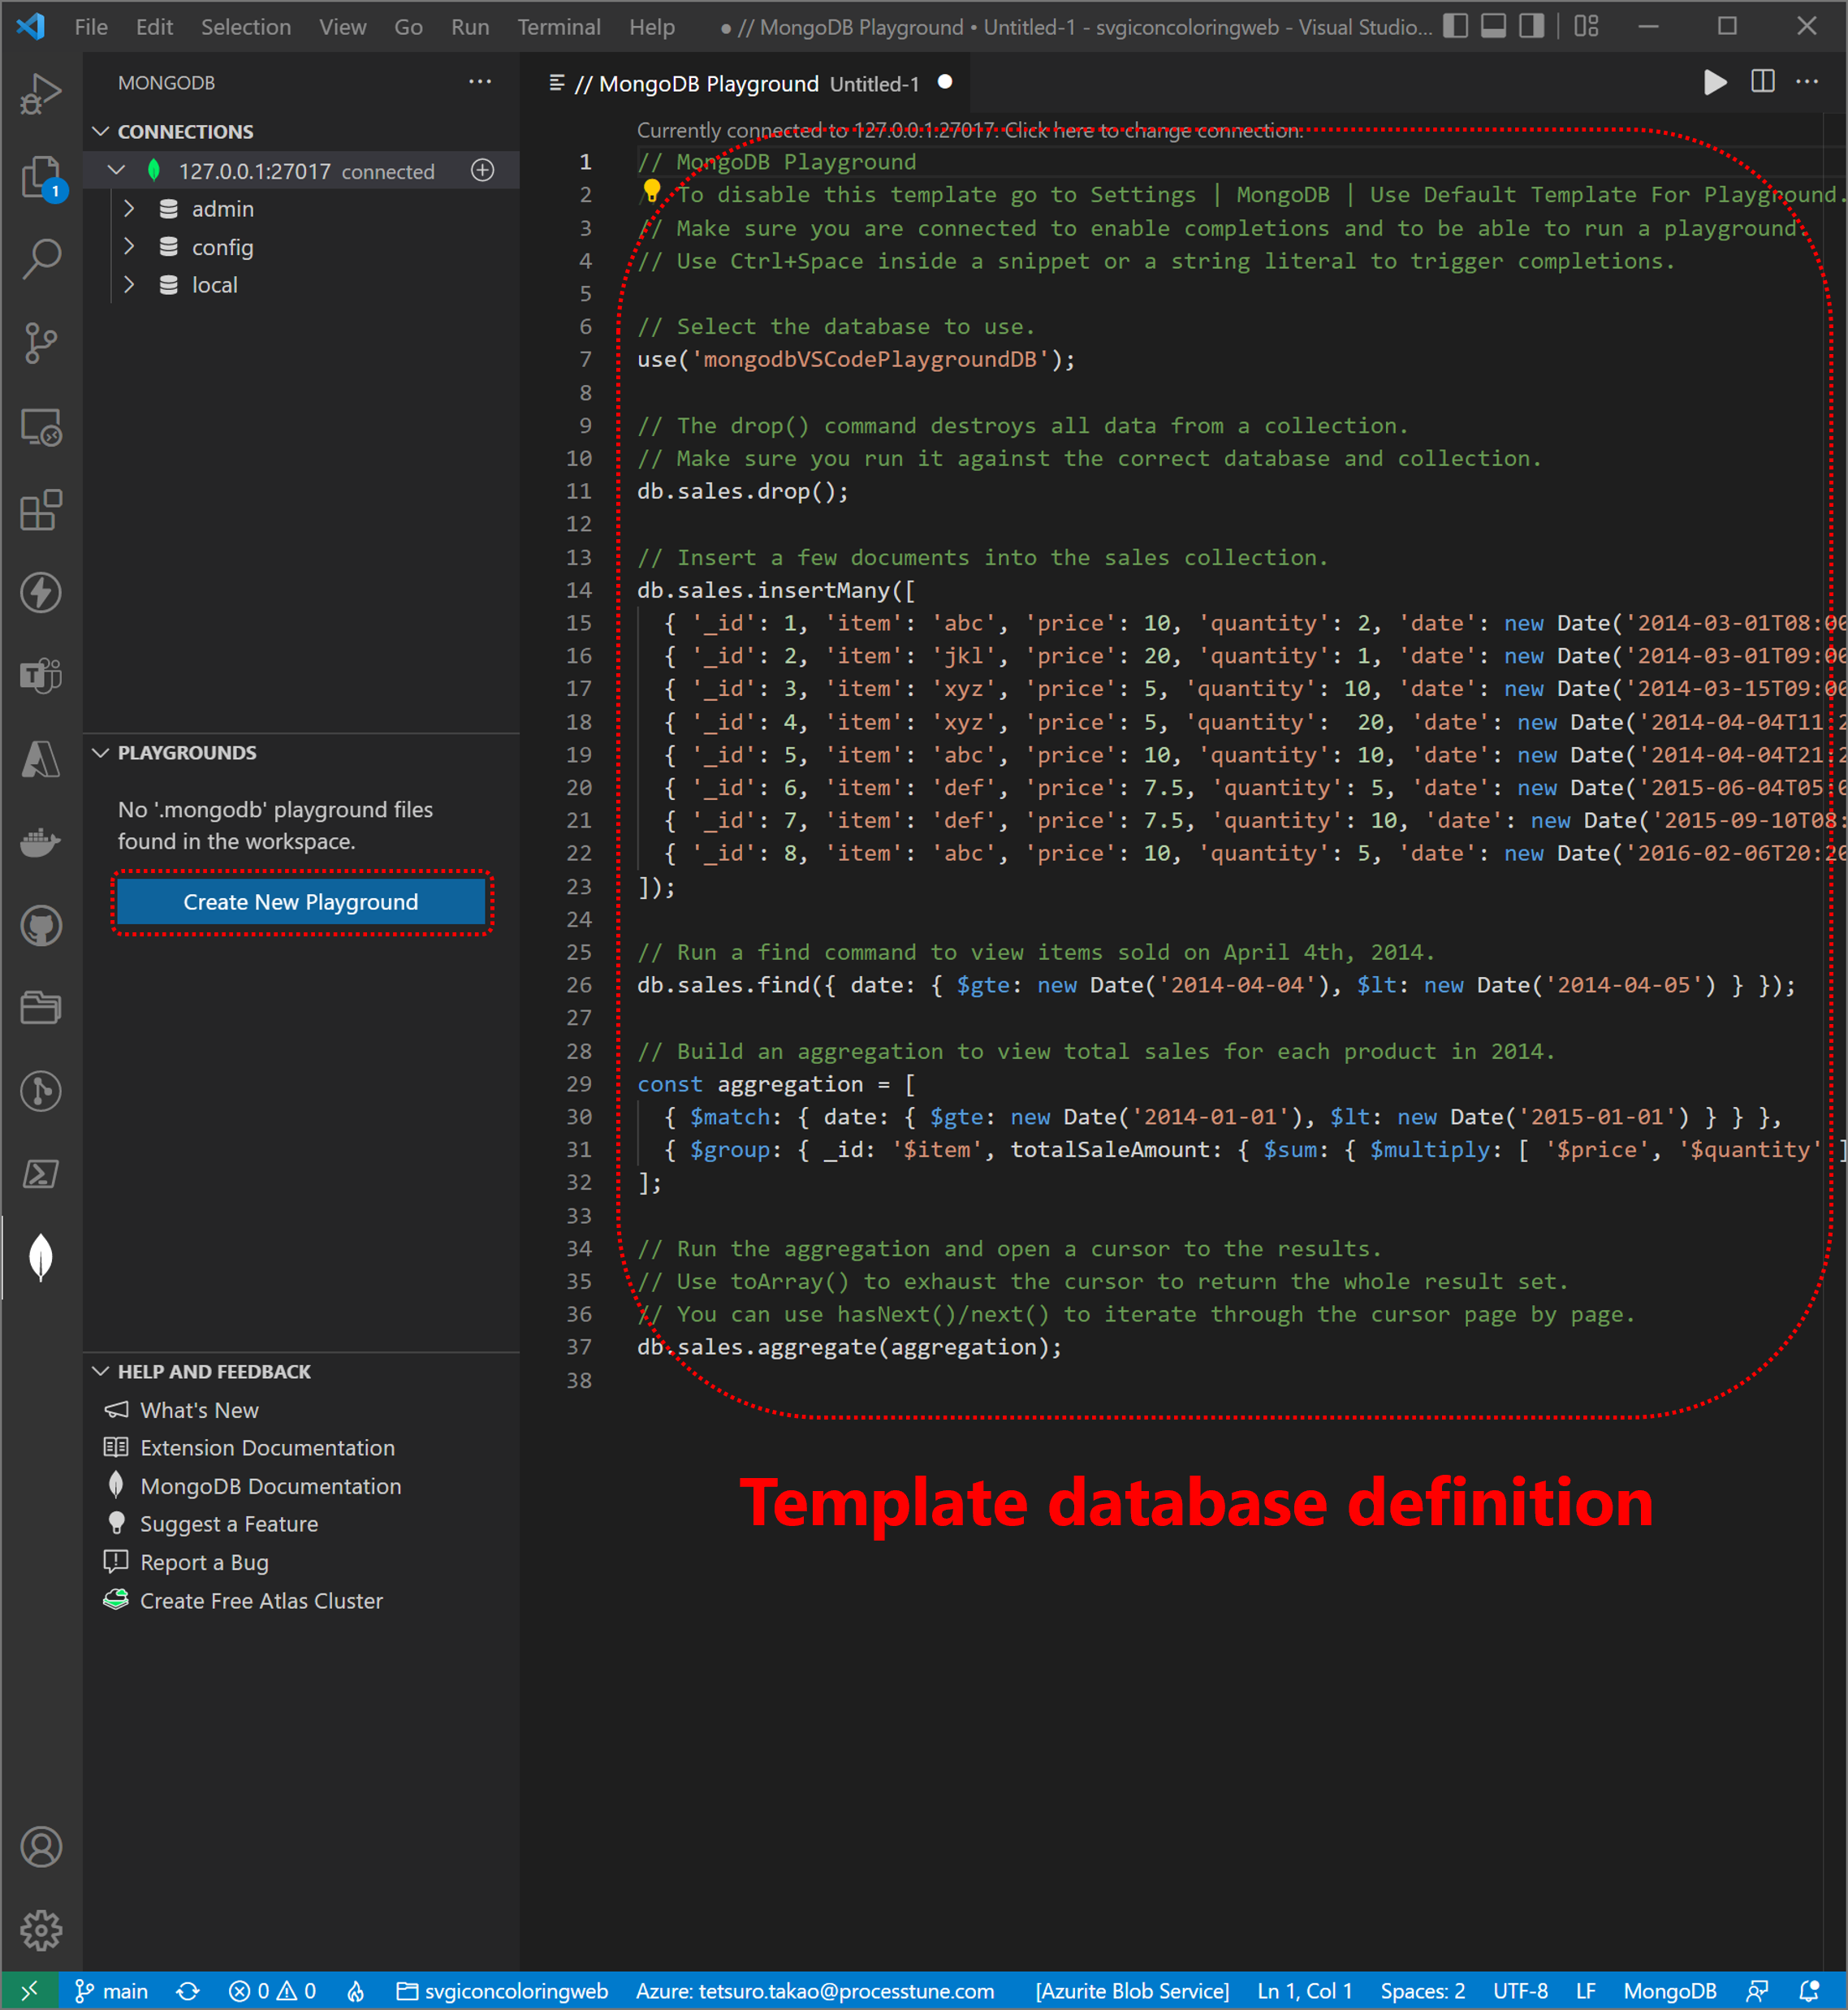
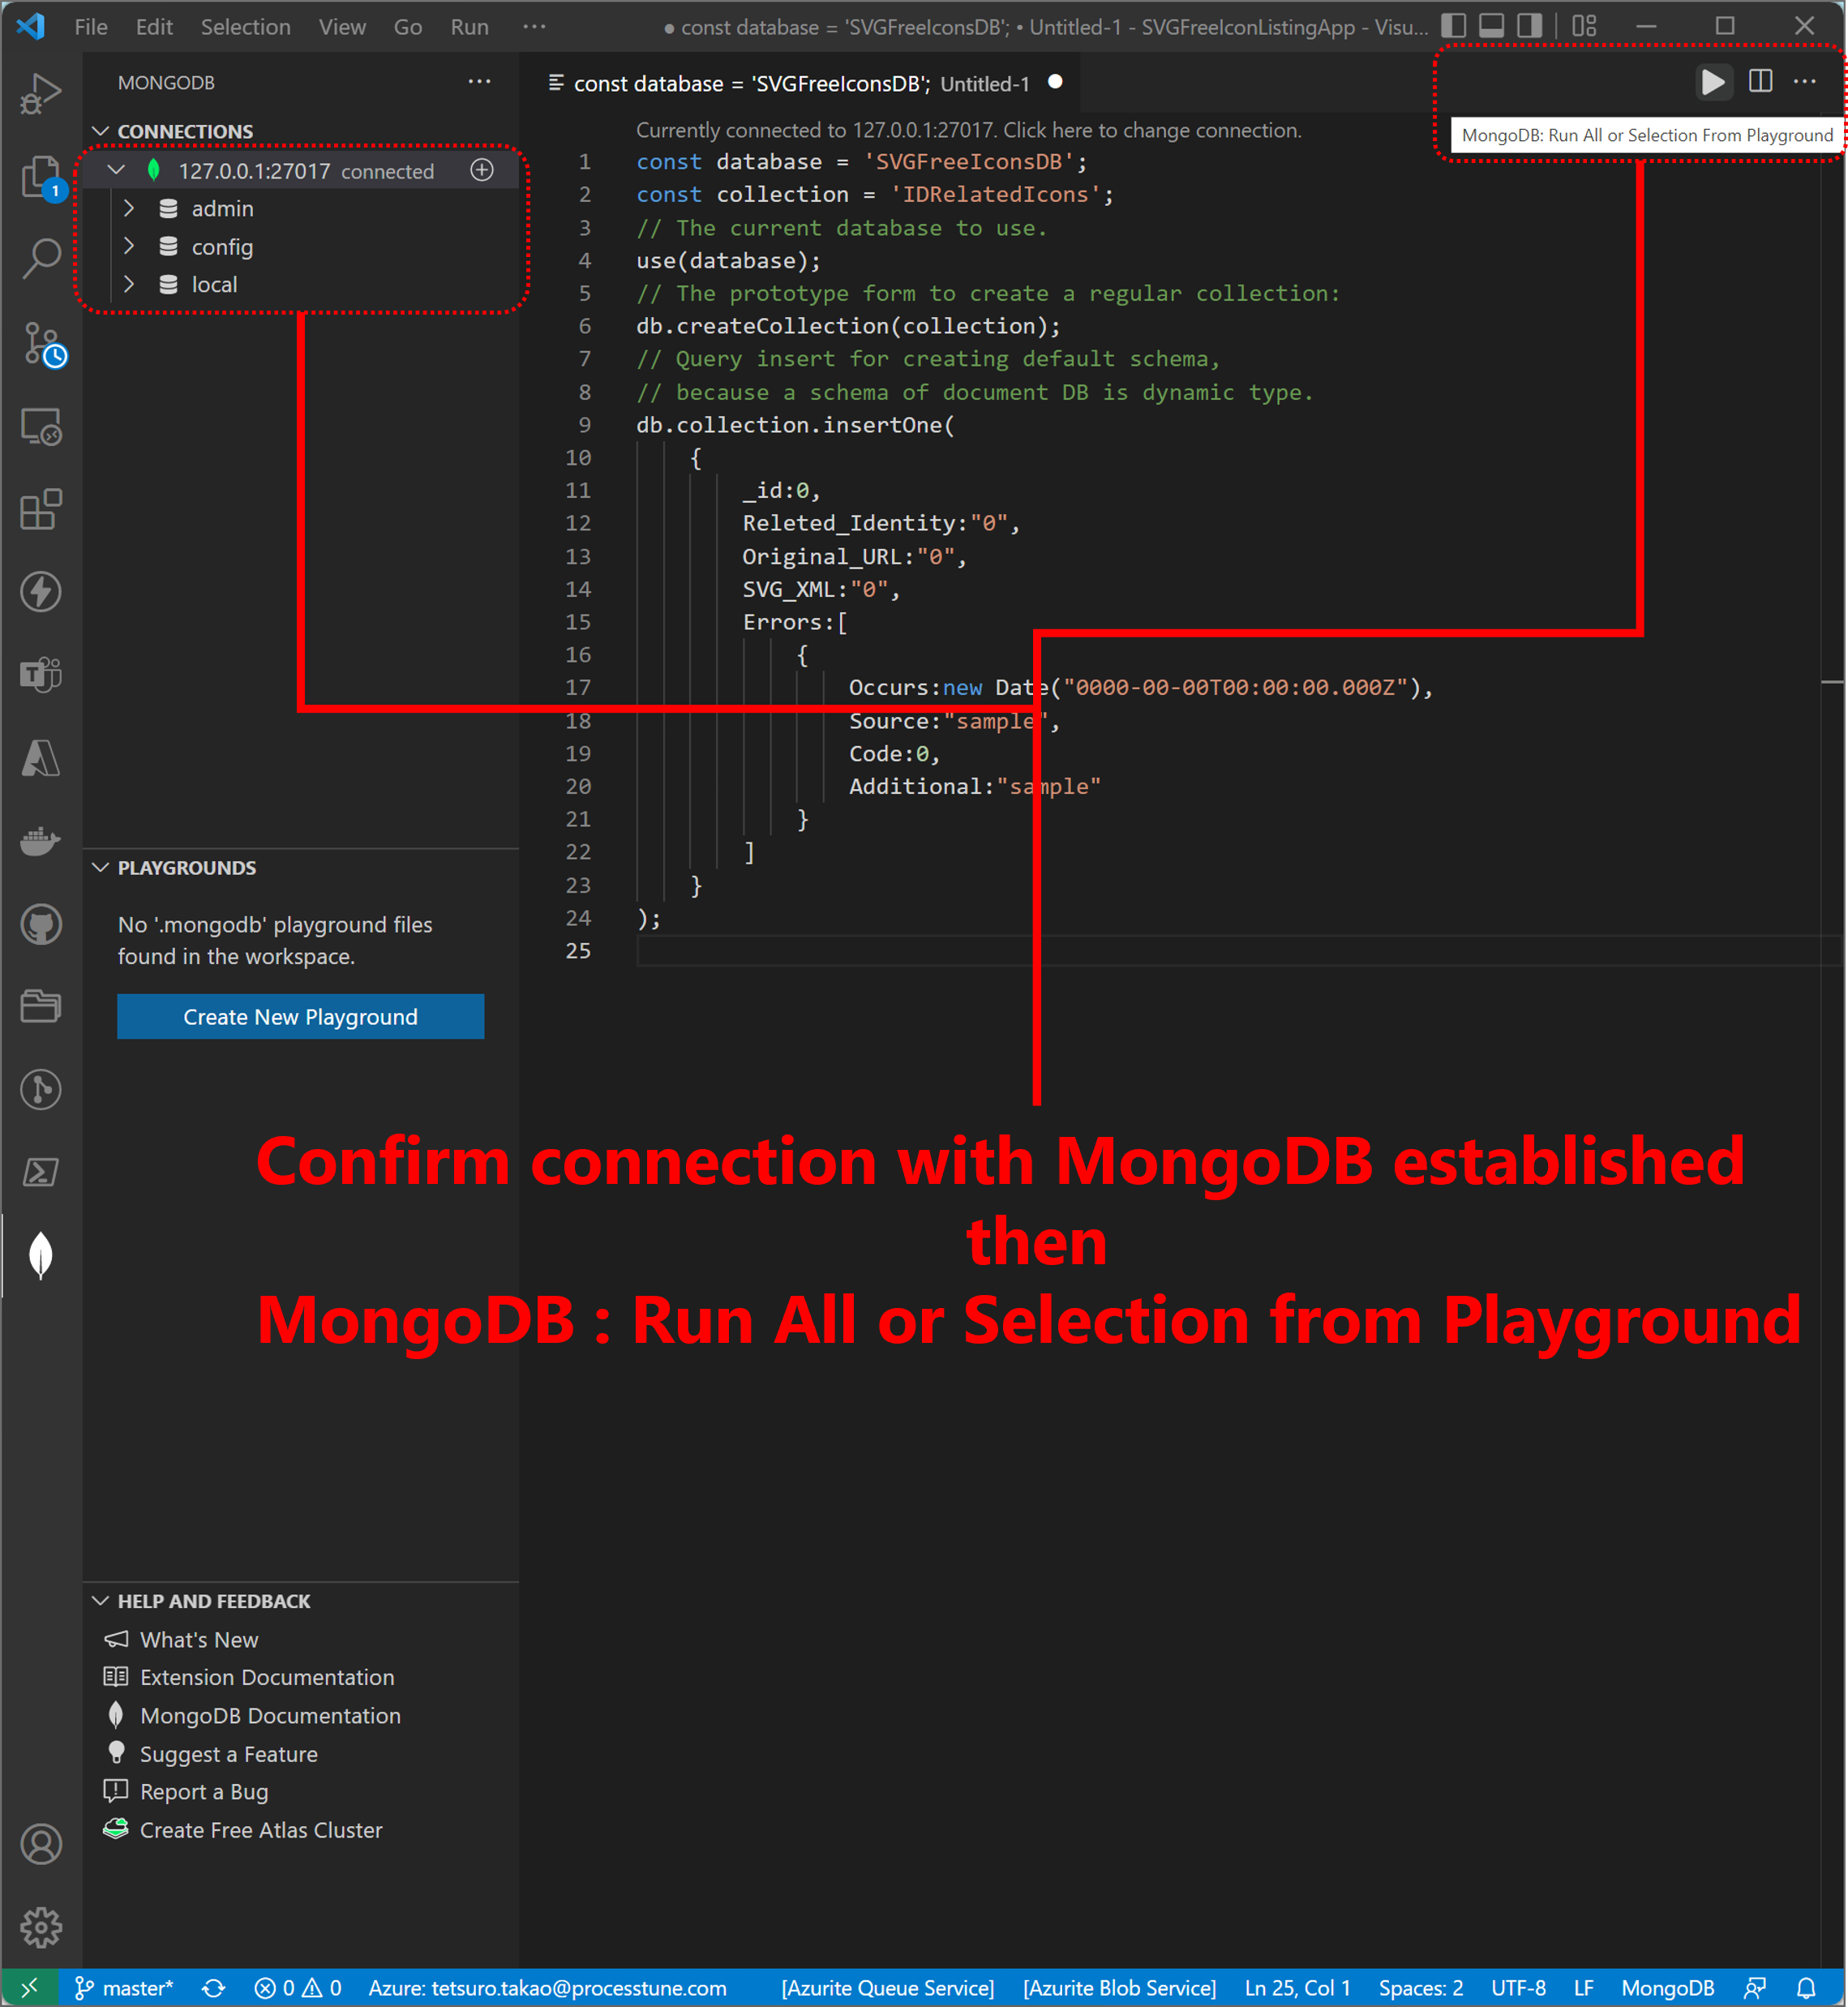
Selection of the [Create New Playground] button creates sample database definition (figure left above). And defines database and collection same as follows figure (figure right above), then select the [MongoDB : Run All or Selection from Playground] button to create.
const database = 'SVGFreeIconsDB';
const collection = 'IDRelatedIcons';
// The current database to use.
use(database);
// The prototype form to create a regular collection:
db.createCollection(collection);
// Query insert for creating default schema,
// because a schema of document DB is dynamic type.
db.collection.insertOne(
    {
        _id:0,
        Releted_Identity:"0",
        Original_URL:"0",
        SVG_XML:"0",
        Errors:[
            {
                Occurs:new Date("0000-00-00T00:00:00.000Z"),
                Source:"sample",
                Code:0,
                Additional:"sample"
            }
        ]
    }
);
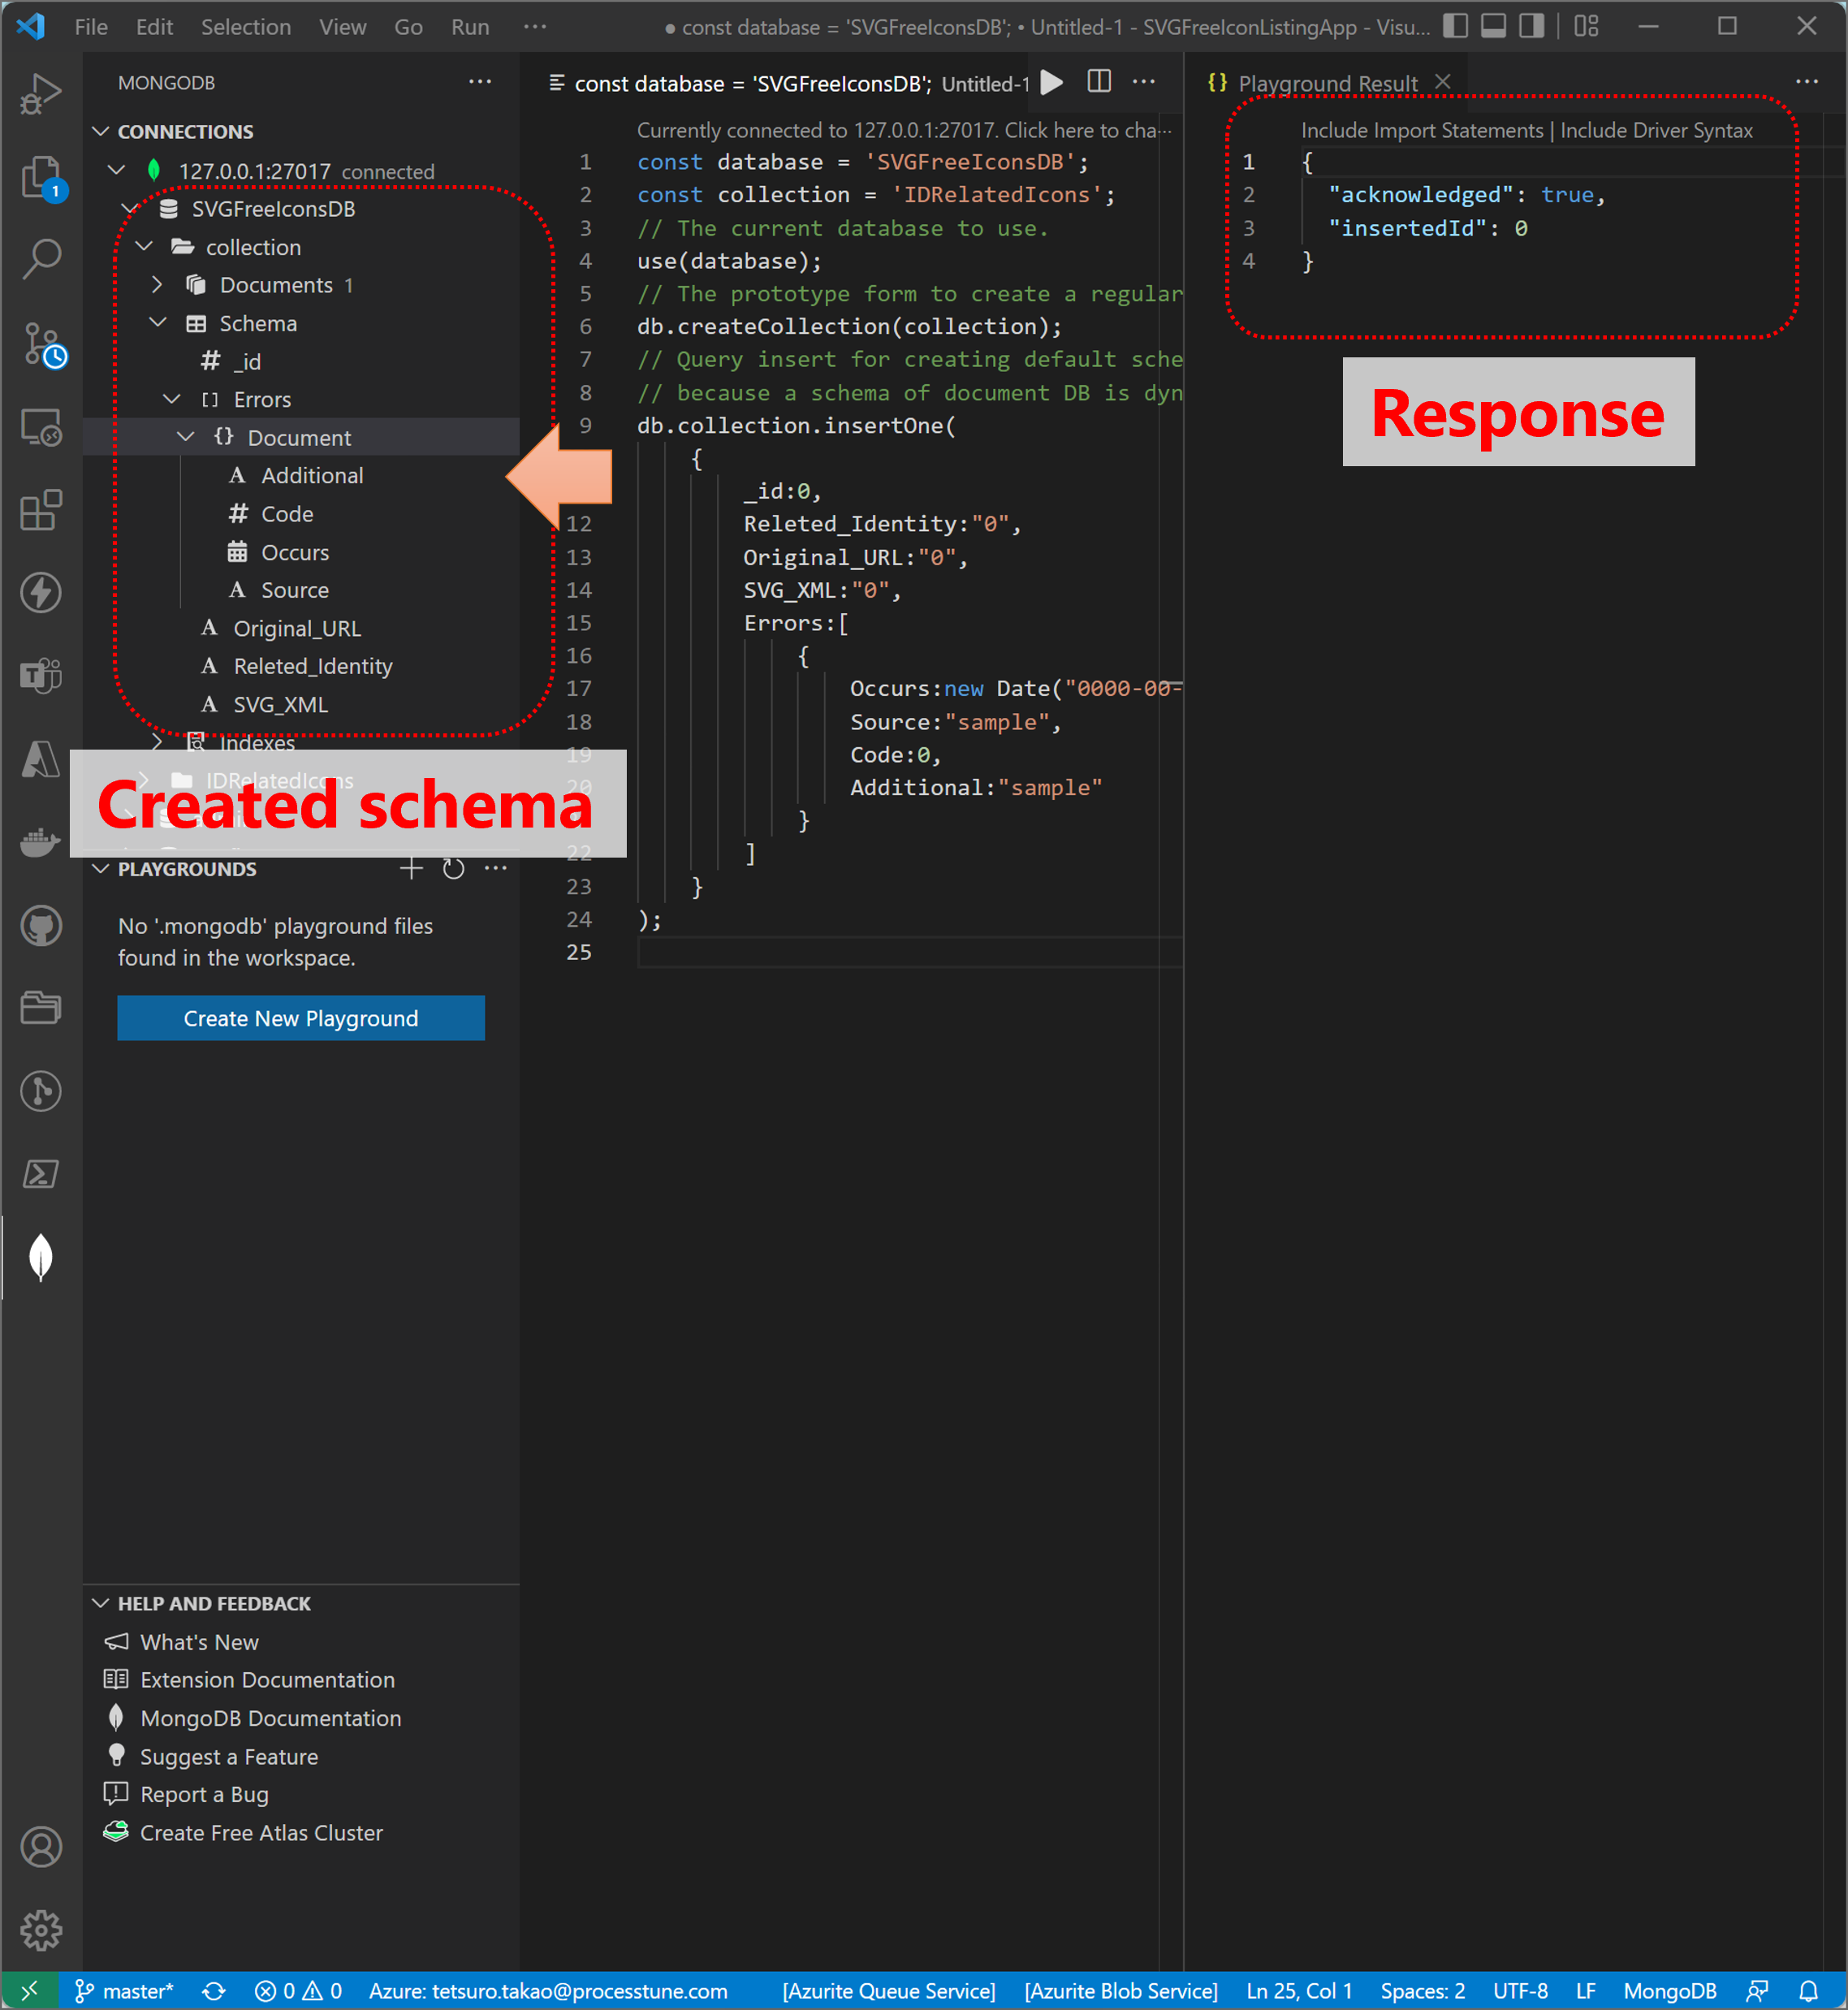
Select [yes] button of showed dialog box after select the [MongoDB : Run All or Selection from Playground] button. Then confirm created schema with open the [SVGFreeIconsDB] tree.

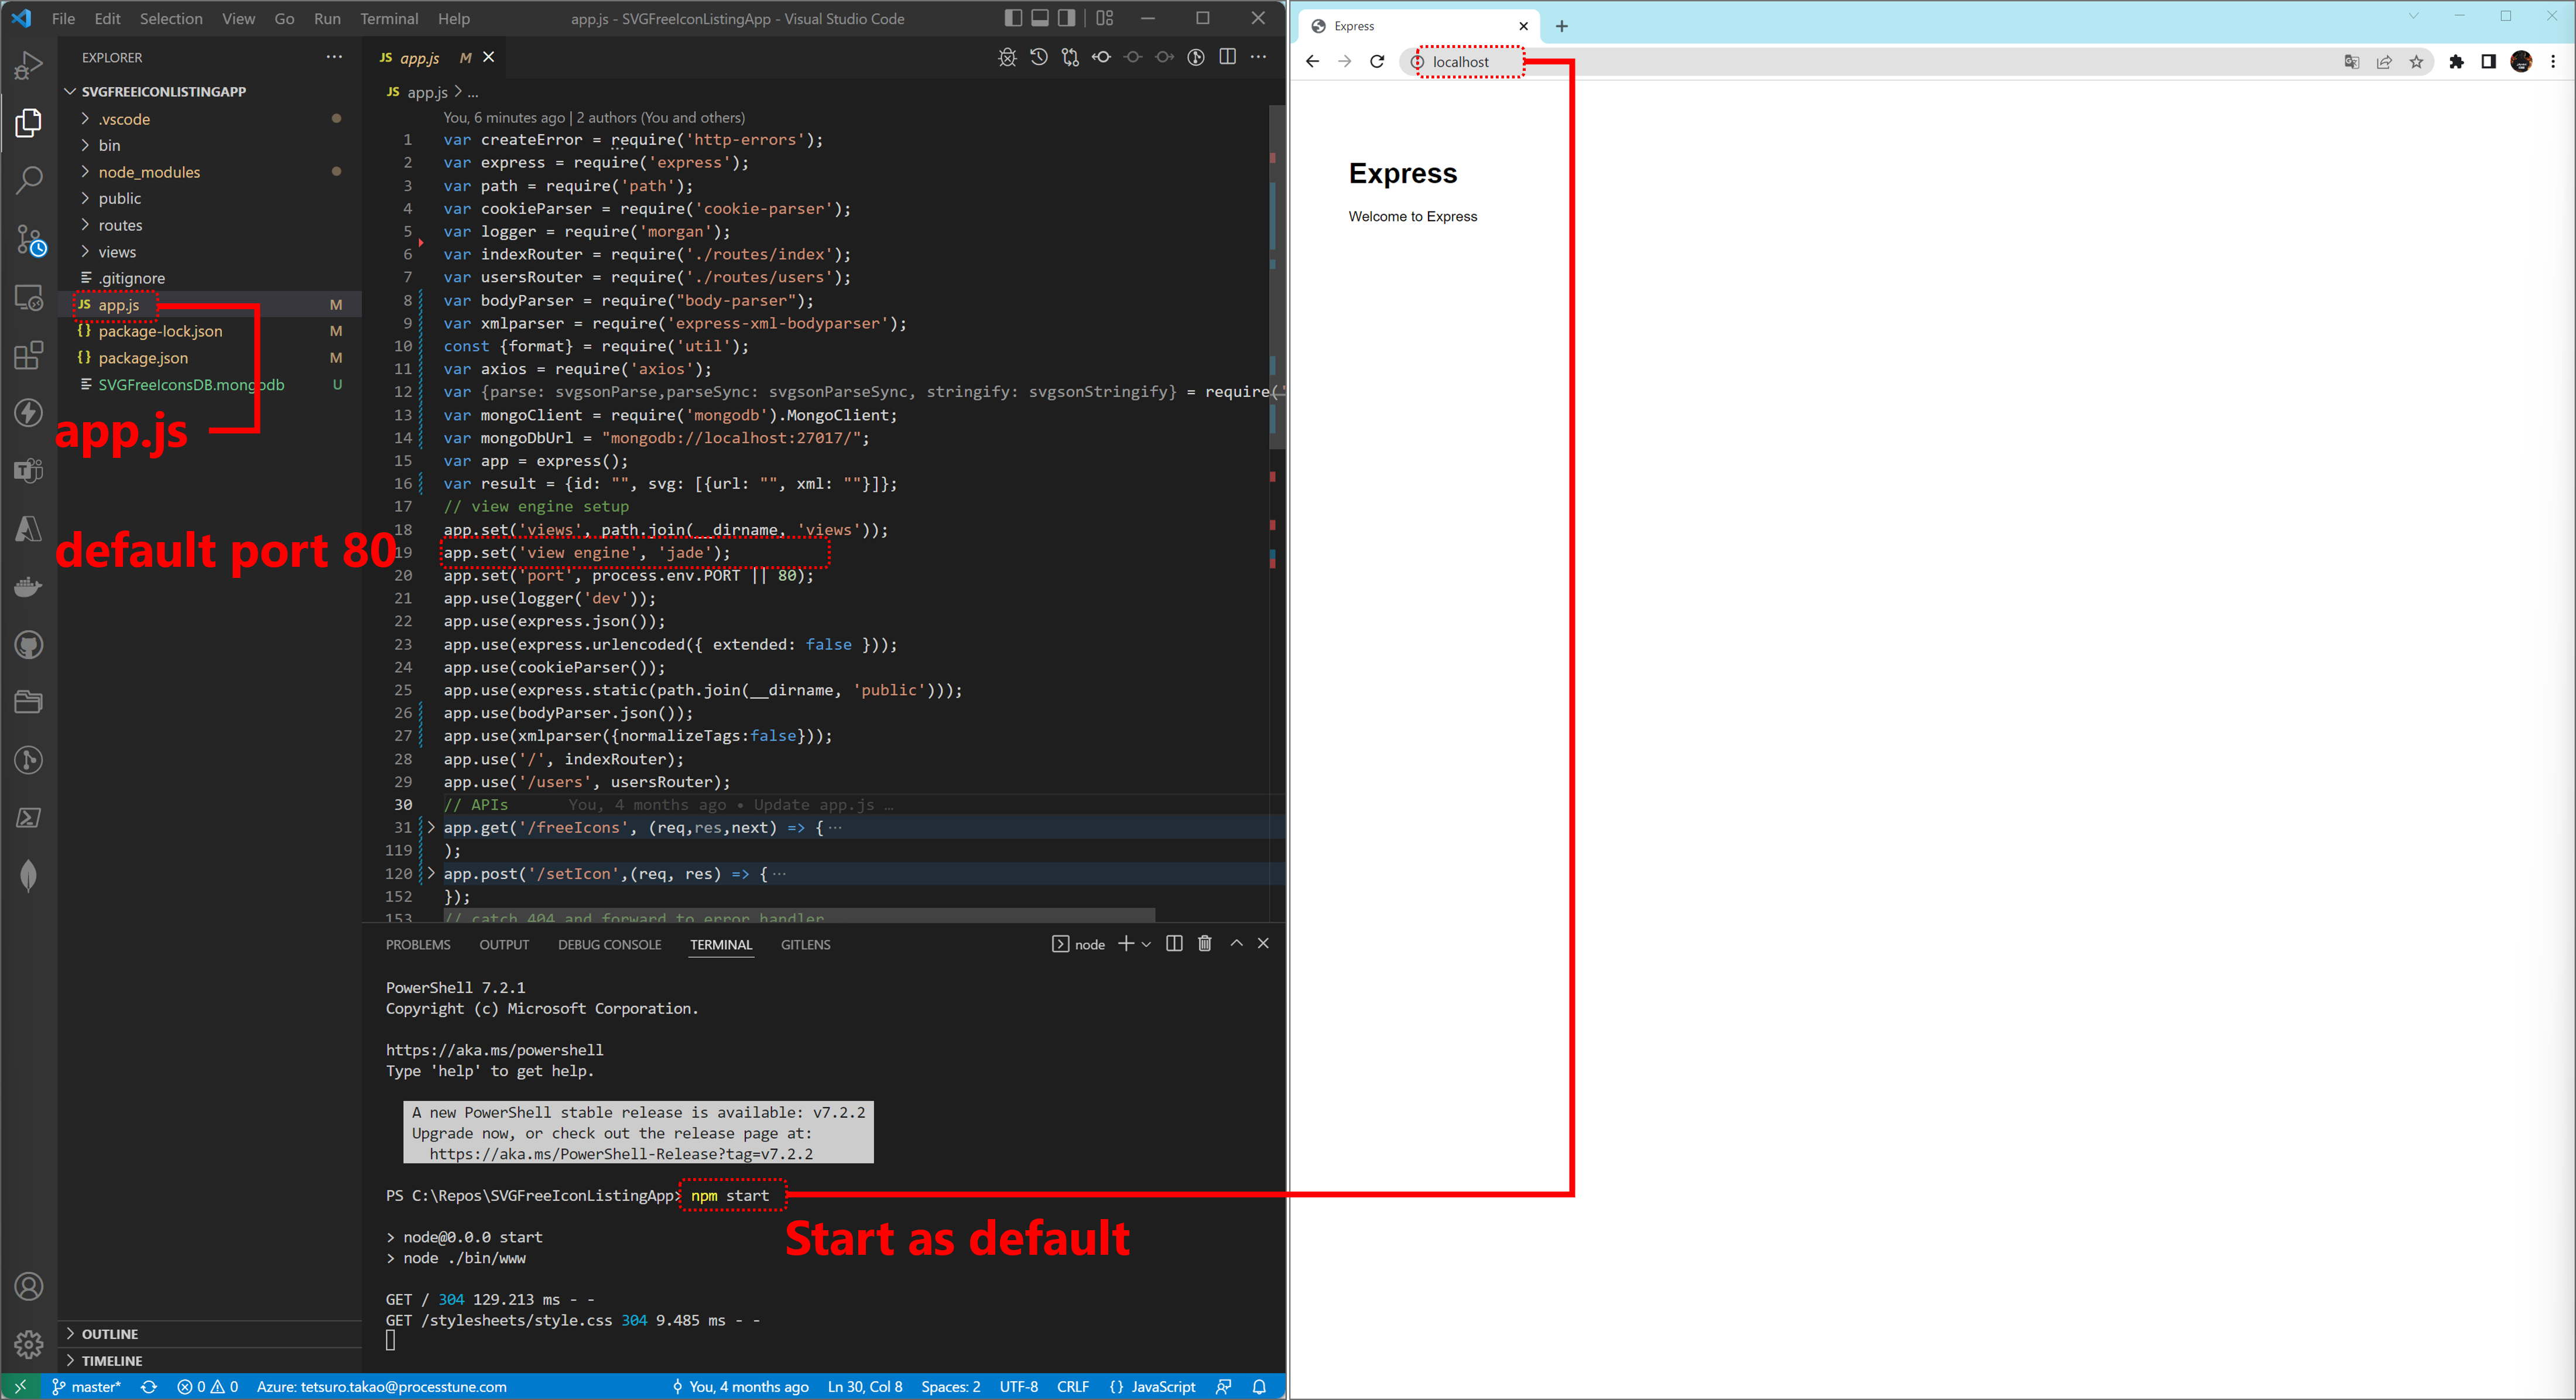
Save the [SCGFreeIconsDB.mongodb] file at project root of the sample project.


・Use persistence layer of the service
At first of modify application, confirm the Node-Express application project is runable on Windows. the Node-Express application project is defined as using the port number [80], or any port number if use the [port] argument. Type the [npm start] command on the Windows terminal, then launch the web browser and type [localhost] in the address box of the web browser.
Structure of routing is processed by order from above of the code that listened a request, so [/][/users][/freeIcons][/setIcon] are processed distinguishably then continues to the follows process if it does not prepared routing path for the request. This error creation function is provided by the Express framework, and this [404] error creation process that means [Not Found] has to set at first.
So other calls of errors creation function has to set at a routing path for the request respectively. For transfer the processing to the function of error message creation at the bottom of the code, define return code for exit it at an error handling block of the routing path.
Detail of the error creation function provided by the Express framework is able to refer the npm documentation that is a base of the feature.
So most important task is API caller send information of id and svg xml, then acquire a result as success or falt of saving svg to the data storage. It is better that the response has id information as an evidence for sent id, also it is better that the response has svg information as an evidence for sent svg.
On the other hand, the request have to include id information, if does not include sent svg, it is OK save empty to the storage as specific svg for the id. If includes original url of svg, it is better that is able to save it to the storage. As result, exchange models are follows.
If an error occured which a URL of the request is not define routing or an error occurs at individual routing path, the processing is transfered to the function of an error response creation at the bottom of the code. In the case of an error does not created by Express framework before this function is processing, create a response of an error contents with HTTP status [500] in this function.

For implementing of the routing path [/setIcon], design an exchange model with an API caller.
There is simple model that in MongoDB, it has the [Releted_Identity], the [Original_URL] and the [SVG_XML] properties. API caller does not have interesting to the [Original_URL] property, this aspect is important for designing models. Addition, more one point is important for designing models, it is the [Releted_Identity] is not API caller side context but service side context. API caller side context is [Identity] or [ID], so API interface name has to be same as API caller side. This exchange is called [Object-Relational mapping for impedance mismatch]. A lot of a describes on web contents of [Object-Relational mapping for impedance mismatch] says propaties of models excess or deficiency although, follows are also important for designing models,
*an interest at inside of the [Boundary Context] for attributes respectively of the [Subdomain].
*an attribute meanings in the [Boundary Context].
(above are names as Domain Driven Design, so assume other names of design pattern familiar).
So most important task is API caller send information of id and SVG XML, then acquire a result as success or falt of saving SVG XML to the data storage. It is better that the response has id information as an evidence for sent id, also it is better that the response has SVG information as an evidence for sent SVG XML.
On the other hand, the request have to include id information, if does not include sent svg, it is OK save empty to the storage as specific svg for the id. If includes original url of svg, it is better that is able to save it to the storage. As result, exchange models are follows.
// API caller set the [id] property and the [xml] property of POST body to acquire saved result (responseMessage).
// Optional request the [url] property of POST body for original url of free icon website as memo.
// Optional results (id: as an evidence for sent id, svg[n]: as an evidence for is sent SVG information). The SVG information is saved one so far.
var result = {id: "", svg: [{url: "", xml: ""}], responseMessage: ""};
// Object-Relational mapping to save SVG XML to the persistence layer.
var updata = {Releted_Identity:req.body.id,Original_URL:req.body.svg[0].url,SVG_XML:req.body.svg[0].xml};
Use the body-parser middleware to acquire the HTTP POST request body and use the MongoDB NodeJS Driver to access to MongoDB. The [var app = express();] statement creates an instance of the Express framework, then the [app.use(bodyParser.json());] statement sets a middleware for parse and serialize.
The instance of the Express framework is able to listen HTTP request, aim to create POST method service against a HTTP request this time, so at first, verify HTTP POST request body to store requested SVG XML as requested identity specific.
var bodyParser = require("body-parser");
var result = {id: "", svg: [{url: "", xml: ""}], responseMessage};
var mongoClient = require('mongodb').MongoClient;
var mongoDbUrl = "mongodb://localhost:27017/";
var app = express();
// view engine setup
app.use(bodyParser.json());
// APIs
app.post('/setIcon',(req, res, next) => {
  //Verify HTTP POST request
  if(!req.body.id){
    next(createError(400,"The [id] attribute of post request body is requirement"));
    result.responseMessage += format("[BadRequest] : %s");
    return;
  }
  var updata = {Releted_Identity:req.body.id,Original_URL:"",SVG_XML:""};
  if(req.body.svg.length > 0){
    if(req.body.svg[0].xml){
      updata.SVG_XML = req.body.svg[0].xml;
    }
    if(req.body.svg[0].url){
      updata.Original_URL = req.body.svg[0].url;
    }
  }
  //Save to MongoDB ...
  res.writeHead(200,{'Content-Type' : 'text/plain'});
  res.write(format('SetIcon service result : \n %s', JSON.stringify(result)));
  res.end(format('SVG icon for %s saved', req.body.id));
});
Creating a feature of save to MongoDB, then create an error handlings. If already the identity specific SVG XML is existing, update data of MongoDB, or insert when there is not the identity specific SVG XML.
  //Save to MongoDB
  mongoClient.connect(mongoDbUrl, function(err, db) {
    var dbo = db.db("SVGFreeIconsDB");
    dbo.collection("IDRelatedIcons").find({ Releted_Identity: req.body.id }).toArray(function(err, result) {
      if(result.length > 0){
        dbo.collection("IDRelatedIcons").updateOne({_id:result._id},{$set : updata}, function(err, res) {
          result.responseMessage = "[Update MongoID]:" + res._id;
        });
      }
      else {
        dbo.collection("IDRelatedIcons").insertOne(updata, function(err, res) {
          result.responseMessage = "[Insert MongoID]:" + res._id;
        });
      }
      result.id = result[0]._id;
    });
    db.close();
  });
An error handling will be set at the top of inside the connection function, the finding function, the update function and the insert function respectivery.
if (err) {
  next(createError(err.status));
  err.message = "[Connection Error]: " + err.message;
    or
  err.message = "[Finding execution Error]: " + err.message;
    or
  err.message = "[Updating execution Error]: " + err.message;
    or
  err.message = "[Inserting execution Error]: " + err.message;
  return;
}
・Deploy to Azure Functions
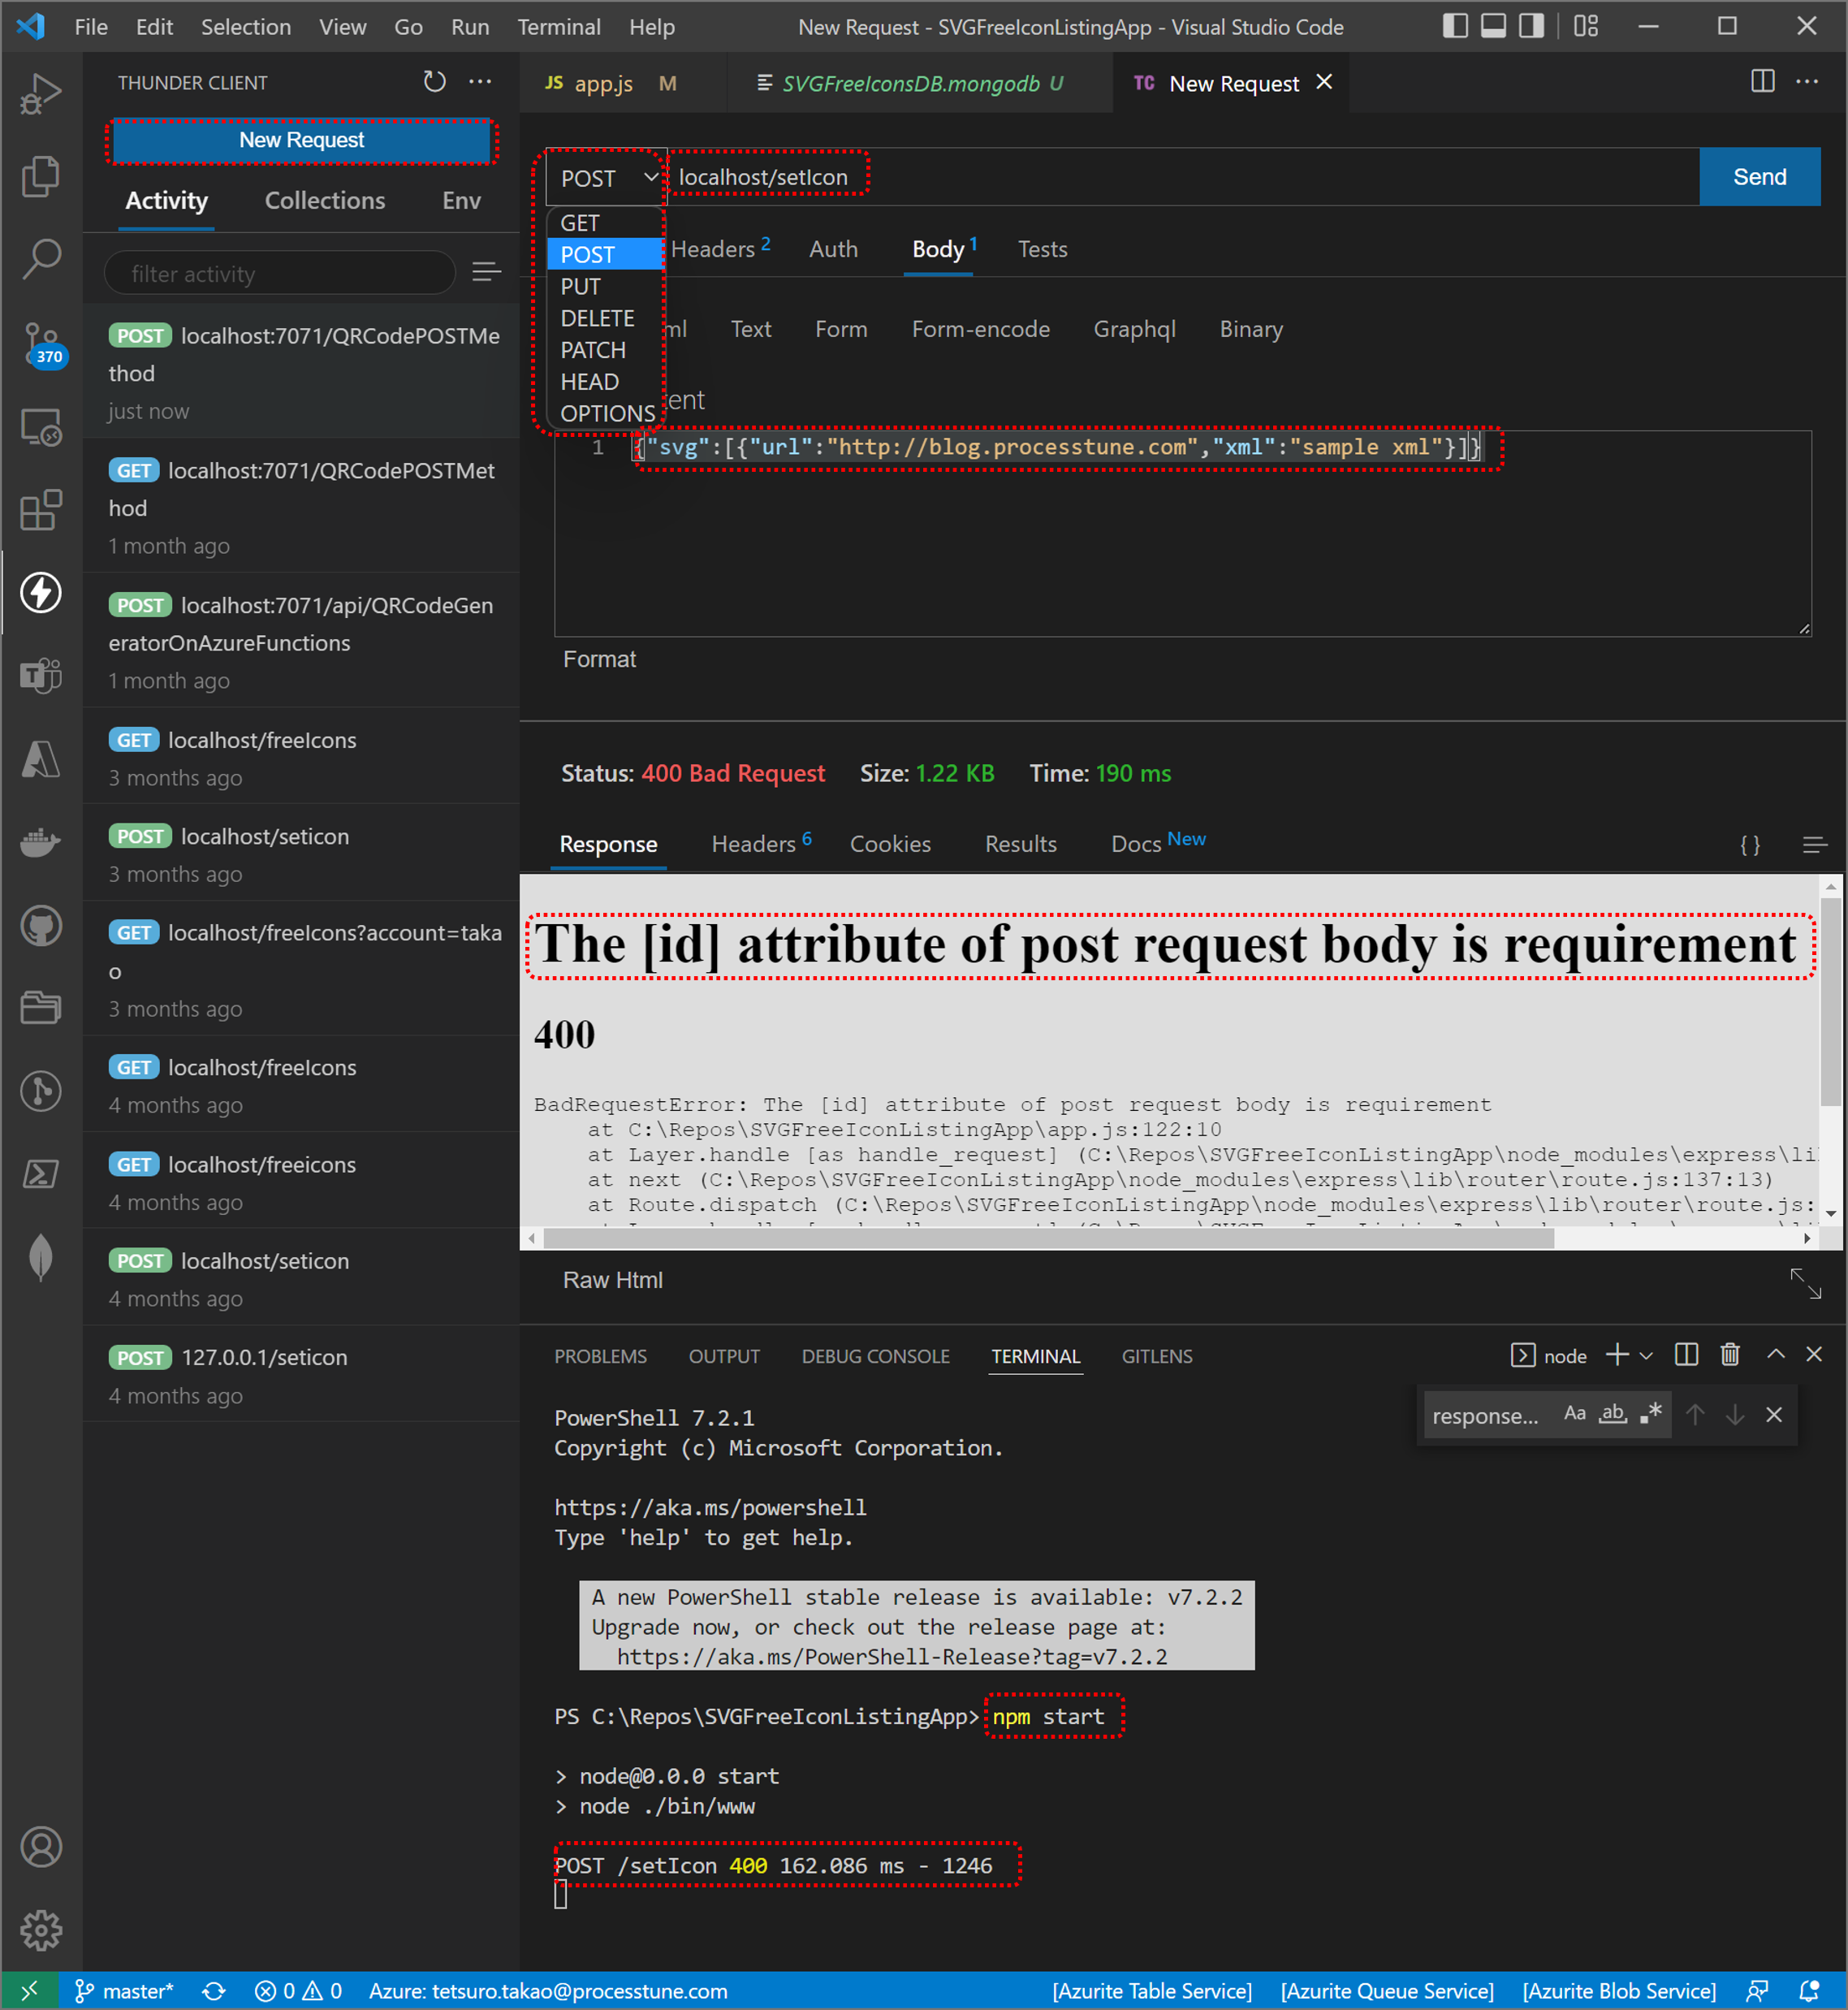
Confirm excution of the routing path [/setIcon] after create it. Run container of the MongoDB and the Node-Express app same as description above and send HTTP POST request with body to the service using Visual Studio Code [Thunder Client] extension.
For confirm error handling actually, select [POST] at the select list of HTTP request method and type [localhost/setIcon] into input box for address then type [{“svg”:[{“url”:”http://blog.processtune.com”,”xml”:”sample xml”}]}] into input box for JSON body and select the [Send] button. Confirm the error contents of [400] that create at the code.

Azure Functions provides Functions App feature that is able to host the Docker container and serverless program code of C# or Java, Python or several scripting and so on. And more, there are test feature, monitorring feature and so on. The execution control features etc. such as run/stop/refresh.
https://blogsamplefunctions.azurewebsites.net/QRCodePOSTMethod?source=microsoft.com
additional information
The ‘extensionBundle’ values of [%Project root%\host.json] file makes Azure Function project enable runable the project of other language that .NET runtime does not support.
table
No responses yet